We'll start off by taking the code we wrote yesterday and splitting it up into more manageable chunks. First of all the end of the code in our last part is used to update the mesh component of the game object. This will be separated into its own function so that we can run it once the entire mesh is planned.
 void UpdateMesh () {
  mesh.Clear ();
  mesh.vertices = newVertices.ToArray();
  mesh.triangles = newTriangles.ToArray();
  mesh.uv = newUV.ToArray();
  mesh.Optimize ();
  mesh.RecalculateNormals ();
 }
Now in addition, put all the new* lines in their own function with parameters for the position and texture. We'll be making some changes to the code then using it to call for every square we want to generate with unique positions textures assigned to them.
void GenSquare(int x, int y, Vector2 texture){
   newVertices.Add( new Vector3 (x  , y  , z ));
   newVertices.Add( new Vector3 (x + 1 , y  , z ));
   newVertices.Add( new Vector3 (x + 1 , y-1 , z ));
   newVertices.Add( new Vector3 (x  , y-1 , z ));

   newTriangles.Add(0);
   newTriangles.Add(1);
   newTriangles.Add(3);
   newTriangles.Add(1);
   newTriangles.Add(2);
   newTriangles.Add(3);

   newUV.Add(new Vector2 (tUnit * tStone.x, tUnit * tStone.y + tUnit));
   newUV.Add(new Vector2 (tUnit * tStone.x + tUnit, tUnit * tStone.y + tUnit));
   newUV.Add(new Vector2 (tUnit * tStone.x + tUnit, tUnit * tStone.y));
   newUV.Add(new Vector2 (tUnit * tStone.x, tUnit * tStone.y));
}
To make this code work on a larger scale we'll have to make some changes. Because we are using lists opposed to arrays there's a lot less work because we're using the .Add() command to add a lot of the info which appends to the end of the list but the triangles list refers to specific indexes in the vertices array which means that while the first 6 entries might be 0,1,3,1,2,3 after we get to the 150th square it might have to be something like 1000,1001,1003,1001,1002,1003. To address this we'll add a new variable to the script, "squareCount". This will be an int that keeps track of which square we're on so how much we have to add to the ints we send to the triangles.
  public class PolygonGenerator : MonoBehaviour {

   public List<vector3> newVertices = new List<vector3>();
     public List<int> newTriangles = new List<int>();
    public List<vector2> newUV = new List<vector2>();

   private Mesh mesh;

   private float tUnit = 0.25f;
   private Vector2 tStone = new Vector2 (1, 0);
   private Vector2 tGrass = new Vector2 (0, 1);

   private int squareCount;
Then we change the new GenSquare function to use this variable. What we do is add (squareCount*4) to each number we .Add() to newTriangles. This needs to be done because the numbers we add to newTriangles are referring to the newVerticies we added 2 lines up. Earlier we didn't need this because with only one set of 4 vertices we knew exactly which vertices to point to in newTriangles but now that we're planning on adding several squares we need each time we call this function for for the numbers added to newTriangles to be incremented by new number for newVertices added each time. To make squareCount accurately show how many squares in we are we also need to add a squareCount++; to the bottom of the function.
Also replace all the references to tStone with texture. Now when we call the function we'll call it with the desired texture as a parameter that will be used for that square.
void GenSquare(int x, int y, Vector2 texture){

 newVertices.Add( new Vector3 (x  , y  , 0 ));
 newVertices.Add( new Vector3 (x + 1 , y  , 0 ));
 newVertices.Add( new Vector3 (x + 1 , y-1 , 0 ));
 newVertices.Add( new Vector3 (x  , y-1 , 0 ));

 newTriangles.Add(squareCount*4);
 newTriangles.Add((squareCount*4)+1);
 newTriangles.Add((squareCount*4)+3);
 newTriangles.Add((squareCount*4)+1);
 newTriangles.Add((squareCount*4)+2);
 newTriangles.Add((squareCount*4)+3);

 newUV.Add(new Vector2 (tUnit * texture.x, tUnit * texture.y + tUnit));
 newUV.Add(new Vector2 (tUnit*texture.x+tUnit, tUnit*texture.y+tUnit));
 newUV.Add(new Vector2 (tUnit * texture.x + tUnit, tUnit * texture.y));
 newUV.Add(new Vector2 (tUnit * texture.x, tUnit * texture.y));

 squareCount++;

}
Also go ahead and reset the squareCount at the end of the UpdateMesh function we made earlier with squareCount=0; so that the next time we generate the mesh the count starts at 0 and add in clear commands for all our lists so that we can start again without adding on top of existing data.
void UpdateMesh () {
 mesh.Clear ();
 mesh.vertices = newVertices.ToArray();
 mesh.triangles = newTriangles.ToArray();
 mesh.uv = newUV.ToArray();
 mesh.Optimize ();
 mesh.RecalculateNormals ();

 squareCount=0;
 newVertices.Clear();
 newTriangles.Clear();
 newUV.Clear();

}
Now let's start making more squares. We're going to make a 2d array to store block information so add a 2d byte array called blocks to the script.
public byte[,] blocks;
A byte array is an easy choice for level information. It supports numbers 0-255 so that's a lot of blocks and it saves us the hassle of using enumerators. What we'll do is have 0 be air, 1 is rock and 2 is grassand that should be enough for now.
We'll need a way to build this array into something other than blank space so create a function called GenTerrain. In the next part we'll do some basic perlin noise operations for generating terrain but for now we'll do half air half rock.
void GenTerrain(){
 blocks=new byte[10,10];

 for(int px=0;px<blocks.GetLength(0);px++){
  for(int py=0;py<blocks.GetLength(1);py++){
   if(py==5){
    blocks[px,py]=2;
   } else if(py<5){
    blocks[px,py]=1;
   }
  }
 }
}
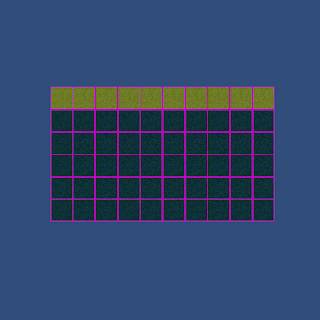
This makes blocks a 10x10 array then goes through each block making any block with a y less that 5 into rock and the row at 5 into grass. Now we need to make a function that will read our block array and build blocks based on it. We'll make another function called BuildMesh to do this.
void BuildMesh(){
 for(int px=0;px<blocks.GetLength(0);px++){
  for(int py=0;py<blocks.GetLength(1);py++){

   if(blocks[px,py]==1){
    GenSquare(px,py,tStone);
   } else if(blocks[px,py]==2){
    GenSquare(px,py,tGrass);
   }

  }
 }
}
Now this function really just runs through every block in the array and if the byte is 1 it creates runs the GenSquare function using the array index as the position and stone as the texture and if the byte is 2 it does the same with a grass texture.
Now for us to test this we just need to add the following to the start function to run all of these functions at game start:
GenTerrain();
BuildMesh();
UpdateMesh();
Now in unity you should be able to run and you'll see this:
 |
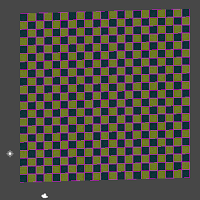
| Might need to add some proper textures soon. |
 |
| For example. |
We'll start just making the colliders and think about how to implement them later. For testing you'll want to make your block array into a 1x1 array. Also make new variables colVertices and colTriangles, a new int colCount and a MeshCollider.
public List<Vector3> colVertices = new List<Vector3>();
public List<int> colTriangles = new List<int>();
private int colCount;

private MeshCollider col;
To use the MeshCollider you'll have to define it in Start() with:
col = GetComponent<MeshCollider> ();
And the UpdateMesh() function will need a few additions, firstly we make a temporary mesh to apply the collision mesh data to and then we apply it to the collision mesh. Then like with the other lists we need to clear the collision lists and reset the counter.
Mesh newMesh = new Mesh();
newMesh.vertices = colVertices.ToArray();
newMesh.triangles = colTriangles.ToArray();
col.sharedMesh= newMesh;

colVertices.Clear();
colTriangles.Clear();
colCount=0;
On to actually making the mesh, we're going to let collider generation happen in it's own function that we'll call for each block when we update the mesh so make a function called GenCollider with the parameters (int x, int y):
void GenCollider(int x, int y){

}
We're now going to make squares just like before except that these will face up, left, right and down to make the squares we've drawn already be solid. You can probably guess what the code is going to look like. We'll be using colVertices and colTriangles instead of newVertices and newTriangles and we won't by using UVs because a collision model doesn't need a texture but otherwise these squares are made in the same way as our textures square.
We'll start with just a top collider, put this in your GenCollider function:
//Top
colVertices.Add( new Vector3 (x  , y  , 1));
colVertices.Add( new Vector3 (x + 1 , y  , 1));
colVertices.Add( new Vector3 (x + 1 , y  , 0 ));
colVertices.Add( new Vector3 (x  , y  , 0 ));

colTriangles.Add(colCount*4);
colTriangles.Add((colCount*4)+1);
colTriangles.Add((colCount*4)+3);
colTriangles.Add((colCount*4)+1);
colTriangles.Add((colCount*4)+2);
colTriangles.Add((colCount*4)+3);

colCount++;
And call the GenCollider function for every block by putting it in the BuildMesh function in the for loops along with an if to check if the block is air:
 void BuildMesh(){
  for(int px=0;px<blocks.GetLength(0);px++){
   for(int py=0;py<blocks.GetLength(1);py++){

    //If the block is not air
    if(blocks[px,py]!=0){

    // GenCollider here, this will apply it
    // to every block other than air
    GenCollider(px,py);

     if(blocks[px,py]==1){
      GenSquare(px,py,tStone);
     } else if(blocks[px,py]==2){
      GenSquare(px,py,tGrass);
     }
    }//End air block check
   }
  }
 }
 |
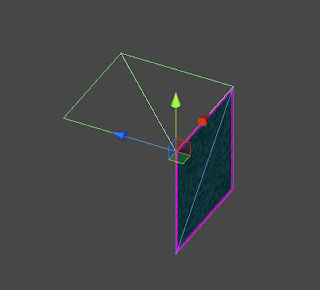
| Your scene view should show this when run now. One face with an upward facing collider behind it. |
So that code was just defining the points of the square and then creating the triangle data. The colCount is the same as the squareCount was to the last mesh code we did. Now I'll lay out the code for the other sides, there's really not much to learn in what numbers the vertices should be using; for me at least it's mostly a lot of trial and error, scribbling on paper and trying to visualize the four points' coordinates to figure out where each mesh should have its vertices. As long as you understand that each colVertices is a coordinate in 3d space that a corner of the cube uses and that the side that's facing you when you put down the triangle coordinates clockwise will be the solid one you've got it.
Before we add the other sides though let's move the triangle code to it's own small function because we're going to be using it so much, call it ColliderTriangles:
 void ColliderTriangles(){
  colTriangles.Add(colCount*4);
  colTriangles.Add((colCount*4)+1);
  colTriangles.Add((colCount*4)+3);
  colTriangles.Add((colCount*4)+1);
  colTriangles.Add((colCount*4)+2);
  colTriangles.Add((colCount*4)+3);
 }
Good, now we can call that function instead of writing it out four times. Now all the sides for the collider should look like this:
void GenCollider(int x, int y){

  //Top
  colVertices.Add( new Vector3 (x  , y  , 1));
  colVertices.Add( new Vector3 (x + 1 , y  , 1));
  colVertices.Add( new Vector3 (x + 1 , y  , 0 ));
  colVertices.Add( new Vector3 (x  , y  , 0 ));

  ColliderTriangles();

  colCount++;

  //bot
  colVertices.Add( new Vector3 (x  , y -1 , 0));
  colVertices.Add( new Vector3 (x + 1 , y -1 , 0));
  colVertices.Add( new Vector3 (x + 1 , y -1 , 1 ));
  colVertices.Add( new Vector3 (x  , y -1 , 1 ));

  ColliderTriangles();
  colCount++;

  //left
  colVertices.Add( new Vector3 (x  , y -1 , 1));
  colVertices.Add( new Vector3 (x  , y  , 1));
  colVertices.Add( new Vector3 (x  , y  , 0 ));
  colVertices.Add( new Vector3 (x  , y -1 , 0 ));

  ColliderTriangles();

  colCount++;

  //right
  colVertices.Add( new Vector3 (x +1 , y  , 1));
  colVertices.Add( new Vector3 (x +1 , y -1 , 1));
  colVertices.Add( new Vector3 (x +1 , y -1 , 0 ));
  colVertices.Add( new Vector3 (x +1 , y  , 0 ));

  ColliderTriangles();

  colCount++;

 }
 |
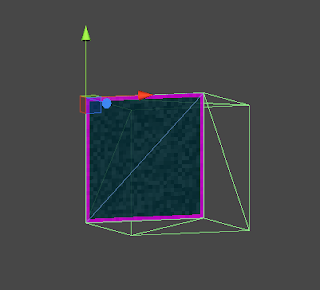
| You should see this; all four colliders. |
 byte Block (int x, int y){

  if(x==-1 || x==blocks.GetLength(0) ||   y==-1 || y==blocks.GetLength(1)){
   return (byte)1;
  }

  return blocks[x,y];
 }
This is a simple function that checks if the block you're checking is within the array's boundaries, if not it returns 1 (Solid rock) otherwise it returns the block's value. This means that we can use this places where we're not sure that the block we're checking is within the level size. We'll use this in the collider function.This is done by surrounding every collider side generation with an if that checks in the direction of the collider. ie. the left collider is only generated if the block to this block's left is air. Do it like this:
 void GenCollider(int x, int y){

  //Top
  if(Block(x,y+1)==0){
  colVertices.Add( new Vector3 (x  , y  , 1));
  colVertices.Add( new Vector3 (x + 1 , y  , 1));
  colVertices.Add( new Vector3 (x + 1 , y  , 0 ));
  colVertices.Add( new Vector3 (x  , y  , 0 ));

  ColliderTriangles();

  colCount++;
  }

  //bot
  if(Block(x,y-1)==0){
  colVertices.Add( new Vector3 (x  , y -1 , 0));
  colVertices.Add( new Vector3 (x + 1 , y -1 , 0));
  colVertices.Add( new Vector3 (x + 1 , y -1 , 1 ));
  colVertices.Add( new Vector3 (x  , y -1 , 1 ));

  ColliderTriangles();
  colCount++;
  }

  //left
  if(Block(x-1,y)==0){
  colVertices.Add( new Vector3 (x  , y -1 , 1));
  colVertices.Add( new Vector3 (x  , y  , 1));
  colVertices.Add( new Vector3 (x  , y  , 0 ));
  colVertices.Add( new Vector3 (x  , y -1 , 0 ));

  ColliderTriangles();

  colCount++;
  }

  //right
  if(Block(x+1,y)==0){
  colVertices.Add( new Vector3 (x +1 , y  , 1));
  colVertices.Add( new Vector3 (x +1 , y -1 , 1));
  colVertices.Add( new Vector3 (x +1 , y -1 , 0 ));
  colVertices.Add( new Vector3 (x +1 , y  , 0 ));

  ColliderTriangles();

  colCount++;
  }

 }
Now when you run it you should get a much more efficient collision mesh, go ahead and switch the array size back to 10 by 10.
 |
| Colliders only along the top where the blocks are exposed to air. |
 |
| Hmm... these are almost starting to look like cubes |
That concludes part two, as always if there are any problems please leave a comment as soon as possible and I'll fix it. I'm open for any feedback. Feel free to follow me on twitter (@STV_Alex) or G+ to get updated when I post part three.
Here is a complete version of the code as of the end of part 2: Part 2 finished code
Next time we'll be using perlin noise to make more interesting terrain, caves and ores and adding functions to build/destroy blocks based on mouse clicks or collisions with the blocks (Like when a character hits a block with a hammer for example).
Edit: Thanks again to Taryndactyl on the unity forums and thanks to Wolli in the comments for pointing out some errors! Taryndactyl's post: Link
Part 3
Anda baru saja membaca artikel Situs GAME NETBOOK GRATIS .exe .zip .rar yang berkategori Tutorial /
Unity /
Voxel Tut /
Voxels
dengan judul Unity Voxel Tutorial Part 2: Level Array and Collision Meshes. Anda bisa bookmark halaman ini dengan URL https://netbook-game.blogspot.com/2013/08/unity-voxel-tutorial-part-2-level-array.html. Terima kasih!
Posted by: templates-office.com
Unity Voxel Tutorial Part 2: Level Array and Collision Meshes Updated at :
05.49


Belum ada komentar untuk "Unity Voxel Tutorial Part 2: Level Array and Collision Meshes"
Posting Komentar