Minggu, 25 Agustus 2013

Unity Voxel Tutorial Part 2: Level Array and Collision Meshes


Now that we've managed to display one square a lot of the work is done, we just have to find a good way to use that code a few thousand times based on some kind of level information. We'll also be adding in collision meshes for blocks exposed to air.

We'll start off by taking the code we wrote yesterday and splitting it up into more manageable chunks. First of all the end of the code in our last part is used to update the mesh component of the game object. This will be separated into its own function so that we can run it once the entire mesh is planned.

 void UpdateMesh () {
mesh.Clear ();
mesh.vertices = newVertices.ToArray();
mesh.triangles = newTriangles.ToArray();
mesh.uv = newUV.ToArray();
mesh.Optimize ();
mesh.RecalculateNormals ();
}

Now in addition, put all the new* lines in their own function with parameters for the position and texture. We'll be making some changes to the code then using it to call for every square we want to generate with unique positions textures assigned to them.

void GenSquare(int x, int y, Vector2 texture){
newVertices.Add( new Vector3 (x , y , z ));
newVertices.Add( new Vector3 (x + 1 , y , z ));
newVertices.Add( new Vector3 (x + 1 , y-1 , z ));
newVertices.Add( new Vector3 (x , y-1 , z ));

newTriangles.Add(0);
newTriangles.Add(1);
newTriangles.Add(3);
newTriangles.Add(1);
newTriangles.Add(2);
newTriangles.Add(3);

newUV.Add(new Vector2 (tUnit * tStone.x, tUnit * tStone.y + tUnit));
newUV.Add(new Vector2 (tUnit * tStone.x + tUnit, tUnit * tStone.y + tUnit));
newUV.Add(new Vector2 (tUnit * tStone.x + tUnit, tUnit * tStone.y));
newUV.Add(new Vector2 (tUnit * tStone.x, tUnit * tStone.y));
}

To make this code work on a larger scale we'll have to make some changes. Because we are using lists opposed to arrays there's a lot less work because we're using the .Add() command to add a lot of the info which appends to the end of the list but the triangles list refers to specific indexes in the vertices array which means that while the first 6 entries might be 0,1,3,1,2,3 after we get to the 150th square it might have to be something like 1000,1001,1003,1001,1002,1003. To address this we'll add a new variable to the script, "squareCount". This will be an int that keeps track of which square we're on so how much we have to add to the ints we send to the triangles.

  public class PolygonGenerator : MonoBehaviour {

public List<vector3> newVertices = new List<vector3>();
public List<int> newTriangles = new List<int>();
public List<vector2> newUV = new List<vector2>();

private Mesh mesh;

private float tUnit = 0.25f;
private Vector2 tStone = new Vector2 (1, 0);
private Vector2 tGrass = new Vector2 (0, 1);

private int squareCount;


Then we change the new GenSquare function to use this variable. What we do is add (squareCount*4) to each number we .Add() to newTriangles. This needs to be done because the numbers we add to newTriangles are referring to the newVerticies we added 2 lines up. Earlier we didn't need this because with only one set of 4 vertices we knew exactly which vertices to point to in newTriangles but now that we're planning on adding several squares we need each time we call this function for for the numbers added to newTriangles to be incremented by new number for newVertices added each time. To make squareCount accurately show how many squares in we are we also need to add a squareCount++; to the bottom of the function.

Also replace all the references to tStone with texture. Now when we call the function we'll call it with the desired texture as a parameter that will be used for that square.
 
void GenSquare(int x, int y, Vector2 texture){

newVertices.Add( new Vector3 (x , y , 0 ));
newVertices.Add( new Vector3 (x + 1 , y , 0 ));
newVertices.Add( new Vector3 (x + 1 , y-1 , 0 ));
newVertices.Add( new Vector3 (x , y-1 , 0 ));

newTriangles.Add(squareCount*4);
newTriangles.Add((squareCount*4)+1);
newTriangles.Add((squareCount*4)+3);
newTriangles.Add((squareCount*4)+1);
newTriangles.Add((squareCount*4)+2);
newTriangles.Add((squareCount*4)+3);

newUV.Add(new Vector2 (tUnit * texture.x, tUnit * texture.y + tUnit));
newUV.Add(new Vector2 (tUnit*texture.x+tUnit, tUnit*texture.y+tUnit));
newUV.Add(new Vector2 (tUnit * texture.x + tUnit, tUnit * texture.y));
newUV.Add(new Vector2 (tUnit * texture.x, tUnit * texture.y));

squareCount++;

}

Also go ahead and reset the squareCount at the end of the UpdateMesh function we made earlier with squareCount=0; so that the next time we generate the mesh the count starts at 0 and add in clear commands for all our lists so that we can start again without adding on top of existing data.

 
void UpdateMesh () {
mesh.Clear ();
mesh.vertices = newVertices.ToArray();
mesh.triangles = newTriangles.ToArray();
mesh.uv = newUV.ToArray();
mesh.Optimize ();
mesh.RecalculateNormals ();

squareCount=0;
newVertices.Clear();
newTriangles.Clear();
newUV.Clear();

}

Now let's start making more squares. We're going to make a 2d array to store block information so add a 2d byte array called blocks to the script.
 
public byte[,] blocks;

A byte array is an easy choice for level information. It supports numbers 0-255 so that's a lot of blocks and it saves us the hassle of using enumerators. What we'll do is have 0 be air, 1 is rock and 2 is grassand that should be enough for now.

We'll need a way to build this array into something other than blank space so create a function called GenTerrain. In the next part we'll do some basic perlin noise operations for generating terrain but for now we'll do half air half rock.
 
void GenTerrain(){
blocks=new byte[10,10];

for(int px=0;px<blocks.GetLength(0);px++){
for(int py=0;py<blocks.GetLength(1);py++){
if(py==5){
blocks[px,py]=2;
} else if(py<5){
blocks[px,py]=1;
}
}
}
}

This makes blocks a 10x10 array then goes through each block making any block with a y less that 5 into rock and the row at 5 into grass. Now we need to make a function that will read our block array and build blocks based on it. We'll make another function called BuildMesh to do this.

 
void BuildMesh(){
for(int px=0;px<blocks.GetLength(0);px++){
for(int py=0;py<blocks.GetLength(1);py++){

if(blocks[px,py]==1){
GenSquare(px,py,tStone);
} else if(blocks[px,py]==2){
GenSquare(px,py,tGrass);
}

}
}
}

Now this function really just runs through every block in the array and if the byte is 1 it creates runs the GenSquare function using the array index as the position and stone as the texture and if the byte is 2 it does the same with a grass texture.

Now for us to test this we just need to add the following to the start function to run all of these functions at game start:
 
GenTerrain();
BuildMesh();
UpdateMesh();

Now in unity you should be able to run and you'll see this:
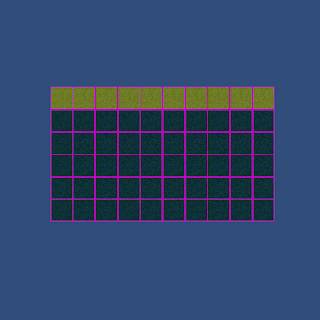
Might need to add some proper textures soon.
You can also make the array bigger or smaller or mess with the GenTerrain function to get some cool effects.

For example.
Now I also promised collision meshes in this part. Collision meshes are really exactly the same as the meshes we made so far just without the textures. They also can't face the camera like the block textures do, they'll have to face up, left, right and down. We can't just go and add collision meshes to every block in the scene though because most of these are surrounded by other blocks, if there's no way to get to a block there's no need to spend time making it solid.

We'll start just making the colliders and think about how to implement them later. For testing you'll want to make your block array into a 1x1 array. Also make new variables colVertices and colTriangles, a new int colCount and a MeshCollider.
 

public List<Vector3> colVertices = new List<Vector3>();
public List<int> colTriangles = new List<int>();
private int colCount;

private MeshCollider col;

To use the MeshCollider you'll have to define it in Start() with:
 
col = GetComponent<MeshCollider> ();

And the UpdateMesh() function will need a few additions, firstly we make a temporary mesh to apply the collision mesh data to and then we apply it to the collision mesh. Then like with the other lists we need to clear the collision lists and reset the counter.
 

Mesh newMesh = new Mesh();
newMesh.vertices = colVertices.ToArray();
newMesh.triangles = colTriangles.ToArray();
col.sharedMesh= newMesh;

colVertices.Clear();
colTriangles.Clear();
colCount=0;

On to actually making the mesh, we're going to let collider generation happen in it's own function that we'll call for each block when we update the mesh so make a function called GenCollider with the parameters (int x, int y):

void GenCollider(int x, int y){

}

We're now going to make squares just like before except that these will face up, left, right and down to make the squares we've drawn already be solid. You can probably guess what the code is going to look like. We'll be using colVertices and colTriangles instead of newVertices and newTriangles and we won't by using UVs because a collision model doesn't need a texture but otherwise these squares are made in the same way as our textures square.

We'll start with just a top collider, put this in your GenCollider function:
//Top
colVertices.Add( new Vector3 (x , y , 1));
colVertices.Add( new Vector3 (x + 1 , y , 1));
colVertices.Add( new Vector3 (x + 1 , y , 0 ));
colVertices.Add( new Vector3 (x , y , 0 ));

colTriangles.Add(colCount*4);
colTriangles.Add((colCount*4)+1);
colTriangles.Add((colCount*4)+3);
colTriangles.Add((colCount*4)+1);
colTriangles.Add((colCount*4)+2);
colTriangles.Add((colCount*4)+3);

colCount++;


And call the GenCollider function for every block by putting it in the BuildMesh function in the for loops along with an if to check if the block is air:
 void BuildMesh(){
for(int px=0;px<blocks.GetLength(0);px++){
for(int py=0;py<blocks.GetLength(1);py++){

//If the block is not air
if(blocks[px,py]!=0){

// GenCollider here, this will apply it
// to every block other than air
GenCollider(px,py);

if(blocks[px,py]==1){
GenSquare(px,py,tStone);
} else if(blocks[px,py]==2){
GenSquare(px,py,tGrass);
}
}//End air block check
}
}
}
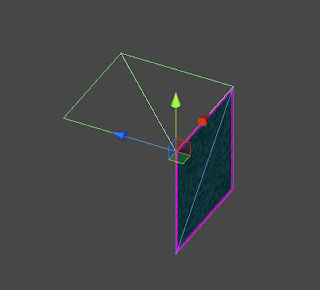
Your scene view should show this when run now. One face with an upward facing collider behind it.
Edit: Taryndactyl pointed out that displaying mesh colliders may be turned off by default in the editor, if you don't see a collider like above check Mesh Colliders in the gizmos menu:


So that code was just defining the points of the square and then creating the triangle data. The colCount is the same as the squareCount was to the last mesh code we did. Now I'll lay out the code for the other sides, there's really not much to learn in what numbers the vertices should be using; for me at least it's mostly a lot of trial and error, scribbling on paper and trying to visualize the four points' coordinates to figure out where each mesh should have its vertices. As long as you understand that each colVertices is a coordinate in 3d space that a corner of the cube uses and that the side that's facing you when you put down the triangle coordinates clockwise will be the solid one you've got it.

Before we add the other sides though let's move the triangle code to it's own small function because we're going to be using it so much, call it ColliderTriangles:
 void ColliderTriangles(){
colTriangles.Add(colCount*4);
colTriangles.Add((colCount*4)+1);
colTriangles.Add((colCount*4)+3);
colTriangles.Add((colCount*4)+1);
colTriangles.Add((colCount*4)+2);
colTriangles.Add((colCount*4)+3);
}

Good, now we can call that function instead of writing it out four times. Now all the sides for the collider should look like this:
void GenCollider(int x, int y){

//Top
colVertices.Add( new Vector3 (x , y , 1));
colVertices.Add( new Vector3 (x + 1 , y , 1));
colVertices.Add( new Vector3 (x + 1 , y , 0 ));
colVertices.Add( new Vector3 (x , y , 0 ));

ColliderTriangles();

colCount++;

//bot
colVertices.Add( new Vector3 (x , y -1 , 0));
colVertices.Add( new Vector3 (x + 1 , y -1 , 0));
colVertices.Add( new Vector3 (x + 1 , y -1 , 1 ));
colVertices.Add( new Vector3 (x , y -1 , 1 ));

ColliderTriangles();
colCount++;

//left
colVertices.Add( new Vector3 (x , y -1 , 1));
colVertices.Add( new Vector3 (x , y , 1));
colVertices.Add( new Vector3 (x , y , 0 ));
colVertices.Add( new Vector3 (x , y -1 , 0 ));

ColliderTriangles();

colCount++;

//right
colVertices.Add( new Vector3 (x +1 , y , 1));
colVertices.Add( new Vector3 (x +1 , y -1 , 1));
colVertices.Add( new Vector3 (x +1 , y -1 , 0 ));
colVertices.Add( new Vector3 (x +1 , y , 0 ));

ColliderTriangles();

colCount++;

}
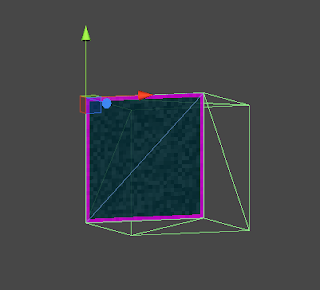
You should see this; all four colliders.
Now, we have a working square with colliders. if you were to extend the size of the array for more squares however, you would run into an efficiency problem because every solid square is creating eight triangles. That's a lot more than we need so we need a way to only make these colliders when they face an empty block. For that we'll need a function to check the contents of a block.
 byte Block (int x, int y){

if(x==-1 || x==blocks.GetLength(0) || y==-1 || y==blocks.GetLength(1)){
return (byte)1;
}

return blocks[x,y];
}
This is a simple function that checks if the block you're checking is within the array's boundaries, if not it returns 1 (Solid rock) otherwise it returns the block's value. This means that we can use this places where we're not sure that the block we're checking is within the level size. We'll use this in the collider function.

This is done by surrounding every collider side generation with an if that checks in the direction of the collider. ie. the left collider is only generated if the block to this block's left is air. Do it like this:
 void GenCollider(int x, int y){

//Top
if(Block(x,y+1)==0){
colVertices.Add( new Vector3 (x , y , 1));
colVertices.Add( new Vector3 (x + 1 , y , 1));
colVertices.Add( new Vector3 (x + 1 , y , 0 ));
colVertices.Add( new Vector3 (x , y , 0 ));

ColliderTriangles();

colCount++;
}

//bot
if(Block(x,y-1)==0){
colVertices.Add( new Vector3 (x , y -1 , 0));
colVertices.Add( new Vector3 (x + 1 , y -1 , 0));
colVertices.Add( new Vector3 (x + 1 , y -1 , 1 ));
colVertices.Add( new Vector3 (x , y -1 , 1 ));

ColliderTriangles();
colCount++;
}

//left
if(Block(x-1,y)==0){
colVertices.Add( new Vector3 (x , y -1 , 1));
colVertices.Add( new Vector3 (x , y , 1));
colVertices.Add( new Vector3 (x , y , 0 ));
colVertices.Add( new Vector3 (x , y -1 , 0 ));

ColliderTriangles();

colCount++;
}

//right
if(Block(x+1,y)==0){
colVertices.Add( new Vector3 (x +1 , y , 1));
colVertices.Add( new Vector3 (x +1 , y -1 , 1));
colVertices.Add( new Vector3 (x +1 , y -1 , 0 ));
colVertices.Add( new Vector3 (x +1 , y , 0 ));

ColliderTriangles();

colCount++;
}

}

Now when you run it you should get a much more efficient collision mesh, go ahead and switch the array size back to 10 by 10.

Colliders only along the top where the blocks are exposed to air.
With changes to the GenTerrain function you can see the side colliders in action too:

Hmm... these are almost starting to look like cubes
If you want you can do the same to the block visuals as with the colliders and not render (Or render a different texture for) blocks that aren't exposed to air in order to hide ores and things. I'll let you figure that out.

That concludes part two, as always if there are any problems please leave a comment as soon as possible and I'll fix it. I'm open for any feedback. Feel free to follow me on twitter (@STV_Alex) or G+ to get updated when I post part three.

Here is a complete version of the code as of the end of part 2: Part 2 finished code

Next time we'll be using perlin noise to make more interesting terrain, caves and ores and adding functions to build/destroy blocks based on mouse clicks or collisions with the blocks (Like when a character hits a block with a hammer for example).

Edit: Thanks again to Taryndactyl on the unity forums and thanks to Wolli in the comments for pointing out some errors! Taryndactyl's post: Link

Part 3
templates-office.com Tutorial, Unity, Voxel Tut, Voxels
Minggu, 18 Agustus 2013

Unity Voxel Tutorial Part 1: Generating meshes from code

I've been meaning to write this tutorial for a long time. It's going to be a long series so bear with me.


We won't be starting with voxels, instead we'll keep to something a little more basic to understand the systems of generating meshes for render and collision. We will be building a tilebased sidescroller where the tiles can be generated proceduraly and edited in-game. Later on we'll be expanding to 3d. In this part we'll write a script that creates a textured square in 3d space.
Let's start with and empty Unity project. I like to set up a folder structure to get started but that's up to you. Make a new scene "RenderTest" and a new C# script in the level folder (Or anywhere)  and call it "PolygonGenerator".

What we're going to do here is go through the basics of building meshes from scratch using the Mesh Class. So, in our new scene add a Game Object with a Mesh Filter, a Mesh Renderer and a Mesh Collider. Also add our new script PolygonGenerator. Make sure that the Game Object is at (0, 0, 10) so that it can be seen by the default camera.


Because we're using lists we need to add some code below the "using System.Collections", add
using System.Collections.Generic; 
below it.

Now let's move on to the script and start making in do things. We'll start with the following variables:

 // This first list contains every vertex of the mesh that we are going to render
public List<Vector3> newVertices = new List<Vector3>();

// The triangles tell Unity how to build each section of the mesh joining
// the vertices
public List<int> newTriangles = new List<int>();

// The UV list is unimportant right now but it tells Unity how the texture is
// aligned on each polygon
public List<Vector2> newUV = new List<Vector2>();


// A mesh is made up of the vertices, triangles and UVs we are going to define,
// after we make them up we'll save them as this mesh
private Mesh mesh;


With those defined we'll assign the mesh some simple values to display something. In the Start function we'll use the following code:

// Use this for initialization
void Start () {

mesh = GetComponent<MeshFilter> ().mesh;

float x = transform.position.x;
float y = transform.position.y;
float z = transform.position.z;


newVertices.Add( new Vector3 (x , y , z ));
newVertices.Add( new Vector3 (x + 1 , y , z ));
newVertices.Add( new Vector3 (x + 1 , y-1 , z ));
newVertices.Add( new Vector3 (x , y-1 , z ));

newTriangles.Add(0);
newTriangles.Add(1);
newTriangles.Add(3);
newTriangles.Add(1);
newTriangles.Add(2);
newTriangles.Add(3);

mesh.Clear ();
mesh.vertices = newVertices.ToArray();
mesh.triangles = newTriangles.ToArray();
mesh.Optimize ();
mesh.RecalculateNormals ();
}


What you should see

Now to explain how this works, first of all line 4: We get the component from the Game Object and assign in to the mesh we defined earlier. This means we can now use "mesh" to access the mesh filter. Next I assigned every axis of the object's position a float, this is just because writing x is easier than transform.position.x.

Now the vertices, if you've run this code you'll see it generates a single pink square on the screen. Each corner of that square is a vertex defined here. Now one thing to remember is that positive x is to the right and negative y is down. If we assume the Game Object's origin to be 0,0,0 then we put the first point at origin, the next one to the right at 1,0,0, then 1,-1,0 so the bottom right and lastly 0,-1, 0 the bottom left. 

After that we define the triangles. Because without them all we have is points in space, we have to show how those points are connected and we connect them in triangles. You probably know that in a 3d model a square is made up of two triangles, that's what we need to define here. An important thing to remember is that with the mesh class you create your triangles by adding the three points clockwise, this defines which direction is solid on your mesh. If you find that you can see a mesh from the back but not from the front it's this. The first triangle we define is 0,1,2 referring to the first second and third vertices we defined. The next triangle is 0,2,3 the first, third and fourth vertices. (The reason the 0,1,2 is the 1st, 2nd and 3rd is because the computer refers to the first point made as point 0).

Sometimes it's easiest to explain on paper.
Then last of all we clear anything in the mesh to begin with, we set the mesh's vertices to ours (But we have to convert the list to an array with the .ToArray() command) and set the mesh's triangles to ours. Then unity does some work for us when we call the optimize command (This usually does nothing but it doesn't use any extra time so don't worry) and the recalculate normals command so that the normals are generated automatically.

And that's how you get a square on the screen.

Now let's put a texture on it. For that we'll be using the newUV list we defined. Because we're almost always going to be using a tilesheet for this sort of thing we'll get to that now. We'll use 32x32 size tiles and we'll have 4x4 tiles on the texture, that makes it a 128x128 sized texture.

Like this!
Drop that thing in your art folder. Now click on the texture file in unity because we're going to change some import settings. You need to set Texture type: Advanced, Generate Mipmaps: False, Filter Mode: Point, Format: ARGB 32 bit.

Like so!
Then drag and drop the texture onto your gameobject so that it uses that texture as its material.

Now that you have that we can get back to the code! For convenience we're going to define a float and change it in the start function. This is something I call a tUnit and it's the fraction of space 1 tile takes up out of the width of the texture. In our case it's 1/4 or 0.25. In addition we'll be adding the coordinates for two textures to test with.

 private float tUnit = 0.25f;
private Vector2 tStone = new Vector2 (0, 0);
private Vector2 tGrass = new Vector2 (0, 1);

When we create texture coordinates it's in tiles away from the texture's 0,0 and 0,0 is the bottom left. Assigning the texture to the polygon we just made is not too hard. Just add some code to define the texture coordinates with newUV right after newTriangles and don't forget to apply our UVs to the mesh:

void Start () {

mesh = GetComponent<MeshFilter> ().mesh;

float x = transform.position.x;
float y = transform.position.y;
float z = transform.position.z;

newVertices.Add( new Vector3 (x , y , z ));
newVertices.Add( new Vector3 (x + 1 , y , z ));
newVertices.Add( new Vector3 (x + 1 , y-1 , z ));
newVertices.Add( new Vector3 (x , y-1 , z ));

newTriangles.Add(0);
newTriangles.Add(1);
newTriangles.Add(3);
newTriangles.Add(1);
newTriangles.Add(2);
newTriangles.Add(3);

newUV.Add(new Vector2 (tUnit * tStone.x, tUnit * tStone.y + tUnit));
newUV.Add(new Vector2 (tUnit * tStone.x + tUnit, tUnit * tStone.y + tUnit));
newUV.Add(new Vector2 (tUnit * tStone.x + tUnit, tUnit * tStone.y));
newUV.Add(new Vector2 (tUnit * tStone.x, tUnit * tStone.y));

mesh.Clear ();
mesh.vertices = newVertices.ToArray();
mesh.triangles = newTriangles.ToArray();
mesh.uv = newUV.ToArray(); // add this line to the code here
mesh.Optimize ();
mesh.RecalculateNormals ();
}
You will have to add a light to the scene to be able to see it but your square should now be textured! Hell Yeah! The code to create the UV information is quite simple, it just defines what 4 corners of the texture you would like the four corners of the square to use. So, tUnit*tStone.x is the left of the tStone tile and tUnit*tStone.x+tUnit is the left plus one tile's width making it the tile's right. To match the order we made the vertices in we define the top left texture coordinate first, then the top right, then the bottom right and last the bottom left.

You should see this.
So that was a lot of work to make a textured square but I promise, this really is the backbone of the whole thing. Next time we'll do collision meshes and generating based on an array.

Please if you're interested in this tutorial leave a comment here or on g+ letting me know what you think, what needs more explanation etc. If you have a better suggestion for a part of my implementation let me know and if you have any problems I'll try and answer as soon as possible.

Bonus: Take this chunk out of the start function and put it in the update loop:

  mesh.Clear ();
mesh.vertices = newVertices.ToArray();
mesh.triangles = newTriangles.ToArray();
mesh.uv = newUV.ToArray();
mesh.Optimize ();
mesh.RecalculateNormals ();

Now you can change the values of newVertices while the game runs and it will move the cube's corners.

Edit: Feel free to follow me on twitter (@STV_Alex) or G+ to get updated when I post part two. Or check back here every day, that's good too.

Edit 2: Thanks to Taryndactyl for pointing out some errors. Those are now fixed, link.

Part 2
templates-office.com Tutorial, Unity, Voxel Tut, Voxels
Sabtu, 17 Agustus 2013

Grapple: an android game where you swing on a rope


Decided to upload an early version of Grapple for those that would like to try it. So far it has been testing on android JellyBean and IceCream Sandwich on two different phones. I haven't done much testing yet so I apologize if there are bugs for your device/version. Please do leave comments here, on reddit or on g+ if you try. Let me know what levels got you stuck or what levels weren't fun.

Known bugs:
-Grapple can misfire when pressing the drag button before fully releasing the tap to aim the grapple.
-Slow Mo when holding in before releasing a grapple will reduce velocity over time.
- Sometimes a level will start with the grapple already attached
- swinging hard into rock will often cause the ball to stick there (releasing the grapple or pulling yourself will unstick you).

This version is far from finished and not completely playable, the tutorial overlay is a 10 minute thing to be able to release this version and there are only 12 levels so far. Have fun.

http://www.mediafire.com/?8u4kgrarz4mhl2o 

templates-office.com Grapple
Jumat, 16 Agustus 2013

Something different

So I've been quiet all summer and now I'm back. Through the summer I haven't been working on the voxel game but on a summer project for mobile. I think releasing games is an important experience for a game dev and I think that a smaller game is what I need to complete and release a finished stand alone game.

The game I've been working on is a remake of a prototype I developed months ago in flash and I decided to try again in Unity. It's a very satisfying gameplay prototype where the player controls a ball by swinging from ropes. It's not that unique an idea but it's an implementation I have yet to see, at least on mobile.

It involves a lot of lines
My implementation makes ropes bend and wrap around obstacles. I've been working for a while to make this element as smooth as possible and the result is a very natural feeling effect. Also I've written physics code to handle the ball hanging on a rope which makes the core gameplay possible.

Once the rope can bend you can swing in ways never possible before.

As well as making a prototype I moved further, started adding art assets and making playable levels and the project is in alpha stage.

The ball wraps around small obstacles quickly.
Although I enjoy the core programming above all it is very satisfying to see the game become more polished with the addition of functional menus and the things a real game needs.


So this is my first attempt at mobile games but it's an interesting platform. It's hard to find a gameplay element that is any fun but I feel like this is pretty fun. I guess I'll get a clearer picture once I move on to playtesting, but I feel I should have more levels ready before then.

templates-office.com Grapple
Rabu, 07 Agustus 2013

Shooting and blasting - making a revolver

After the hacking and slaying it's time to move forward in time and get to the shooting and blasting - guns and rifles and those things in between. 

Note:
This is part of the 1 million views give away. The files attached to this blog post are free and contain the guns and rifles in inkscape's .svg format and as an exploded version to use as gun construction kit.


This is what we are after - simplified handguns and rifles to use in your game. 

Note:
In order to be easily readable I created these with outlines. You can take those off but will have to add additional shading to make up for the loss of detail. 

I took the revolver as a sample to show you how these assets were created. 


Even though I am not big on guns (and please forgive me if I named bits wrongly in the tutorial - as to me they are just 'bits of a gun'), I had a lot of fun creating these. I hope you enjoy the assets as well.


Free!


templates-office.com

Thank you! - the blog just reached 1 Million views


Thanks to all those who read my blog post [that have been spread way too far and there are still too few - or too many topics still to cover. I am working on it... but time seems to fly by too quickly.]

Anyway... I want to thank all of you and am working on a nice [well I hope it is] give away to celebrate reaching this mile stone. 

Sunny greetings,
Chris 
templates-office.com