I've been meaning to write this tutorial for a long time. It's going to be a long series so bear with me.

We won't be starting with voxels, instead we'll keep to something a little more basic to understand the systems of generating meshes for render and collision. We will be building a tilebased sidescroller where the tiles can be generated proceduraly and edited in-game. Later on we'll be expanding to 3d. In this part we'll write a script that creates a textured square in 3d space.
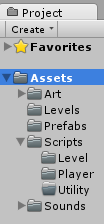 Let's start with and empty Unity project. I like to set up a folder structure to get started but that's up to you. Make a new scene "RenderTest" and a new C# script in the level folder (Or anywhere) and call it "PolygonGenerator".
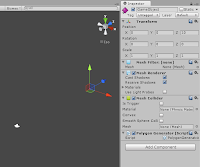
What we're going to do here is go through the basics of building meshes from scratch using the Mesh Class. So, in our new scene add a Game Object with a Mesh Filter, a Mesh Renderer and a Mesh Collider. Also add our new script PolygonGenerator. Make sure that the Game Object is at (0, 0, 10) so that it can be seen by the default camera.
Because we're using lists we need to add some code below the "using System.Collections", add
Now let's move on to the script and start making in do things. We'll start with the following variables:
With those defined we'll assign the mesh some simple values to display something. In the Start function we'll use the following code:
Now to explain how this works, first of all line 4: We get the component from the Game Object and assign in to the mesh we defined earlier. This means we can now use "mesh" to access the mesh filter. Next I assigned every axis of the object's position a float, this is just because writing x is easier than transform.position.x.
Now the vertices, if you've run this code you'll see it generates a single pink square on the screen. Each corner of that square is a vertex defined here. Now one thing to remember is that positive x is to the right and negative y is down. If we assume the Game Object's origin to be 0,0,0 then we put the first point at origin, the next one to the right at 1,0,0, then 1,-1,0 so the bottom right and lastly 0,-1, 0 the bottom left.
After that we define the triangles. Because without them all we have is points in space, we have to show how those points are connected and we connect them in triangles. You probably know that in a 3d model a square is made up of two triangles, that's what we need to define here. An important thing to remember is that with the mesh class you create your triangles by adding the three points clockwise, this defines which direction is solid on your mesh. If you find that you can see a mesh from the back but not from the front it's this. The first triangle we define is 0,1,2 referring to the first second and third vertices we defined. The next triangle is 0,2,3 the first, third and fourth vertices. (The reason the 0,1,2 is the 1st, 2nd and 3rd is because the computer refers to the first point made as point 0).
Then last of all we clear anything in the mesh to begin with, we set the mesh's vertices to ours (But we have to convert the list to an array with the .ToArray() command) and set the mesh's triangles to ours. Then unity does some work for us when we call the optimize command (This usually does nothing but it doesn't use any extra time so don't worry) and the recalculate normals command so that the normals are generated automatically.
And that's how you get a square on the screen.
Now let's put a texture on it. For that we'll be using the newUV list we defined. Because we're almost always going to be using a tilesheet for this sort of thing we'll get to that now. We'll use 32x32 size tiles and we'll have 4x4 tiles on the texture, that makes it a 128x128 sized texture.
Drop that thing in your art folder. Now click on the texture file in unity because we're going to change some import settings. You need to set Texture type: Advanced, Generate Mipmaps: False, Filter Mode: Point, Format: ARGB 32 bit.
Then drag and drop the texture onto your gameobject so that it uses that texture as its material.
Now that you have that we can get back to the code! For convenience we're going to define a float and change it in the start function. This is something I call a tUnit and it's the fraction of space 1 tile takes up out of the width of the texture. In our case it's 1/4 or 0.25. In addition we'll be adding the coordinates for two textures to test with.
So that was a lot of work to make a textured square but I promise, this really is the backbone of the whole thing. Next time we'll do collision meshes and generating based on an array.
Please if you're interested in this tutorial leave a comment here or on g+ letting me know what you think, what needs more explanation etc. If you have a better suggestion for a part of my implementation let me know and if you have any problems I'll try and answer as soon as possible.
Bonus: Take this chunk out of the start function and put it in the update loop:
Now you can change the values of newVertices while the game runs and it will move the cube's corners.
Edit: Feel free to follow me on twitter (@STV_Alex) or G+ to get updated when I post part two. Or check back here every day, that's good too.
Edit 2: Thanks to Taryndactyl for pointing out some errors. Those are now fixed, link.
Part 2

We won't be starting with voxels, instead we'll keep to something a little more basic to understand the systems of generating meshes for render and collision. We will be building a tilebased sidescroller where the tiles can be generated proceduraly and edited in-game. Later on we'll be expanding to 3d. In this part we'll write a script that creates a textured square in 3d space.
Let's start with and empty Unity project. I like to set up a folder structure to get started but that's up to you. Make a new scene "RenderTest" and a new C# script in the level folder (Or anywhere) and call it "PolygonGenerator".
What we're going to do here is go through the basics of building meshes from scratch using the Mesh Class. So, in our new scene add a Game Object with a Mesh Filter, a Mesh Renderer and a Mesh Collider. Also add our new script PolygonGenerator. Make sure that the Game Object is at (0, 0, 10) so that it can be seen by the default camera.
Because we're using lists we need to add some code below the "using System.Collections", add
using System.Collections.Generic;below it.
Now let's move on to the script and start making in do things. We'll start with the following variables:
 // This first list contains every vertex of the mesh that we are going to render
 public List<Vector3> newVertices = new List<Vector3>();

 // The triangles tell Unity how to build each section of the mesh joining
 // the vertices
    public List<int> newTriangles = new List<int>();

 // The UV list is unimportant right now but it tells Unity how the texture is
 // aligned on each polygon
  public List<Vector2> newUV = new List<Vector2>();


 // A mesh is made up of the vertices, triangles and UVs we are going to define,
 // after we make them up we'll save them as this mesh
  private Mesh mesh;
With those defined we'll assign the mesh some simple values to display something. In the Start function we'll use the following code:
// Use this for initialization
 void Start () {

  mesh = GetComponent<MeshFilter> ().mesh;

  float x = transform.position.x;
  float y = transform.position.y;
  float z = transform.position.z;


  newVertices.Add( new Vector3 (x  , y  , z ));
  newVertices.Add( new Vector3 (x + 1 , y  , z ));
  newVertices.Add( new Vector3 (x + 1 , y-1  , z ));
  newVertices.Add( new Vector3 (x  , y-1  , z ));

  newTriangles.Add(0);
  newTriangles.Add(1);
  newTriangles.Add(3);
  newTriangles.Add(1);
  newTriangles.Add(2);
  newTriangles.Add(3);

  mesh.Clear ();
  mesh.vertices = newVertices.ToArray();
  mesh.triangles = newTriangles.ToArray();
  mesh.Optimize ();
  mesh.RecalculateNormals ();
 }
 |
| What you should see |
Now to explain how this works, first of all line 4: We get the component from the Game Object and assign in to the mesh we defined earlier. This means we can now use "mesh" to access the mesh filter. Next I assigned every axis of the object's position a float, this is just because writing x is easier than transform.position.x.
Now the vertices, if you've run this code you'll see it generates a single pink square on the screen. Each corner of that square is a vertex defined here. Now one thing to remember is that positive x is to the right and negative y is down. If we assume the Game Object's origin to be 0,0,0 then we put the first point at origin, the next one to the right at 1,0,0, then 1,-1,0 so the bottom right and lastly 0,-1, 0 the bottom left.
After that we define the triangles. Because without them all we have is points in space, we have to show how those points are connected and we connect them in triangles. You probably know that in a 3d model a square is made up of two triangles, that's what we need to define here. An important thing to remember is that with the mesh class you create your triangles by adding the three points clockwise, this defines which direction is solid on your mesh. If you find that you can see a mesh from the back but not from the front it's this. The first triangle we define is 0,1,2 referring to the first second and third vertices we defined. The next triangle is 0,2,3 the first, third and fourth vertices. (The reason the 0,1,2 is the 1st, 2nd and 3rd is because the computer refers to the first point made as point 0).
 |
| Sometimes it's easiest to explain on paper. |
And that's how you get a square on the screen.
Now let's put a texture on it. For that we'll be using the newUV list we defined. Because we're almost always going to be using a tilesheet for this sort of thing we'll get to that now. We'll use 32x32 size tiles and we'll have 4x4 tiles on the texture, that makes it a 128x128 sized texture.
 |
| Like this! |
 |
| Like so! |
Now that you have that we can get back to the code! For convenience we're going to define a float and change it in the start function. This is something I call a tUnit and it's the fraction of space 1 tile takes up out of the width of the texture. In our case it's 1/4 or 0.25. In addition we'll be adding the coordinates for two textures to test with.
private float tUnit = 0.25f;When we create texture coordinates it's in tiles away from the texture's 0,0 and 0,0 is the bottom left. Assigning the texture to the polygon we just made is not too hard. Just add some code to define the texture coordinates with newUV right after newTriangles and don't forget to apply our UVs to the mesh:
private Vector2 tStone = new Vector2 (0, 0);
private Vector2 tGrass = new Vector2 (0, 1);
void Start () {

  mesh = GetComponent<MeshFilter> ().mesh;

  float x = transform.position.x;
  float y = transform.position.y;
  float z = transform.position.z;

  newVertices.Add( new Vector3 (x  , y  , z ));
  newVertices.Add( new Vector3 (x + 1 , y  , z ));
  newVertices.Add( new Vector3 (x + 1 , y-1 , z ));
  newVertices.Add( new Vector3 (x  , y-1 , z ));

  newTriangles.Add(0);
  newTriangles.Add(1);
  newTriangles.Add(3);
  newTriangles.Add(1);
  newTriangles.Add(2);
  newTriangles.Add(3);

  newUV.Add(new Vector2 (tUnit * tStone.x, tUnit * tStone.y + tUnit));
  newUV.Add(new Vector2 (tUnit * tStone.x + tUnit, tUnit * tStone.y + tUnit));
  newUV.Add(new Vector2 (tUnit * tStone.x + tUnit, tUnit * tStone.y));
  newUV.Add(new Vector2 (tUnit * tStone.x, tUnit * tStone.y));

  mesh.Clear ();
  mesh.vertices = newVertices.ToArray();
  mesh.triangles = newTriangles.ToArray();
  mesh.uv = newUV.ToArray(); // add this line to the code here
  mesh.Optimize ();
  mesh.RecalculateNormals ();
 }
You will have to add a light to the scene to be able to see it but your square should now be textured! Hell Yeah! The code to create the UV information is quite simple, it just defines what 4 corners of the texture you would like the four corners of the square to use. So, tUnit*tStone.x is the left of the tStone tile and tUnit*tStone.x+tUnit is the left plus one tile's width making it the tile's right. To match the order we made the vertices in we define the top left texture coordinate first, then the top right, then the bottom right and last the bottom left. |
| You should see this. |
Please if you're interested in this tutorial leave a comment here or on g+ letting me know what you think, what needs more explanation etc. If you have a better suggestion for a part of my implementation let me know and if you have any problems I'll try and answer as soon as possible.
Bonus: Take this chunk out of the start function and put it in the update loop:
  mesh.Clear ();
  mesh.vertices = newVertices.ToArray();
  mesh.triangles = newTriangles.ToArray();
  mesh.uv = newUV.ToArray();
  mesh.Optimize ();
  mesh.RecalculateNormals ();
Now you can change the values of newVertices while the game runs and it will move the cube's corners.
Edit: Feel free to follow me on twitter (@STV_Alex) or G+ to get updated when I post part two. Or check back here every day, that's good too.
Edit 2: Thanks to Taryndactyl for pointing out some errors. Those are now fixed, link.
Part 2


