Tampilkan postingan dengan label Unity. Tampilkan semua postingan
Selasa, 19 November 2013

Grapple is nearly at beta!


The "Splash Screen" and all the level select screens are placed along the x axis next to each other and the camera snaps to each spot as you swipe or use the arrow buttons. The background is made the same way as the levels which saves space by not using any additional assets and it looks pretty sweet.


The level select screens, following design patterns for mobile level based games.


This is one of the first images listed on the Play page, it really shows the gameplay of grapple in one image.


But one image is too little so I put all these on the Play store page as well. The trail rendered behind the player makes it really clear how the player has been moving.


Recently did up a new menu to match the new cartoony style of the game and also saved some space using meshes with vertex colors to create this while the old one used textures. The carrot score bar has a pretty nice bounce animation as it fills which is coded in by scaling the carrots. I'll have to get a GIF of that.

Pretty soon Grapple will be entering Beta and I'll be looking for people with android phones to try out the beta release and new maps as they're made!

templates-office.com Grapple, Unity
Minggu, 03 November 2013

Unity Voxel Tutorial: Webplayer and Project


A bunch of people asked for a demo of the completed project so here's a webplayer with a first person controller, wasd and space to move and left and right click to destroy/place blocks: http://naglestad.net/alex/

And here is a unitypackage of my project after the last part if you'd like to play around but I strongly recommend that you do the tutorial first. You won't understand the code without having done the tutorials and you won't be able to make much without an understanding of the project: http://www.mediafire.com/?o9nagnm0aa1d6lc
templates-office.com Tutorial, Unity, Voxel Tut, Voxels
Jumat, 01 November 2013

Unity Voxel Tutorial Part 8: Loading Chunks


So here we are at the eighth and final part of the C# voxel tutorial. I hope everyone who has followed this tutorial has gotten what they want out of it. In this part we'll be making chunks generate around the player and despawn when they are outside of a certain range. This was the last part that I felt was necessary for this kind of game. The reason I think I'll be stopping here is that at this point and onward different types of voxel games will be using very different setups depending on what's necessary and I don't want to make a tutorial on how to make a minecraft clone. Lighting is one point that could be useful but personally I prefer deferred lighting so I haven't done the research to write a tutorial that I think would give the best technique. That said if you've come this far you're well on your way to making whatever voxel game you want and I'll add some links to great resources for further development.

On to loading chunks, we'll be replacing the code that instantiates chunks all at the start with something new both to reduce startup time and to reduce drawcalls. This will mean that we can have much larger levels but it won't reduce the ram cost very much because the data of the entire level is still loaded at all times so we still can't run massive levels. To do that you would have to consider writing the level data to disk and loading it per chunk.

Anyway, wall of text above so we'll get started. We'll start by making two new public functions in our world class:
public void GenColumn(int x, int z){

}

public void UnloadColumn(int x, int z){

}


We'll be moving chunk generation to GenColumn in columns at a time and Unload column will delete the game objects. Start with GenColumn which will use the previous chunk spawning code so copy this from the end of the start function and paste it into the GenColumn function.

for (int x=0; x<chunks.GetLength(0); x++) {
for (int y=0; y<chunks.GetLength(1); y++) {
for (int z=0; z<chunks.GetLength(2); z++) {

//Create a temporary Gameobject for the new chunk instead of using chunks[x,y,z]
GameObject newChunk = Instantiate (chunk, new Vector3 (x * chunkSize - 0.5f,
y * chunkSize + 0.5f, z * chunkSize - 0.5f), new Quaternion (0, 0, 0, 0)) as GameObject;

chunks [x, y, z] = newChunk.GetComponent (\"Chunk\") as Chunk;
chunks [x, y, z].worldGO = gameObject;
chunks [x, y, z].chunkSize = chunkSize;
chunks [x, y, z].chunkX = x * chunkSize;
chunks [x, y, z].chunkY = y * chunkSize;
chunks [x, y, z].chunkZ = z * chunkSize;

}
}
}

Now this is to generate the whole level so remove the x for loop and the z for loop and the corresponding closing brackets. Now it will spawn all the chunks at a given x and z.

For the UnloadChunk function copy the for loop from GenColumn but inside it we'll destroy the gameobject for every script in chunks with the specified x and z:
for (int y=0; y<chunks.GetLength(1); y++) {
Object.Destroy(chunks [x, y, z].gameObject);

}

This calls Object.Destroy on the gameobject of every chunk script we have in the array at x and z. Now we just have to call these functions. We'll do that in the modify terrain class so move over there and create a function called LoadChunks:
public void LoadChunks(Vector3 playerPos, float distToLoad, float distToUnload){
}

What this will do is generate chunks around a position, if it's within distToLoad it loads them and outside distToUnload it removes them. So for each chunk x,z get the distance to the player and then if it's closer than distToLoad and it hasn't been spawned yet spawn the column, otherwise if it's further than distToUnload and it is spawned unload the column:
public void LoadChunks(Vector3 playerPos, float distToLoad, float distToUnload){


for(int x=0;x<world.chunks.GetLength(0);x++){
for(int z=0;z<world.chunks.GetLength(2);z++){

float dist=Vector2.Distance(new Vector2(x*world.chunkSize,
z*world.chunkSize),new Vector2(playerPos.x,playerPos.z));

if(dist<distToLoad){
if(world.chunks[x,0,z]==null){
world.GenColumn(x,z);
}
} else if(dist>distToUnload){
if(world.chunks[x,0,z]!=null){

world.UnloadColumn(x,z);
}
}

}
}

}

When this runs it will make sure that all the chunks are in check. We'll call it in the update loop for ModifyTerrain, I've used 32 and 48 for the distances this way you'll see them load not to far away but not be able to fall out of the world. I also get the player position using the Player tag.
LoadChunks(GameObject.FindGameObjectWithTag("Player").transform.position,32,48);

This doesn't need to be run every frame, once a second should be more than enough especially if the distance is large enough. To make this work you'll have to tag something as the player, the camera will do if you change the tag from MainCamera to Player and you can move it around in the editor and see the chunks update around you or you can import the standard unity FPScontroller from Assets>Import Package>Character Controller and tweak the capsule collider radius to 0.4.

Now if you run the game you should see that chunks only load around the player and nowhere else meaning you can have a map size much larger and run it smoothly. Try 512x32x512 for example and see how that works. If you walk to the middle you'll see a large circle of chunks loaded around the player tagged object if you look in the editor view.

Thank you everyone who has followed through all this way I hope your satisfied. Please let me know what you think of this tutorial series as a whole and this part. As always any bugs you encounter I'll try to fix right away. I may be writing a beginner tutorial after this but I haven't decided yet, if you have any suggestions let me know.

Complete unity project file and web player demo

Here are some resources to help you further:

Let's make a Voxel Engine: Concepts behind a Voxel engine explained in detail by the developer of Vox.
LibNoise: Using noise functions to do amazing things
Save Mesh Created by Script in Editor PlayMode: How to save a mesh generated from code ingame
Pathfinding in unity for voxel structures: Again from UnityCoder.com pathfinding for voxel games
Unity forum's "After Playing MineCraft" thread: Unity thread where people have made MineCraft like games using Unity
Cubiquity: An excellent free voxel terrain asset for Unity
More Voxel Resources: Lastly, UnityCoder.com lists even more voxel resources
If you want to stay updated on my next tutorial follow me on twitter (@STV_Alex) or on google+ (+AlexandrosStavrinou). 
templates-office.com Tutorial, Unity, Voxel Tut, Voxels
Rabu, 16 Oktober 2013

Unity Voxel Tutorial Part 7: Modifying the terrain


I went ahead and added block breaking and block placing to make our chunks interactive.


This tutorial is about editing the terrain similar to part 4 but in 3d. First of all we're going to change the scripts we've already written a little bit. If I had been smarter I would have written them this way in the first place but I didn't think ahead.

In Chunk.cs the change is simple, make the GenerateMesh function public so we can call it whenever we make changes to a mesh.
public void GenerateMesh(){ //Made this public

In World.cs our changes are bigger, we're changing the chunks array from a GameObject array to a Chunk array because we don't actually need access to the gameobjects we need access to the chunk scripts. And we're offsetting the positions the chunks are created at because if you remember in the 2d prototype whenever we checked the position of a block we had to offset the point of collision before we could round to get the block position. This time we're doing it right and just making sure the center of every block is its x,y,z position.

We'll start with the position change, in the instatiate line for the chunks we'll add offsets to each axis:
chunks[x,y,z]=Instantiate(chunk,
new Vector3(x*chunkSize-0.5f,y*chunkSize+0.5f,z*chunkSize-0.5f),
new Quaternion(0,0,0,0)) as GameObject;
See how after x*chunkSize I have -0.5f? That's the offset, -0.5 to x, +0.5 to y and -0.5 to z.

Now we'll change that chunks array, change it in the variable definition first:
public Chunk[,,] chunks;  //Changed from public GameObject[,,] chunks;

Next change the line where we define the size of the array:
  chunks=new Chunk[Mathf.FloorToInt(worldX/chunkSize),
Mathf.FloorToInt(worldY/chunkSize),Mathf.FloorToInt(worldZ/chunkSize)];
Just change the chunks= new GameObject... to chunks=new Chunk...

Now all the stuff in those for loops below is wrong so we need to switch some stuff around:
//Create a temporary Gameobject for the new chunk instead of using chunks[x,y,z]
GameObject newChunk= Instantiate(chunk,new Vector3(x*chunkSize-0.5f,
y*chunkSize+0.5f,z*chunkSize-0.5f),new Quaternion(0,0,0,0)) as GameObject;

//Now instead of using a temporary variable for the script assign it
//to chunks[x,y,z] and use it instead of the old \"newChunkScript\"
chunks[x,y,z]= newChunk.GetComponent(\"Chunk\") as Chunk;
chunks[x,y,z].worldGO=gameObject;
chunks[x,y,z].chunkSize=chunkSize;
chunks[x,y,z].chunkX=x*chunkSize;
chunks[x,y,z].chunkY=y*chunkSize;
chunks[x,y,z].chunkZ=z*chunkSize;

Ok great! Sorry about that but now it's done. Now we can get started, create a new script called "ModifyTerrain.cs" and open it. This script is going to have a collection of functions for adding and removing blocks. We'll set it up by creating all the functions first and then writing what they do after.
public void ReplaceBlockCenter(float range, byte block){
//Replaces the block directly in front of the player
}

public void AddBlockCenter(float range, byte block){
//Adds the block specified directly in front of the player
}

public void ReplaceBlockCursor(byte block){
//Replaces the block specified where the mouse cursor is pointing
}

public void AddBlockCursor( byte block){
//Adds the block specified where the mouse cursor is pointing
}

public void ReplaceBlockAt(RaycastHit hit, byte block) {
//removes a block at these impact coordinates, you can raycast against the terrain and call this with the hit.point
}

public void AddBlockAt(RaycastHit hit, byte block) {
//adds the specified block at these impact coordinates, you can raycast against the terrain and call this with the hit.point
}

public void SetBlockAt(Vector3 position, byte block) {
//sets the specified block at these coordinates
}

public void SetBlockAt(int x, int y, int z, byte block) {
//adds the specified block at these coordinates
}

public void UpdateChunkAt(int x, int y, int z){
//Updates the chunk containing this block
}


That's a lot of functions but the way this is going to work is that if the player calls one of the top functions like ReplaceBlockCursor(block) it runs and then calls ReplaceBlockAt(RaycastHit, block) that runs and calls SetBlockAt (vector3, block) which calls SetBlockAt(int,int,int, block) which sets the block and calls UpdateChunkAt. So if you have a reason to you can set a block by its coordinates or you can just send collision data to the script or you can just call a function to remove the block in front of the player.

Now we also need access to some other things so add the following variables:
World world;
GameObject cameraGO;

And we'll assign those in the start function. We can get the world script  with gameObject.getComponent because we'll place both scripts on the same game object and we'll get the camera by its tag.

void Start () {

world=gameObject.GetComponent("World") as World;
cameraGO=GameObject.FindGameObjectWithTag("MainCamera");

}

Now we can start with the functions, let's start with SetBlockAt(int,int,int,block), here we just change the value in the data array in World.cs and run UpdateChunk:
public void SetBlockAt(int x, int y, int z, byte block) {
//adds the specified block at these coordinates

print("Adding: " + x + ", " + y + ", " + z);


world.data[x,y,z]=block;
UpdateChunkAt(x,y,z);

}

Let's get UpdateChunkAt while we're at it, we need to derive which chunk the block is in from its coordinates and run an update on that block. For now we'll just update the block immediately to get it working but this is an inefficient method because often the player will be editing multiple blocks in the same chunk in a single frame and this way we generate the mesh again for each change. Later we'll switch to setting a flag in the chunk and then updating the chunk if the flag is set at the end of the frame.
//To do: add a way to just flag the chunk for update then it update it in lateupdate
public void UpdateChunkAt(int x, int y, int z){
//Updates the chunk containing this block

int updateX= Mathf.FloorToInt( x/world.chunkSize);
int updateY= Mathf.FloorToInt( y/world.chunkSize);
int updateZ= Mathf.FloorToInt( z/world.chunkSize);

print(\"Updating: \" + updateX + \", \" + updateY + \", \" + updateZ);

world.chunks[updateX,updateY, updateZ].GenerateMesh();

}

So what we do is take each axis, divide the value by the chunk size and this gives us a value that used to be between 0 and (world width) as a value between 0 and (number of chunks on this axis) so when we round to the nearest whole number we round to the closed chunk index.

Continuing to work our way up move to SetBlockAt(Vector3, block) This takes a vector3 and finds the nearest block by rounding the float components of the vector3 to ints:
public void SetBlockAt(Vector3 position, byte block) {
//sets the specified block at these coordinates

int x= Mathf.RoundToInt( position.x );
int y= Mathf.RoundToInt( position.y );
int z= Mathf.RoundToInt( position.z );

SetBlockAt(x,y,z,block);
}

Now the RaycastHit functions, these will take a collision and find either the block collided with or the one next to the one collided with for placing blocks where you're looking. Lets start first with ReplaceBlockAt(RaycastHit, block):
public void ReplaceBlockAt(RaycastHit hit, byte block) {
//removes a block at these impact coordinates, you can raycast against the terrain and call this with the hit.point
Vector3 position = hit.point;
position+=(hit.normal*-0.5f);

SetBlockAt(position, block);
}

This takes the impact coordinates of a raycast and finds the block it hit by moving the point inwards into the block so that when we round it it's within the cube and is rounded to its coordinates. hit.normal is the outwards direction of the surface it hit so the reverse of that in the direction into the cube. Therefore we take the hit position and add to it the half the reverse normal (Half so that it doesn't come out the other end of the block). This places the point within the bounds of the cube so we send it off to SetBlockAt(Vector3, block).

The other RaycastHit function, AddBlockAt(RaycastHit,block) is very similar only that it doesn't invert the normal because it places a block at the block next to the block hit so we move the impact position outwards from the surface hit and run SetBlockAt(Vector3, block):
public void AddBlockAt(RaycastHit hit, byte block) {
//adds the specified block at these impact coordinates, you can raycast against the terrain and call this with the hit.point
Vector3 position = hit.point;
position+=(hit.normal*0.5f);

SetBlockAt(position,block);

}

Now that we have ways to handle raycast information we should carry out some raycasts, start with the cursor functions. These are only different in what function they call after they're done and they're pretty standard raycast from mouse position functions:
 public void ReplaceBlockCursor(byte block){
//Replaces the block specified where the mouse cursor is pointing

Ray ray = Camera.main.ScreenPointToRay (Input.mousePosition);
RaycastHit hit;

if (Physics.Raycast (ray, out hit)) {

ReplaceBlockAt(hit, block);
Debug.DrawLine(ray.origin,ray.origin+( ray.direction*hit.distance),
Color.green,2);

}

}

public void AddBlockCursor( byte block){
//Adds the block specified where the mouse cursor is pointing

Ray ray = Camera.main.ScreenPointToRay (Input.mousePosition);
RaycastHit hit;

if (Physics.Raycast (ray, out hit)) {

AddBlockAt(hit, block);
Debug.DrawLine(ray.origin,ray.origin+( ray.direction*hit.distance),
Color.green,2);
}

}

We define a ray using the mouse position, then use that to raycast and send the information with the RaycastHit functions.

The last two functions, the center functions are very similar to the last two just that the ray is derived from the camera position and rotation not taking into account the position of the mouse and these functions take a range parameter which stops the function if the terrain is beyond range:
 public void ReplaceBlockCenter(float range, byte block){
//Replaces the block directly in front of the player

Ray ray = new Ray(cameraGO.transform.position, cameraGO.transform.forward);
RaycastHit hit;

if (Physics.Raycast (ray, out hit)) {

if(hit.distance<range){
ReplaceBlockAt(hit, block);
}
}

}

public void AddBlockCenter(float range, byte block){
//Adds the block specified directly in front of the player

Ray ray = new Ray(cameraGO.transform.position, cameraGO.transform.forward);
RaycastHit hit;

if (Physics.Raycast (ray, out hit)) {

if(hit.distance<range){
AddBlockAt(hit,block);
}
Debug.DrawLine(ray.origin,ray.origin+( ray.direction*hit.distance),Color.green,2);
}

}


You can test all this by adding this to the update loop:
if(Input.GetMouseButtonDown(0)){
ReplaceBlockCursor(0);
}

if(Input.GetMouseButtonDown(1)){
AddBlockCursor(1);
}

You should be able to place and remove blocks but you might notice that sometimes it seems to glitch and you can see through the terrain after a block is removed. What's happening here is that after you remove a block and update the chunk it updates fine but if the block is on the border with another chunk then that chunk still won't update meaning the side of the now exposed block in the neighbor chunk won't get drawn.

To fix this we need to get back to the chunk update script which we were going to change a bit anyway to make more efficient. Lets start with the update method, we'll make some changes in Chunk.cs, first add a bool and call it update. Then create a new function called LateUpdate, this is a unity function called after all the other update functions, here we'll update the chunk if update is true:
public bool update;

void LateUpdate () {
if(update){
GenerateMesh();
update=false;
}
}


Now instead of calling the GenerateTerrain function in UpdateChunkAt in the ModifyTerrain.cs script just set update to true:
world.chunks[updateX,updateY, updateZ].update=true;

Now on to making neighbor blocks update when necessary, this is only needed when the block changed is on the edge of its chunk so only if x, y or z is 0 or 15 relative to its chunk. Based on the coordinates of the block we can find if its on the edge and also which edge like this:
if(x-(world.chunkSize*updateX)==0 && updateX!=0){
world.chunks[updateX-1,updateY, updateZ].update=true;
}

if(x-(world.chunkSize*updateX)==15 && updateX!=world.chunks.GetLength(0)-1){
world.chunks[updateX+1,updateY, updateZ].update=true;
}

if(y-(world.chunkSize*updateY)==0 && updateY!=0){
world.chunks[updateX,updateY-1, updateZ].update=true;
}

if(y-(world.chunkSize*updateY)==15 && updateY!=world.chunks.GetLength(1)-1){
world.chunks[updateX,updateY+1, updateZ].update=true;
}

if(z-(world.chunkSize*updateZ)==0 && updateZ!=0){
world.chunks[updateX,updateY, updateZ-1].update=true;
}

if(z-(world.chunkSize*updateZ)==15 && updateZ!=world.chunks.GetLength(2)-1){
world.chunks[updateX,updateY, updateZ+1].update=true;
}

This should keep all the neighbors updated if they need to be, it finds the x, y or z of the block relative to the chunk by subtracting the chunk's coordinates (world.chunkSize*updateX where updateX is how many chunks along on the x axis this chunk is) and then if the relative coordinate is 0 it updates the block further down on that axis, if it's 15 it updates the one further up. It also checks to make sure that there is a chunk in that direction in case it's the edge of the level.

It should now work as intended to left click and right click to remove and place blocks. Also at this point it's probably a good idea to add a directional light to the scene. I hope you guys come up with some cool uses for this!

Student Game Dev. Unfortunately I am art impaired.
Edit:
With fog enabled in render settings and shadows enabled on your directional lights it can look pretty cool.


Feel free to follow me on twitter or g+ and as always of you have a problem please let me know and I'll do my best to fix it.

Part 8: Loading Chunks
templates-office.com Tutorial, Unity, Voxel Tut, Voxels
Senin, 14 Oktober 2013

Unity Voxel Tutorial Part 5: Building a 3d Voxel


Ok, I took a long break since the last part. I'm pretty bad at being active especially with a lot of work to focus on but without further adieu we will start building our meshes to be viewed in 3d. This is probably what a lot of people had in mind when they started this tutorial series but I promise, with the understanding gained from the earlier tutorials this part will come a lot easier. However users that haven't followed the last 4 parts are welcome to start here but I won't be going into as much detail about how meshes are created.

Also this tutorial and the next one I'm writing as I go instead of using parts of my finished code (of course still using that as reference) so I'm hoping that will help stop me from making as many mistakes as I shouldn't skip things or have to make changes to things as I past them to the tutorial as much.

Let's start by making a new scene in unity with an empty game object. Name that object "Chunk", this will be the mesh for a 16x16x16 area (Or larger) of our world. Also make a new script and call it "Chunk" as well because it goes on the chunk object. Let's make our code create one cube to start.

First of all set up the variables:
using UnityEngine;
using System.Collections;
using System.Collections.Generic;

public class Chunk : MonoBehaviour {

private List<Vector3> newVertices = new List<Vector3>();
private List<int> newTriangles = new List<int>();
private List<Vector2> newUV = new List<Vector2>();

private float tUnit = 0.25f;
private Vector2 tStone = new Vector2 (1, 0);
private Vector2 tGrass = new Vector2 (0, 1);

private Mesh mesh;
private MeshCollider col;

private int faceCount;

When you're adding these remember to include the line "using System.Collections.Generic;" from line 3 up there. Now, this should look pretty familiar, same lists of verticies, tris and UVs, a tUnit and texture coordinates, our mesh filter and mesh collider and lastly a faceCount which is just a new name for the squareCount we used in the other script.

Set up the start function to set some of our variables:
mesh = GetComponent<MeshFilter> ().mesh;
col = GetComponent<MeshCollider> ();

After you've done this go to unity and add a Mesh Filter, a Mesh Renderer and a Mesh Collider to our Chunk game object.

Now create two functions:
void CubeTop (int x, int y, int z, byte block) {

}

void UpdateMesh ()
{

}

And call them in the start loop:
void Start () { 

mesh = GetComponent<MeshFilter> ().mesh;
col = GetComponent<MeshCollider> ();

CubeTop(0,0,0,0);
UpdateMesh ();
}

CubeTop will be one of six functions that generate a side of the cube and update mesh will commit the verticies and things to the mesh filter. We'll just start with the top to get it working.

Because this is actually very similar to the 2d example I'll take this in some larger steps than normal now, here is what we need in the CubeTop function:
void CubeTop (int x, int y, int z, byte block) {

newVertices.Add(new Vector3 (x, y, z + 1));
newVertices.Add(new Vector3 (x + 1, y, z + 1));
newVertices.Add(new Vector3 (x + 1, y, z ));
newVertices.Add(new Vector3 (x, y, z ));

newTriangles.Add(faceCount * 4 ); //1
newTriangles.Add(faceCount * 4 + 1 ); //2
newTriangles.Add(faceCount * 4 + 2 ); //3
newTriangles.Add(faceCount * 4 ); //1
newTriangles.Add(faceCount * 4 + 2 ); //3
newTriangles.Add(faceCount * 4 + 3 ); //4

Vector2 texturePos;

texturePos=tStone;

newUV.Add(new Vector2 (tUnit * texturePos.x + tUnit, tUnit * texturePos.y));
newUV.Add(new Vector2 (tUnit * texturePos.x + tUnit, tUnit * texturePos.y + tUnit));
newUV.Add(new Vector2 (tUnit * texturePos.x, tUnit * texturePos.y + tUnit));
newUV.Add(new Vector2 (tUnit * texturePos.x, tUnit * texturePos.y));

}

And here is the UpdateMesh Function:
void UpdateMesh ()
{

mesh.Clear ();
mesh.vertices = newVertices.ToArray();
mesh.uv = newUV.ToArray();
mesh.triangles = newTriangles.ToArray();
mesh.Optimize ();
mesh.RecalculateNormals ();

//col.sharedMesh=null;
//col.sharedMesh=mesh;

newVertices.Clear();
newUV.Clear();
newTriangles.Clear();

faceCount=0; //Fixed: Added this thanks to a bug pointed out by ratnushock!

}

What's happening here? Well CubeTop runs first and it creates verticies for a square facing upwards using the x,y,z coordinates, then it creates numbers for the triangles using the faceCount and lastly it applies the texture at the coordinates to the face. For now though texturePos is just set to tStone. We'll add some ifs to set the texture once we have more than one cube.

Now lets hop over to unity and place our gameobjects so that we can run. Put the Chunk at 0,0,0 and set the camera's position y to 10 and rotation x to 45. This should put it dead center.

This is what you should see when you run
So as you can see there are no textures yet and it's just the top face so let's add the materials first of all. Just drag the tilesheet texture onto the chunk gameobject (for those of you who haven't done the previous tutorials, the tilesheet is a 128x128 size image with 4x4 tiles. Here's the one I'm using: Link!).

For the rest of the faces the functions will be quite similar, all we'll be doing is adjusting the verticies. Pretty much the rest of the function will be the same for every face so what we'll do is remove the common parts of the functions and put them in a separate function instead of having it written out for each face.

So create a new function called Cube with a Vector2 called texturePos as a parameter, this function will be called for every face and run all the code common to all faces. Move the newTriangles lines to it and the newUV lines to it. Then add "faceCount++" to the end.
void Cube (Vector2 texturePos) {

newTriangles.Add(faceCount * 4 ); //1
newTriangles.Add(faceCount * 4 + 1 ); //2
newTriangles.Add(faceCount * 4 + 2 ); //3
newTriangles.Add(faceCount * 4 ); //1
newTriangles.Add(faceCount * 4 + 2 ); //3
newTriangles.Add(faceCount * 4 + 3 ); //4

newUV.Add(new Vector2 (tUnit * texturePos.x + tUnit, tUnit * texturePos.y));
newUV.Add(new Vector2 (tUnit * texturePos.x + tUnit, tUnit * texturePos.y + tUnit));
newUV.Add(new Vector2 (tUnit * texturePos.x, tUnit * texturePos.y + tUnit));
newUV.Add(new Vector2 (tUnit * texturePos.x, tUnit * texturePos.y));

faceCount++; // Add this line
}

Now your CubeTop function should be a little shorter but call Cube(texturePos); at the end of the function. We decide the texture coordinates in the function unique to each side because the Cube function doesn't have any block data to decide what texture to use and because textures might be based on which face of the cube we're making. Your CubeTop function should look like this now:
void CubeTop (int x, int y, int z, byte block) {

newVertices.Add(new Vector3 (x, y, z + 1));
newVertices.Add(new Vector3 (x + 1, y, z + 1));
newVertices.Add(new Vector3 (x + 1, y, z ));
newVertices.Add(new Vector3 (x, y, z ));

Vector2 texturePos;

texturePos=tStone;

Cube (texturePos);

}

Now we can make the other five functions, they'll look just the same as this one except that they'll use different coordinates for the verticies. Later on they will also decide what textures to use in the unique functions but for now just keep using texturePos=tStone.

Now create 5 new functions with the same content as CubeTop called CubeNorth, CubeEast, CubeSouth, CubeWest and CubeBot but change out the newVerticies lines with these:
//CubeNorth
newVertices.Add(new Vector3 (x + 1, y-1, z + 1));
newVertices.Add(new Vector3 (x + 1, y, z + 1));
newVertices.Add(new Vector3 (x, y, z + 1));
newVertices.Add(new Vector3 (x, y-1, z + 1));

//CubeEast
newVertices.Add(new Vector3 (x + 1, y - 1, z));
newVertices.Add(new Vector3 (x + 1, y, z));
newVertices.Add(new Vector3 (x + 1, y, z + 1));
newVertices.Add(new Vector3 (x + 1, y - 1, z + 1));

//CubeSouth
newVertices.Add(new Vector3 (x, y - 1, z));
newVertices.Add(new Vector3 (x, y, z));
newVertices.Add(new Vector3 (x + 1, y, z));
newVertices.Add(new Vector3 (x + 1, y - 1, z));

//CubeWest
newVertices.Add(new Vector3 (x, y- 1, z + 1));
newVertices.Add(new Vector3 (x, y, z + 1));
newVertices.Add(new Vector3 (x, y, z));
newVertices.Add(new Vector3 (x, y - 1, z));

//CubeBot
newVertices.Add(new Vector3 (x, y-1, z ));
newVertices.Add(new Vector3 (x + 1, y-1, z ));
newVertices.Add(new Vector3 (x + 1, y-1, z + 1));
newVertices.Add(new Vector3 (x, y-1, z + 1));

Now you should have 6 functions and one common function for the faces of the cube. Go to the start function and add the five new functions after CubeTop with the parameters 0,0,0,0 for all of them. If you run it in unity now you should see a cube, not so visible in the camera view but if you look around in the scene view you'll see it.

You should see this
Lets have a look at the collision model generation as well, in the 2d example we generated a different collision mesh after the mesh to be rendered but here we'll use the same mesh for both. The commented lines in the UpdateMesh function do just this. First of all we reset the collision mesh and then we set the collision mesh to mesh so we use the same one we've already made for the mesh renderer. So, uncomment these lines:
col.sharedMesh=null;
col.sharedMesh=mesh;

And you'll have a cube with a collision mesh!

I'll end this part here, it seems like a logical point to stop but what we have now is more than a cube, what we have is a system to create individual faces which will come in very handy when we're creating a surface that resembles cubes but is actually made of just the visible faces. But that's for next time.

Until then please message me with any problems you find and follow me on twitter or google plus to get updated!

Part 6
templates-office.com Tutorial, Unity, Voxel Tut, Voxels

Unity Voxel Tutorial Part 6: Building 3d Voxels


You may have noticed how I cleverly named the last part 3d voxel and this one 3d voxels. That it because in this part we'll be making our chunk show an actual chunk of blocks. So picking up from last tile where we had one block rendering what we'll do now is make a way to store the information of the chunk.

This is an interesting point because there are two ways to do this, you can store the information in each chunk so that every chunk has the data for the blocks it contains or you can use a big array for all the level data that each chunk refers to. I think we'll use the big array because it's easier later on. This will mean that our world has a fixed size though but making an infinitely generating world will have to remain outside of the scope of this tutorial.

So to store our level data make a new script and call it World .Also create a gameobject and call it world as well and put the script on it. The core of this script will be the data array, start by setting up the variables:
public byte[,,] data;
public int worldX=16;
public int worldY=16;
public int worldZ=16;

We'll initiate the byte array with the world* variables as the sizes of the array. Use the start array for this:
void Start () {

data = new byte[worldX,worldY,worldZ];

}

With the default variables our world is only one chunk in size but we'll change that later. This array is pretty useless when it's all empty so let's at least fill it with some placeholder data, similar to how we filled the 2d array we'll cycle through all the dimensions of this array and turn anything lower than 8 to stone. Remember that in our data array 0 is air, 1 is stone and 2 is dirt.
void Start () {

data = new byte[worldX,worldY,worldZ];

for (int x=0; x<worldX; x++){
for (int y=0; y<worldY; y++){
for (int z=0; z<worldZ; z++){

if(y<=8){
data[x,y,z]=1;
}

}
}
}

}

Later on we'll use this script to also generate all our chunk game objects but for now we're just going to use it to store the data while we finish setting up the chunk script so we'll jump back to that chunk script. Go ahead and add a new public variable to the chunk for the world object and a private one for the world script. This is temporary so that we can access the world data.
public GameObject worldGO;
private World world;

Go into unity and set the worldGO variable to the world gameobject by dragging it from the heirarchy window to the variable in the inspector on the Chunk game object. In the start function add the following line:
world=worldGO.GetComponent("World") as World;

Now we can access the world data with world.data but this isn't ideal so jump over to the world script and add a new function called Block:
public byte Block(int x, int y, int z){

if( x>=worldX || x<0 || y>=worldY || y<0 || z>=worldZ || z<0){
return (byte) 1;
}

return data[x,y,z];
}

Now in the chunk script we'll use world.block(0,0,0) to get block data. This function just returns the data from the array but it includes an if to check that the requested block is within the boundaries of the array and otherwise it returns stone.

Back in the chunk script let's get to generating. Create a new function in the chunk script and call it Generate Mesh, with this chunk we're going to cycle through every block in the chunk and based on data from the world.data array generate a mesh. We can't just create a face for every block though because that would be far too many faces that the player actually can't see, instead we're going to only make faces that are exposed to air. This means that blocks buried and surrounded by other blocks aren't rendered at all saving us time. Create a function like this:
Edit: as ratnushock pointed out we need to add this variable to the script first, this defines the chunk size:
public int chunkSize=16;


void GenerateMesh(){

for (int x=0; x<chunkSize; x++){
for (int y=0; y<chunkSize; y++){
for (int z=0; z<chunkSize; z++){
//This code will run for every block in the chunk

if(world.Block(x,y,z)!=0){
//If the block is solid

if(world.Block(x,y+1,z)==0){
//Block above is air
CubeTop(x,y,z,world.Block(x,y,z));
}

if(world.Block(x,y-1,z)==0){
//Block below is air
CubeBot(x,y,z,world.Block(x,y,z));

}

if(world.Block(x+1,y,z)==0){
//Block east is air
CubeEast(x,y,z,world.Block(x,y,z));

}

if(world.Block(x-1,y,z)==0){
//Block west is air
CubeWest(x,y,z,world.Block(x,y,z));

}

if(world.Block(x,y,z+1)==0){
//Block north is air
CubeNorth(x,y,z,world.Block(x,y,z));

}

if(world.Block(x,y,z-1)==0){
//Block south is air
CubeSouth(x,y,z,world.Block(x,y,z));

}

}

}
}
}

UpdateMesh ();
}

Now this will cycle through every block in the chunk, if the block is not air it will run through all the faces of the block and check adjacent blocks. For each adjacent air block it will create a face for that side. We just check if the block at x,y,z + 1 in whatever direction we're checking is air and if so we run the function for that face. At the end of the function we call UpdateMesh() to set the mesh to the new one.

Replace the code that generated a block in the start function (all the CubeTop, CubeNorth, etc. and the UpdateMesh() ) with GenerateMesh();

If you run now you should get a flat mesh showing the tops of 16x16 blocks.

You should see this!
So this is pretty cool, it's terrain with a collision mesh and you can update it at any time by calling GenerateMesh(); You can also change the creation of the data array contents to get something more interesting than a plane. The problem here is that we've written the code so far just to make this one chunk but ideally we would have lots of chunks for more advanced terrain. Why don't we do that now.

What we'll do is just use the world gameobject for initialization and it will generate the chunk gameobjects as needed. Take your chunk gameobject in unity and drag it into the project window (into a prefabs folder if you want to keep it neat) and this will make a prefab of it. Now you can delete it from the scene. Switch to the world script and we can get going.

First add some variables to the world script:
public GameObject chunk;
public GameObject[,,] chunks;
public int chunkSize=16;

And go into unity and set the chunk gameobject to be the prefab we just created.

After we generate the contents of the data array we'll generate and array of chunk gameobjects:
chunks=new GameObject[Mathf.FloorToInt(worldX/chunkSize),
Mathf.FloorToInt(worldY/chunkSize),
Mathf.FloorToInt(worldZ/chunkSize)];

for (int x=0; x<chunks.GetLength(0); x++){
for (int y=0; y<chunks.GetLength(1); y++){
for (int z=0; z<chunks.GetLength(2); z++){

chunks[x,y,z]= Instantiate(chunk,
new Vector3(x*chunkSize,y*chunkSize,z*chunkSize),
new Quaternion(0,0,0,0)) as GameObject;

Chunk newChunkScript= chunks[x,y,z].GetComponent(\"Chunk\") as Chunk;

newChunkScript.worldGO=gameObject;
newChunkScript.chunkSize=chunkSize;
newChunkScript.chunkX=x*chunkSize;
newChunkScript.chunkY=y*chunkSize;
newChunkScript.chunkZ=z*chunkSize;

}
}
}

What this does is generate enough chunks to display the contents of the data array and then sets them up with the variables needed. First we initialize the chunks array taking the size of the level and dividing each dimension by the chunk size so that we get the right amount of chunks based on the size of our world and we turn them into ints rounding down so that if they don't match up we get fewer chunks rather than chunks that aren't filled. This means that we never have to define how many chunks we want instead we just define the size of the level and the size of the chunks to represent them.

Then we go through and for each slot in the chunks array we instantiate a new chunk prefab. They are positioned with a new one every chunksize so we get their position with dimension*chunksize. Then we get access to their Chunk script and then set some variables. The worldGO, the chunk size and then some new variables; the coordinates of the chunk so that it can know which blocks it represents.

Go into the chunk script because we have to make some changes here too. Add these new variables for the position that we'll use to access the right blocks from the data array.
public int chunkX;
public int chunkY;
public int chunkZ;

Secondly we're going to add yet another step to our getting block data method, create a new function called Block:
byte Block(int x, int y, int z){
return world.Block(x+chunkX,y+chunkY,z+chunkZ);
}

All this does is add on the position of the chunk to the position of the block we're accessing so that the chunk further to the center of the level accesses the blocks at it's location.

To use this function we have to change the way we accessed the blocks before so find are replace occurrences of world.Block with just Block. However don't replace the one in the function we just added.
byte Block(int x, int y, int z){
return world.Block(x+chunkX,y+chunkY,z+chunkZ); // Don't replace the world.Block in this line!
}

So you can either click replace for each instance and skip the one return line we want to keep or you can replace all then remember to change back that one line.
You open this menu by pressing ctrl+f and then pressing the down arrow on the left to get the replace box
Now we can set the size of the world in the world object and leave the chunk size at 16. If you set the size of the world to 64x64 it should generate 4x4 chunks!

Now we're getting somewhere
But the problem now is that this terrain is super boring, why don't we fix that? To the World Script!
This is very similar to the way we added noise to the 2d level, we'll be generating perlin noise for each column.

First of all we now need more advanced noise than the standard unity perlin noise can offer as far as I know so we'll be using someone else's implementation of Perlin's Simplex noise in c#: Perlin Simplex Noise for C# and XNA. What you'll need to do is create a new C# script, call it "Noise" and remove everything but:
using UnityEngine;
using System.Collections;

Then after that paste in the code from simplex noise implementation linked as Download at the bottom of the post I just linked. Just save this file and we can access it from the World script.

Now we'll create a new function in the world script to retrieve the noise:
int PerlinNoise(int x,int y, int z, float scale, float height, float power){
float rValue;
rValue=Noise.GetNoise (((double)x) / scale, ((double)y)/ scale, ((double)z) / scale);
rValue*=height;

if(power!=0){
rValue=Mathf.Pow( rValue, power);
}

return (int) rValue;
}

Now we can call Perlin noise with some extra variables like scale and height and power like in the 2d version but now we have a whole new dimension. Up in the start function where we created a floor of stone let's replace that with something a little more interesting.
for (int x=0; x<worldX; x++){
for (int z=0; z<worldZ; z++){
int stone=PerlinNoise(x,0,z,10,3,1.2f);
stone+= PerlinNoise(x,300,z,20,4,0)+10;
int dirt=PerlinNoise(x,100,z,50,2,0) +1; //Added +1 to make sure minimum grass height is 1

for (int y=0; y<worldY; y++){
if(y<=stone){
data[x,y,z]=1;
} else if(y<=dirt+stone){ //Changed this line thanks to a comment
data[x,y,z]=2;
}

}
}
}

This should add a little noise to the surface and in addition add a new block. If you run now the surface should be noisy but everything will be the same block. What you can do now is add different textures for blocks.

Back in the chunk script in the code for each face we decided what texture to use but just set it to stone, now let's change that.

I created a new variable called tGrassTop to set a texture based on the face of the block:
private Vector2 tGrassTop = new Vector2 (1, 1);

Then in the CubeTop function I use this:
Vector2 texturePos=new Vector2(0,0);

if(Block(x,y,z)==1){
texturePos=tStone;
} else if(Block(x,y,z)==2){
texturePos=tGrassTop;
}

Now the sides of the blocks are often going to be the same so if you want you can set up a common function to set the textures for the sides of the blocks but what I've done is used this for all of them and the bottom:
if(Block(x,y,z)==1){
texturePos=tStone;
} else if(Block(x,y,z)==2){
texturePos=tGrass;
}

If you run this you should get some ugly terrain with our placeholder textures but it should work as a prototype:


Now it needs some remove and place block functions and some more block types but you can see how it's done. Next time I think we'll be able to place and remove blocks and come up with a better way to generate the chunks than before the game loads.

Here's an example of what you could do with what we've made so far, with some new textures and directional lights it's starting to look professional.


Until then though good luck, even with just this I think you have a good start to work from if you feel like you don't want to rely on my tutorial. Feel free to follow me on twitter or g+ and as always of you have a problem please let me know and I'll do my best to fix it.


Part 7: Modifying the terrain
templates-office.com Terrain Generation, Tutorial, Unity, Voxel Tut, Voxels
Senin, 02 September 2013

Unity Voxel Tutorial Part 4: Destroying and placing blocks


Now that we have semi realistic terrain we need to be able to manipulate the terrain in real time because that's kind of a staple of these kinds of games or even the point of these kinds of games. The difficulty of this mostly comes down to converting floating point positions from unity to coordinates in our grid array. Our grid array is offset by a little so we need to figure out these offsets. We could also adjust our block generation to align it better to the real positions but this solution is easier.

What we'll start off with is a raycasting script to destroy blocks. Make a new script and call it "RaycastExample". Give it the following variables:
public GameObject terrain;
private PolygonGenerator tScript;
public GameObject target;
private LayerMask layerMask = (1 << 0);

The terrain GameObject will refer to the object with the "PolygonGenerator" script and in the start function we'll get the polygon generator script and save it as the tScript variable:

void Start () {
tScript=terrain.GetComponent("PolygonGenerator") as PolygonGenerator;
}

Now in the update function we'll raycast every frame from this object to the target object destroying the first block hit.
void Update () {

RaycastHit hit;

float distance=Vector3.Distance(transform.position,target.transform.position);

if( Physics.Raycast(transform.position, (target.transform.position -
transform.position).normalized, out hit, distance , layerMask)){

Debug.DrawLine(transform.position,hit.point,Color.red);


} else {
Debug.DrawLine(transform.position,target.transform.position,Color.blue);
}
}

If you haven't used raycasts before I won't go into the basics here but essentially it's the origin of the ray, the direction that we calculate using the origin and the target location, the variable we'll output the hit data to, the max distance of the ray which is calculated earlier as the distance between origin and target, and lastly the layer mask which is which layers this ray collides with. The layermask we've already defined in the start, it's set to 0 which is the default layer. This way you could have characters or entities on another layer and not have them stop the raycasts.

Add the script to a gameobject and create another gameobject to set as the target, make sure they are both at 10 z. Also set the raycaster's terrain variable to the gameobject containing the polygon generator.

If you run it now you should see a line drawn in red to the hit point if it collides and a blue line to the target if not.

The raycast hitting the terrain.
Now we'll use the location of the hit to figure out which block it is. So create a vector2 with the hit.point's x and y and then add the inverse of the hit's x and y normals. What this does is that it gives use the hit location and then moves it further into the block using the normals.
 if( Physics.Raycast(transform.position, (target.transform.position -
transform.position).normalized, out hit, distance , layerMask)){

Debug.DrawLine(transform.position,hit.point,Color.red);

Vector2 point= new Vector2(hit.point.x, hit.point.y); //Add this line
point+=(new Vector2(hit.normal.x,hit.normal.y))*-0.5f; //And this line

} else {
Debug.DrawLine(transform.position,target.transform.position,Color.blue);
}
}
What these lines do is that they take the position of the collision (hit.point) and create a new vector2 with the position, then we add to that Vector2 half of the reverse of the normal of the surface hit. The normal is the direction that would point straight away from the surface, so adding the reverse takes us 1 unit further into the block but half that takes us half a unit further in where we can round to the position of the block.

You won't see this but this is a visualization of the raycast to the hitpoint and then a line to the new point with the inverse normals added, you can see that it now ends up inside the block.
Now we'll set the block at this point to air:
tScript.blocks[Mathf.RoundToInt(point.x-.5f),Mathf.RoundToInt(point.y+.5f)]=0;

This goes after the vector2 point is defined and adjusted. It rounds the point's x and y to ints to that we can use them to choose points in the array. First though you have to subtract .5f from x and add .5f from y because of the terrain's offset from the world coordinates. You wouldn't need this if block 0,0's center was at 0,0 but it isn't.

Now to update the blocks but instead of just rebuilding and updating the mesh remotely we'll use the polygon generator's update to let it do it. Go back to the polygon generator and add a public bool called update.

public bool update=false;

Then create an Update function for the polygon generator. In the Update loop add this:
void Update(){
if(update){
BuildMesh();
UpdateMesh();
update=false;
}
}

This way we can set update to true remotely and the mesh will update but the best part is that even if several scripts change blocks they will and just change update to true but the mesh will only update once for all of them when its Update loop runs.

So set update to true for our polygon generator from the raycast script:
tScript.update=true;

The raycast should destroy one block per frame until it reaches it's target.
Sweet, now we have lasers. You could easily convert this to a part of a player script to run once and destry the block for example in front of the player.

Now that's not all though, sometimes you don't want to destroy a block at a specific point, you want to destroy all the blocks in a general area. For this we'll make a new script "ColliderExample". Give it the following variables:
public GameObject terrain;
private PolygonGenerator tScript;
public int size=4;
public bool circular=false;

And we'll use the same start code to get the Polygon Generator script
void Start () {
tScript=terrain.GetComponent("PolygonGenerator") as PolygonGenerator;
}
Because this is going to be removing a lot of blocks at once we'll make a RemoveBlock function:

bool RemoveBlock(float offsetX, float offsetY){
int x =Mathf.RoundToInt(transform.position.x+offsetX);
int y=Mathf.RoundToInt(transform.position.y+1f+offsetY);

if(x<tScript.blocks.GetLength(0) && y<tScript.blocks.GetLength(1) && x>=0 && y>=0){

if(tScript.blocks[x,y]!=0){
tScript.blocks[x,y]=0;
return true;
}
}
return false;
}

What we do here is very similar to the last remove block code we wrote only this time we also check first to see if the block is within the bounds of the array (in case our object is placed close to the edge). Then if the block isn't already air we just set the block to zero and return true to let the script that calls it know that a change was made.

Now in the update loop we'll run the remove block script for all the blocks in an area. I'll just paste in the whole chunk:
void Update () {


bool collision=false;
for(int x=0;x<size;x++){
for(int y=0;y<size;y++){
if(circular){

if(Vector2.Distance(new Vector2(x-(size/2),
y-(size/2)),Vector2.zero)<=(size/3)){

if(RemoveBlock(x-(size/2),y-(size/2))){

collision=true;
}

}
} else {

if(RemoveBlock(x-(size/2),y-(size/2))){

collision=true;
}
}

}
}
if( collision){
tScript.update=true;

}

}

So we run this for each block in a square of size by size, if the circular bool is true then first we check to see if the distance from the origin is smaller than one third the size to create a circular effect. Originally I used half the size consistent with everything else but I found that at low values some sides would be cut off so when set to circular the blast radius is smaller that otherwise. Then for both the circular and noncircular parts we remove the block at that point subtracting half the size (Because otherwise the object would be in the top left of the blast, this offsets it to the center) if the remove block function returns true we set the collision we defined earlier to true. After the loops if anything set collision to true we update the polygon generator, this way we don't update the mesh if nothing was removed.

Apply the script to a gameobject and you can do this.
Now you have both area and specific point block removers. You could even combine them and do this:

For explosive effects
Now I also promised creating blocks, this will work exactly like the raycast code. Make a new script called BlockPlaceExample and copy the contents of the raycast example there but replace the name with BlockPlaceExample.

Now all you have to change is instead of multiplying the normals that you add to the hit point by -0.5f you just multiply by 0.5f to get the block next to the block hit. And instead of setting it to air you set it to whatever you want. For example:


point+=(new Vector2(hit.normal.x,hit.normal.y))*0.5f;

tScript.blocks[Mathf.RoundToInt(point.x-.5f),Mathf.RoundToInt(point.y+.5f)]=1;


And instead of destroying a block every frame you will build one.

It looks kind of freaky.
Now instead of running it every frame you could run it once and instead of using a target just shoot it one meter to the left or right of the player and place a block!

And that's part 4, message me with any problems you find or feedback you think of. Follow me on twitter (@STV_Alex) or G+ to get updated when I post part five!

Completed code for the tutorial so far: http://netbook-game.blogspot.no/p/part-4-complete-code.html

Part 5
templates-office.com Tutorial, Unity, Voxel Tut, Voxels

Unity Voxel Tutorial Part 3: Perlin noise for terrain


Welcome to part three of the voxel tutorial. We'll be setting up the 2d game with some perlin noise to give the terrain some shape.
We'll get started by using perlin noise to create some varied terrain and caves from our blocks. Start by increasing the size of the block array to 96x128 so that we have some more room to work with. This is defined in the GenTerrain function. Also take away the old code that we used to generate terrain, the one that gave us 5 rows of blocks.

void GenTerrain(){
blocks=new byte[96,128];

for(int px=0;px<blocks.GetLength(0);px++){

for(int py=0;py<blocks.GetLength(1);py++){

}
}
}

To use perlin noise I like to use a separate function to call the Mathf.PerlinNoise unity function so that I can include things like scale and apply exponents with the parameters of my function. Here's that function:
int Noise (int x, int y, float scale, float mag, float exp){

return (int) (Mathf.Pow ((Mathf.PerlinNoise(x/scale,y/scale)*mag),(exp) ));

}

Perlin noise is an algorithm created by Ken Perlin to create gradient noise. Other people can explain it much better than me: This is a good source. But all you really need to know is that it returns values between 1 and 0 based on the values you enter. It can be used for numbers of dimentions far beyond what we need but the Unity function only takes two. For now that will be fine because this example is 2d.

What the function above does is it takes coordinates for x and y to sample for noise, then it calls the perlin noise function with those divided by scale. Because perlin noise isn't random but bases itself on the coordinates supplied then the closer those coordinates are to each other the more similar the values it returns. So when we divide the coordinates by a number they end up as smaller numbers closer to each other. (1,0) and (2,0) might return 0.5 and 0.3 respectively but if we divide them by two calling perlin noise for (0.5,0) and (1,0) instead the numbers might be 0.4 and 0.5. This will be more clear once we apply it to the terrain.

Then we take the value we get from perlin noise and multiply it by the magnitude "mag" because perlin noise returns a value between 0 and 1 and we are going to want noise that creates hills that vary in height by larger sizes like between 0 and 10. Then we take the result and put it to the power of the exponent "exp". This is useful for mountains and things. Lastly we convert the float returned into an int.

We'll apply this to the GenTerrain function column by column. By getting a number for perlin noise in the first loop (for each x) and then using that number in the y loop as the height of the terrain:

void GenTerrain(){
blocks=new byte[96,128];

for(int px=0;px<blocks.GetLength(0);px++){
int stone= Noise(px,0, 80,15,1);
stone+= Noise(px,0, 50,30,1);
stone+= Noise(px,0, 10,10,1);
stone+=75;

int dirt = Noise(px,0, 100,35,1);
dirt+= Noise(px,0, 50,30,1);
dirt+=75;

for(int py=0;py<blocks.GetLength(1);py++){
if(py<stone){
blocks[px, py]=1;


} else if(py<dirt) {
blocks[px,py]=2;
}


}
}
}


We create a stone int and a dirt int and using a few layers of perlin noise they get more textured values. Because this is essentially a 1d heightmap we only need x and the y variable can be used just to sample from a different area to make sure the results aren't the same. You can see the stone is three noise layers with different values.

Layer 1:
int stone= Noise(px,0, 80,15,1);

Layer one has a scale of 80 making it quite smooth with large rolling hills, the magnitude is 15 so the hills are at most 15 high (but in practice they're usually around 12 at the most) and at the least 0 and the exponent is 1 so no change is applied exponentially.

Layer 2:
stone+= Noise(px,0, 50,30,1);

The next layer has a smaller scale so it's more choppy (but still quite tame) and has a larger magnitude so a higher max height. This ends up being the most prominent layer making the hills.

Layer 3:
stone+= Noise(px,0, 10,10,1);

The third layer has an even smaller scale so it's even noisier but it's magnitude is 10 so its max height is lower, it's mostly for adding some small noise to the stone to make it look more natural. Lastly we add 75 to the stone to raise it up.

The dirt layer has to be mostly higher than the stone so the magnitudes here are higher but the scales are 100 and 50 which gives us rolling hills with little noise. Again we add 75 to raise it up.

The result is a noisy stone layer with highs and lows and a smooth dirt layer on top that's usually higher than the stone layer but sometimes the stone sticks out. You could also change the y value to offset the location of the noise sample. This is applied in the y loop where we change all blocks with a y below the stone int to stone and if they're higher than the stone (else) we check if y is below the dirt in and if so change the blocks to dirt.

Stone and dirt noise.
Also with noise we will add caves and spots of dirt in the stone. Surprisingly this is simpler than the dirt and stone layers. What we do is that in the if function for creating stone to a certain height we add another two ifs for caves and dirt so if the block is made into stone check to see if it should be a cave or a dirt spot instead. Here we'll use both x and y because the noise should be 2d.

void GenTerrain(){
blocks=new byte[96,128];

for(int px=0;px<blocks.GetLength(0);px++){
int stone= Noise(px,0, 80,15,1);
stone+= Noise(px,0, 50,30,1);
stone+= Noise(px,0, 10,10,1);
stone+=75;

print(stone);

int dirt = Noise(px,0, 100f,35,1);
dirt+= Noise(px,100, 50,30,1);
dirt+=75;


for(int py=0;py<blocks.GetLength(1);py++){
if(py<stone){
blocks[px, py]=1;

//The next three lines make dirt spots in random places
if(Noise(px,py,12,16,1)>10){
blocks[px,py]=2;

}

//The next three lines remove dirt and rock to make caves in certain places
if(Noise(px,py*2,16,14,1)>10){ //Caves
blocks[px,py]=0;

}

} else if(py<dirt) {
blocks[px,py]=2;
}


}
}
}

So you see inside the stone if ( if(py<stone) ) we also have an if that compares noise with 10 so if the noise we return is larger than 10 it turns the block to dirt instead of stone. The magnitude of the noise value is 16 so it reruns a over 10 only a little of the time and the scale is fairly low so the spots are pretty small and frequent. We're using x and y here and running the if for every block so the dirt is distributed through the whole array.

After that we add caves with a similar function but we multiply y by two to stretch out the caves so they are wider than they are tall and we use a larger scale to make larger less frequent caves and the magnitude is lower to reduce the size of the caves that was increased by the scale.

Now you should get caves and dirt spots.
The caves and spots are pretty evenly distributed, I like to use y to change the scale and magnitude for both to make caves more likely and large the lower you go and the opposite for dirt spots but that's all taste. You can also use similar functions to add things like ores and things.

Thanks for reading part 3, let me know about any problems you find or feedback you think of. Follow me on twitter (@STV_Alex) or G+ to get updated when I post part four. It should be out very shortly, part three was actually going to include it but I decided to split them up, anyway in that one we'll be destroying and placing blocks!

Edit: Thanks again to Taryndactyl! Taryndactyl's post: Link

Part 4
templates-office.com Terrain Generation, Tutorial, Unity, Voxel Tut, Voxels
Minggu, 25 Agustus 2013

Unity Voxel Tutorial Part 2: Level Array and Collision Meshes


Now that we've managed to display one square a lot of the work is done, we just have to find a good way to use that code a few thousand times based on some kind of level information. We'll also be adding in collision meshes for blocks exposed to air.

We'll start off by taking the code we wrote yesterday and splitting it up into more manageable chunks. First of all the end of the code in our last part is used to update the mesh component of the game object. This will be separated into its own function so that we can run it once the entire mesh is planned.

 void UpdateMesh () {
mesh.Clear ();
mesh.vertices = newVertices.ToArray();
mesh.triangles = newTriangles.ToArray();
mesh.uv = newUV.ToArray();
mesh.Optimize ();
mesh.RecalculateNormals ();
}

Now in addition, put all the new* lines in their own function with parameters for the position and texture. We'll be making some changes to the code then using it to call for every square we want to generate with unique positions textures assigned to them.

void GenSquare(int x, int y, Vector2 texture){
newVertices.Add( new Vector3 (x , y , z ));
newVertices.Add( new Vector3 (x + 1 , y , z ));
newVertices.Add( new Vector3 (x + 1 , y-1 , z ));
newVertices.Add( new Vector3 (x , y-1 , z ));

newTriangles.Add(0);
newTriangles.Add(1);
newTriangles.Add(3);
newTriangles.Add(1);
newTriangles.Add(2);
newTriangles.Add(3);

newUV.Add(new Vector2 (tUnit * tStone.x, tUnit * tStone.y + tUnit));
newUV.Add(new Vector2 (tUnit * tStone.x + tUnit, tUnit * tStone.y + tUnit));
newUV.Add(new Vector2 (tUnit * tStone.x + tUnit, tUnit * tStone.y));
newUV.Add(new Vector2 (tUnit * tStone.x, tUnit * tStone.y));
}

To make this code work on a larger scale we'll have to make some changes. Because we are using lists opposed to arrays there's a lot less work because we're using the .Add() command to add a lot of the info which appends to the end of the list but the triangles list refers to specific indexes in the vertices array which means that while the first 6 entries might be 0,1,3,1,2,3 after we get to the 150th square it might have to be something like 1000,1001,1003,1001,1002,1003. To address this we'll add a new variable to the script, "squareCount". This will be an int that keeps track of which square we're on so how much we have to add to the ints we send to the triangles.

  public class PolygonGenerator : MonoBehaviour {

public List<vector3> newVertices = new List<vector3>();
public List<int> newTriangles = new List<int>();
public List<vector2> newUV = new List<vector2>();

private Mesh mesh;

private float tUnit = 0.25f;
private Vector2 tStone = new Vector2 (1, 0);
private Vector2 tGrass = new Vector2 (0, 1);

private int squareCount;


Then we change the new GenSquare function to use this variable. What we do is add (squareCount*4) to each number we .Add() to newTriangles. This needs to be done because the numbers we add to newTriangles are referring to the newVerticies we added 2 lines up. Earlier we didn't need this because with only one set of 4 vertices we knew exactly which vertices to point to in newTriangles but now that we're planning on adding several squares we need each time we call this function for for the numbers added to newTriangles to be incremented by new number for newVertices added each time. To make squareCount accurately show how many squares in we are we also need to add a squareCount++; to the bottom of the function.

Also replace all the references to tStone with texture. Now when we call the function we'll call it with the desired texture as a parameter that will be used for that square.
 
void GenSquare(int x, int y, Vector2 texture){

newVertices.Add( new Vector3 (x , y , 0 ));
newVertices.Add( new Vector3 (x + 1 , y , 0 ));
newVertices.Add( new Vector3 (x + 1 , y-1 , 0 ));
newVertices.Add( new Vector3 (x , y-1 , 0 ));

newTriangles.Add(squareCount*4);
newTriangles.Add((squareCount*4)+1);
newTriangles.Add((squareCount*4)+3);
newTriangles.Add((squareCount*4)+1);
newTriangles.Add((squareCount*4)+2);
newTriangles.Add((squareCount*4)+3);

newUV.Add(new Vector2 (tUnit * texture.x, tUnit * texture.y + tUnit));
newUV.Add(new Vector2 (tUnit*texture.x+tUnit, tUnit*texture.y+tUnit));
newUV.Add(new Vector2 (tUnit * texture.x + tUnit, tUnit * texture.y));
newUV.Add(new Vector2 (tUnit * texture.x, tUnit * texture.y));

squareCount++;

}

Also go ahead and reset the squareCount at the end of the UpdateMesh function we made earlier with squareCount=0; so that the next time we generate the mesh the count starts at 0 and add in clear commands for all our lists so that we can start again without adding on top of existing data.

 
void UpdateMesh () {
mesh.Clear ();
mesh.vertices = newVertices.ToArray();
mesh.triangles = newTriangles.ToArray();
mesh.uv = newUV.ToArray();
mesh.Optimize ();
mesh.RecalculateNormals ();

squareCount=0;
newVertices.Clear();
newTriangles.Clear();
newUV.Clear();

}

Now let's start making more squares. We're going to make a 2d array to store block information so add a 2d byte array called blocks to the script.
 
public byte[,] blocks;

A byte array is an easy choice for level information. It supports numbers 0-255 so that's a lot of blocks and it saves us the hassle of using enumerators. What we'll do is have 0 be air, 1 is rock and 2 is grassand that should be enough for now.

We'll need a way to build this array into something other than blank space so create a function called GenTerrain. In the next part we'll do some basic perlin noise operations for generating terrain but for now we'll do half air half rock.
 
void GenTerrain(){
blocks=new byte[10,10];

for(int px=0;px<blocks.GetLength(0);px++){
for(int py=0;py<blocks.GetLength(1);py++){
if(py==5){
blocks[px,py]=2;
} else if(py<5){
blocks[px,py]=1;
}
}
}
}

This makes blocks a 10x10 array then goes through each block making any block with a y less that 5 into rock and the row at 5 into grass. Now we need to make a function that will read our block array and build blocks based on it. We'll make another function called BuildMesh to do this.

 
void BuildMesh(){
for(int px=0;px<blocks.GetLength(0);px++){
for(int py=0;py<blocks.GetLength(1);py++){

if(blocks[px,py]==1){
GenSquare(px,py,tStone);
} else if(blocks[px,py]==2){
GenSquare(px,py,tGrass);
}

}
}
}

Now this function really just runs through every block in the array and if the byte is 1 it creates runs the GenSquare function using the array index as the position and stone as the texture and if the byte is 2 it does the same with a grass texture.

Now for us to test this we just need to add the following to the start function to run all of these functions at game start:
 
GenTerrain();
BuildMesh();
UpdateMesh();

Now in unity you should be able to run and you'll see this:

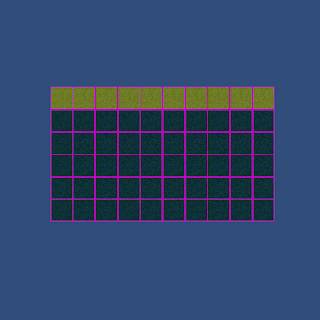
Might need to add some proper textures soon.
You can also make the array bigger or smaller or mess with the GenTerrain function to get some cool effects.
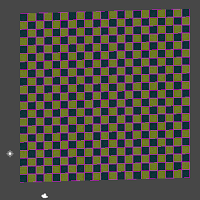
For example.
Now I also promised collision meshes in this part. Collision meshes are really exactly the same as the meshes we made so far just without the textures. They also can't face the camera like the block textures do, they'll have to face up, left, right and down. We can't just go and add collision meshes to every block in the scene though because most of these are surrounded by other blocks, if there's no way to get to a block there's no need to spend time making it solid.

We'll start just making the colliders and think about how to implement them later. For testing you'll want to make your block array into a 1x1 array. Also make new variables colVertices and colTriangles, a new int colCount and a MeshCollider.
 

public List<Vector3> colVertices = new List<Vector3>();
public List<int> colTriangles = new List<int>();
private int colCount;

private MeshCollider col;

To use the MeshCollider you'll have to define it in Start() with:
 
col = GetComponent<MeshCollider> ();

And the UpdateMesh() function will need a few additions, firstly we make a temporary mesh to apply the collision mesh data to and then we apply it to the collision mesh. Then like with the other lists we need to clear the collision lists and reset the counter.
 

Mesh newMesh = new Mesh();
newMesh.vertices = colVertices.ToArray();
newMesh.triangles = colTriangles.ToArray();
col.sharedMesh= newMesh;

colVertices.Clear();
colTriangles.Clear();
colCount=0;

On to actually making the mesh, we're going to let collider generation happen in it's own function that we'll call for each block when we update the mesh so make a function called GenCollider with the parameters (int x, int y):

void GenCollider(int x, int y){

}

We're now going to make squares just like before except that these will face up, left, right and down to make the squares we've drawn already be solid. You can probably guess what the code is going to look like. We'll be using colVertices and colTriangles instead of newVertices and newTriangles and we won't by using UVs because a collision model doesn't need a texture but otherwise these squares are made in the same way as our textures square.

We'll start with just a top collider, put this in your GenCollider function:
//Top
colVertices.Add( new Vector3 (x , y , 1));
colVertices.Add( new Vector3 (x + 1 , y , 1));
colVertices.Add( new Vector3 (x + 1 , y , 0 ));
colVertices.Add( new Vector3 (x , y , 0 ));

colTriangles.Add(colCount*4);
colTriangles.Add((colCount*4)+1);
colTriangles.Add((colCount*4)+3);
colTriangles.Add((colCount*4)+1);
colTriangles.Add((colCount*4)+2);
colTriangles.Add((colCount*4)+3);

colCount++;


And call the GenCollider function for every block by putting it in the BuildMesh function in the for loops along with an if to check if the block is air:
 void BuildMesh(){
for(int px=0;px<blocks.GetLength(0);px++){
for(int py=0;py<blocks.GetLength(1);py++){

//If the block is not air
if(blocks[px,py]!=0){

// GenCollider here, this will apply it
// to every block other than air
GenCollider(px,py);

if(blocks[px,py]==1){
GenSquare(px,py,tStone);
} else if(blocks[px,py]==2){
GenSquare(px,py,tGrass);
}
}//End air block check
}
}
}

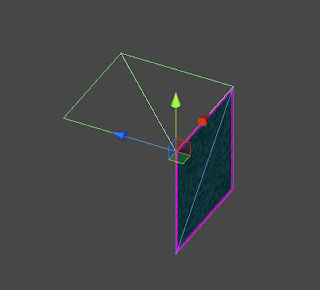
Your scene view should show this when run now. One face with an upward facing collider behind it.
Edit: Taryndactyl pointed out that displaying mesh colliders may be turned off by default in the editor, if you don't see a collider like above check Mesh Colliders in the gizmos menu:


So that code was just defining the points of the square and then creating the triangle data. The colCount is the same as the squareCount was to the last mesh code we did. Now I'll lay out the code for the other sides, there's really not much to learn in what numbers the vertices should be using; for me at least it's mostly a lot of trial and error, scribbling on paper and trying to visualize the four points' coordinates to figure out where each mesh should have its vertices. As long as you understand that each colVertices is a coordinate in 3d space that a corner of the cube uses and that the side that's facing you when you put down the triangle coordinates clockwise will be the solid one you've got it.

Before we add the other sides though let's move the triangle code to it's own small function because we're going to be using it so much, call it ColliderTriangles:
 void ColliderTriangles(){
colTriangles.Add(colCount*4);
colTriangles.Add((colCount*4)+1);
colTriangles.Add((colCount*4)+3);
colTriangles.Add((colCount*4)+1);
colTriangles.Add((colCount*4)+2);
colTriangles.Add((colCount*4)+3);
}

Good, now we can call that function instead of writing it out four times. Now all the sides for the collider should look like this:
void GenCollider(int x, int y){

//Top
colVertices.Add( new Vector3 (x , y , 1));
colVertices.Add( new Vector3 (x + 1 , y , 1));
colVertices.Add( new Vector3 (x + 1 , y , 0 ));
colVertices.Add( new Vector3 (x , y , 0 ));

ColliderTriangles();

colCount++;

//bot
colVertices.Add( new Vector3 (x , y -1 , 0));
colVertices.Add( new Vector3 (x + 1 , y -1 , 0));
colVertices.Add( new Vector3 (x + 1 , y -1 , 1 ));
colVertices.Add( new Vector3 (x , y -1 , 1 ));

ColliderTriangles();
colCount++;

//left
colVertices.Add( new Vector3 (x , y -1 , 1));
colVertices.Add( new Vector3 (x , y , 1));
colVertices.Add( new Vector3 (x , y , 0 ));
colVertices.Add( new Vector3 (x , y -1 , 0 ));

ColliderTriangles();

colCount++;

//right
colVertices.Add( new Vector3 (x +1 , y , 1));
colVertices.Add( new Vector3 (x +1 , y -1 , 1));
colVertices.Add( new Vector3 (x +1 , y -1 , 0 ));
colVertices.Add( new Vector3 (x +1 , y , 0 ));

ColliderTriangles();

colCount++;

}

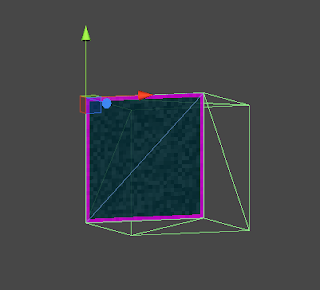
You should see this; all four colliders.
Now, we have a working square with colliders. if you were to extend the size of the array for more squares however, you would run into an efficiency problem because every solid square is creating eight triangles. That's a lot more than we need so we need a way to only make these colliders when they face an empty block. For that we'll need a function to check the contents of a block.
 byte Block (int x, int y){

if(x==-1 || x==blocks.GetLength(0) || y==-1 || y==blocks.GetLength(1)){
return (byte)1;
}

return blocks[x,y];
}
This is a simple function that checks if the block you're checking is within the array's boundaries, if not it returns 1 (Solid rock) otherwise it returns the block's value. This means that we can use this places where we're not sure that the block we're checking is within the level size. We'll use this in the collider function.

This is done by surrounding every collider side generation with an if that checks in the direction of the collider. ie. the left collider is only generated if the block to this block's left is air. Do it like this:
 void GenCollider(int x, int y){

//Top
if(Block(x,y+1)==0){
colVertices.Add( new Vector3 (x , y , 1));
colVertices.Add( new Vector3 (x + 1 , y , 1));
colVertices.Add( new Vector3 (x + 1 , y , 0 ));
colVertices.Add( new Vector3 (x , y , 0 ));

ColliderTriangles();

colCount++;
}

//bot
if(Block(x,y-1)==0){
colVertices.Add( new Vector3 (x , y -1 , 0));
colVertices.Add( new Vector3 (x + 1 , y -1 , 0));
colVertices.Add( new Vector3 (x + 1 , y -1 , 1 ));
colVertices.Add( new Vector3 (x , y -1 , 1 ));

ColliderTriangles();
colCount++;
}

//left
if(Block(x-1,y)==0){
colVertices.Add( new Vector3 (x , y -1 , 1));
colVertices.Add( new Vector3 (x , y , 1));
colVertices.Add( new Vector3 (x , y , 0 ));
colVertices.Add( new Vector3 (x , y -1 , 0 ));

ColliderTriangles();

colCount++;
}

//right
if(Block(x+1,y)==0){
colVertices.Add( new Vector3 (x +1 , y , 1));
colVertices.Add( new Vector3 (x +1 , y -1 , 1));
colVertices.Add( new Vector3 (x +1 , y -1 , 0 ));
colVertices.Add( new Vector3 (x +1 , y , 0 ));

ColliderTriangles();

colCount++;
}

}

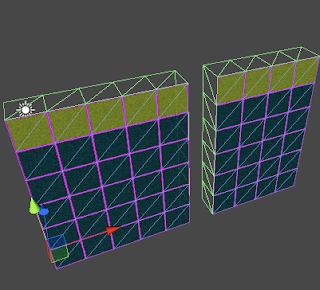
Now when you run it you should get a much more efficient collision mesh, go ahead and switch the array size back to 10 by 10.

Colliders only along the top where the blocks are exposed to air.
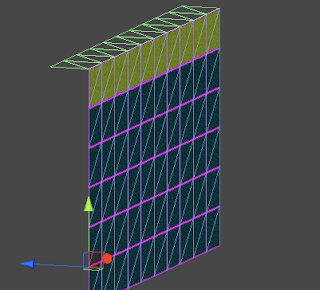
With changes to the GenTerrain function you can see the side colliders in action too:

Hmm... these are almost starting to look like cubes
If you want you can do the same to the block visuals as with the colliders and not render (Or render a different texture for) blocks that aren't exposed to air in order to hide ores and things. I'll let you figure that out.

That concludes part two, as always if there are any problems please leave a comment as soon as possible and I'll fix it. I'm open for any feedback. Feel free to follow me on twitter (@STV_Alex) or G+ to get updated when I post part three.

Here is a complete version of the code as of the end of part 2: Part 2 finished code

Next time we'll be using perlin noise to make more interesting terrain, caves and ores and adding functions to build/destroy blocks based on mouse clicks or collisions with the blocks (Like when a character hits a block with a hammer for example).

Edit: Thanks again to Taryndactyl on the unity forums and thanks to Wolli in the comments for pointing out some errors! Taryndactyl's post: Link

Part 3
templates-office.com Tutorial, Unity, Voxel Tut, Voxels