Kamis, 24 Oktober 2013

I seem to have finally managed finite water (And infinite water)

It's a good thing voxel water looks so pretty with the amount of posts on this blog dedicated to it. Some of the first posts here are about my failed experiments with finite water including the spectacular infinite water bug that created a tidal wave of infinitely expanding water. Well, now that I've managed to create a stable water simulation I was also able to optimize enough to turn that old bug into a feature, infinite water is back:

An unrelenting wall of infinitely expanding water
The entire rendered area can flood without so much as a hiccup in the frame rate. Of course the main focus of this system is realistic water so that's possible too like I showed in the last post but I've fixed up the meshing to give the water sides. Also pictured above are hard shadows from a directional light (Unity Free).


Water is a really fun system to implement, it's one thing that really lets you use a voxel system to its full potential. The real joy with voxels for me at least is having complex systems that are visually represented but are completely dynamic and reactive and that a programmer can build from the ground up as simple rules and relationships between blocks.
While I won't go through my water approach step by step in a tutorial part I'll sit down and write up some pointers from my experience setting this up and researching it that might help anyone else trying to make their own system.
templates-office.com Voxels
Senin, 21 Oktober 2013

Unity Voxels: water experiments

I've tried water so many times when working with voxels and I've always had trouble making a semi realistic simulation that runs at an acceptable speed. I've been having a go at it now, creating finite water simulation and it's performing quite well.

Stable water in a 1 block deep puddle
Water running down the hillside
Still very much a prototype but water height is based on the amount in the block.
So this probably won't make it into the tutorial, it's a little complicated to explain and water I think is best implemented on a case by case basis but I really recommend trying it out, it's a lot of fun!

Meanwhile I've also been adding chunk loading and unloading around the player to let the game run larger maps without lag so that will probably be in the next part I release, then I'm thinking lighting or spending a little more time generating the terrain and additions like structures being generated.
templates-office.com Voxels
Jumat, 18 Oktober 2013

DMC(Devil May Cry)


Developers       : Ninja Theory, QLOC
Publishers        : Capcom
Producers         : Motohide Eshiro,dkk
Release Date    : January 25, 2013
Engine             : Unreal Engine 3
Genre              : Action-Adventure
Theme             : Horor,Thriller,Fantasy
ESRB                : MATURE
Platform           : PlayStation 3, Xbox 360, PC


DmC: Devil May Cry adalah game yang dikembangkan oleh Ninja Theory dan diterbitkan oleh Capcom untuk konsol Xbox 360, PlayStation 3, dan PC. Game ini merupakan seri ke-5 (atau sering disebut versi reboot) dari franchise game Devil May Cry.

Game ini mengisahkan tentang seorang pemuda bernama Dante yang lahir dari keturunan setan dipihak ayah,malaikat di pihak ibu dan mempunyai saudara kandung bernama Vergil. Dante dan Vergil adalah Nephilim yaitu peranakan setan malaikat yang memiliki percampuran dua kekuatan setan,malaikat. Mereka hidup di kota limbo yang dihuni oleh beberapa setan-setan yang menyamar menjadi manusia yang dikuasai oleh makhluk yang paling jahat yaitu Mundus,raja iblis dan hanya Nephilim yang mampu mengalahkannya. Dante dan Vergil dua bersaudara berkerja sama untuk menghentikan Mandus yang mengontrol dunia melalui cara-cara yang modern pada saat ini seperti: pengawasan keamanan, media berita, utang, hiburan dan pangan seperti minuman ringan.

Gambar 1. Pertempuran dengan Boss  

Pemain memerankan Dante untuk bertarung melawan musuh melalui combo serangan yang dilengkapi dengan alat-alat senjata seperti pedang Rebellion,pistol Ebony & Ivory, kampak Arbiter dan senjata lainnya. Pemain dapat menyesuaikan serangan dengan mengganti mode setan,malaikat dan manusia untuk mendapatkan nilai score yang tinggi. Semakin banyak kombinasi serangan yang dilancarkan maka semakin tinggi score yang didapatkan. Ketika menggunakan mode malaikat maka pedang dante akan berubah menjadi Osiris,yaitu jenis senjata seperti kapak sabit dengan gerakan yang cepat dan sangat efektif untuk pertarungan dengan jumlah musuh yang banyak. Sementara mode setan pedang akan berubah menjadi Arbiter. Arbiter yaitu senjata seperti kapak dengan gerakan serangan lebih lambat akan tetapi lebih kuat. Mode ini juga mengubah mobilitas Dante,dengan menggunakan mode malaikat memungkinkan Dante untuk menarik diri ke musuh dan ke berbagai titik di setiap tingkat, sementara mode setan memungkinkan Dante menarik musuh dan benda ke arahnya. Ketika daya bertarung Dante telah mencukupi maka Dante dapat mengaktifkan Devil Trigger yang memperlambat waktu di sekelilingnya dan musuh akan melayang ke udara yang memungkinkan dia untuk melakukan serangan yang lebih kuat terhadap musuhnya. Dante dapat mengumpulkan berbagai jenis item jiwa yang dapat digunakan untuk memulihkan kesehatan, membeli item pendukung  dan upgrade pergerakan serangan tempur Dante. Pada Game ini juga terdapat dua alam yang dapat dimasuki dante ketika berpetualang menjalankan misinya yaitu alam manusia dan alam ghaib.


Gambar 2.Serangan Arbiter(mode setan) dengan efek pukulannya

Gambar 3. Serangan Osiris(mode malaikat) dengan peringkat style B

Gambar 4. Serangan Arbiter(mode setan) dengan peringkat style SS

Game DMC ini menurut saya sangat menarik, karena menyuguhkan desain dan pergerakan yang luar biasa dengan efek-efek serangannya yang memikau serta perpaduan kombinasi serangan yang bertubi tubi yang harus dilakukan untuk mendapatkan peringkat style serangan selama pertempuran dengan standar nilai dari terendah dimulai D,C,B,A,S,SS, hingga peringkat SSS yang tertinggi, oleh karena itu dibutuhkan keahlian dalam memainkan game ini seperti mengontrol pergerakan karakter sesuai scenario yang telah dirancang dalam hal ini seperti terbang(mode malaikat),menarik diri ke benda atau musuh(mode malaikat),menarik musuh untuk mendekat(mode setan) dan masih banyak lagi, serta kecepatan tangan untuk melakukan serangan dan menghindar dari serangan musuh dengan cara mengklik mouse/keyboard dengan kombinasi tombol yang telah ditentukan. Lalu alur cerita yang menarik untuk diikuti yang membuat para pemain penasaran.


NAMA  : Iqbal Abrian.Z 
NRP       : 5110100139
Abrian Ianz

Buat Lencana Anda


The Cave


The Cave adalah puzzle-platform/adventure video game yang dikembangkan oleh Double Fine Productions dan didistribusikan oleh Sega pada Januari 2013 untuk PlayStation 3, Xbox 360 dan Wii U dan pada Steam untuk Microsoft Windows, Mac OS X dan Linux.

Gameplay
Game ini menceritakan tentang petualangan sekelompok orang dalam menelusuri gelapnya sebuah gua. Dalam gua tersebut berisi berbagai benda yang belum pernah kamu temui sebelumnya. Gameplay dari game ini adalah kita harus menyelesaikan puzzle yang ada diiringi dengan cerita yang lucu sesuai dengan karakter yang kita pilih pada awal permainan. Beberapa Cave (gua) hanya biasa diakses oleh karakter tertentu sesuai dengan ceritanya. 


Kita bisa menyusun tim yang terdiri dari 3 orang untuk memainkan game ini dengan keunikan karakter yang berbeda-beda. Sementara, jumlah karakter yang bisa dipilih yaitu 7 orang. Karakter tersebut adalah Monk, Adventurer, Scientist, Twins, Knight, Hillbilly, dan Time Traveler. Setiap karakter memiliki kemampuan yang unik sesuai dengan karakternya.


Alasan mengapa saya memilih game ini sebagai game terbaik adalah karena game ini memiliki story yang menarik dari setiap karakternya dan masing-masing dari mereka juga memiliki kemampuan yang unik sesuai dengan karakternya. Selain itu game ini memiliki puzzle yang cukup sulit untuk dipecahkan karena membutuhkan kerjasama dari ketiga karakter yang sudah dipilih pada awal permainan.


Untuk video bisa dilihat disini:

Klasifikasi:
Genre: Puzzle Advanture
Theme: Fantasy
ESRB rating: Remaja
Platform: PlayStation 3, Xbox 360 and Wii, Steam untuk Microsoft Windows, Mac OS X dan Linux


Facebook Badge
Kessya Din Dalmi | Create your badge
Rabu, 16 Oktober 2013

Unity Voxel Tutorial Part 7: Modifying the terrain


I went ahead and added block breaking and block placing to make our chunks interactive.


This tutorial is about editing the terrain similar to part 4 but in 3d. First of all we're going to change the scripts we've already written a little bit. If I had been smarter I would have written them this way in the first place but I didn't think ahead.

In Chunk.cs the change is simple, make the GenerateMesh function public so we can call it whenever we make changes to a mesh.
public void GenerateMesh(){ //Made this public

In World.cs our changes are bigger, we're changing the chunks array from a GameObject array to a Chunk array because we don't actually need access to the gameobjects we need access to the chunk scripts. And we're offsetting the positions the chunks are created at because if you remember in the 2d prototype whenever we checked the position of a block we had to offset the point of collision before we could round to get the block position. This time we're doing it right and just making sure the center of every block is its x,y,z position.

We'll start with the position change, in the instatiate line for the chunks we'll add offsets to each axis:
chunks[x,y,z]=Instantiate(chunk,
new Vector3(x*chunkSize-0.5f,y*chunkSize+0.5f,z*chunkSize-0.5f),
new Quaternion(0,0,0,0)) as GameObject;
See how after x*chunkSize I have -0.5f? That's the offset, -0.5 to x, +0.5 to y and -0.5 to z.

Now we'll change that chunks array, change it in the variable definition first:
public Chunk[,,] chunks;  //Changed from public GameObject[,,] chunks;

Next change the line where we define the size of the array:
  chunks=new Chunk[Mathf.FloorToInt(worldX/chunkSize),
Mathf.FloorToInt(worldY/chunkSize),Mathf.FloorToInt(worldZ/chunkSize)];
Just change the chunks= new GameObject... to chunks=new Chunk...

Now all the stuff in those for loops below is wrong so we need to switch some stuff around:
//Create a temporary Gameobject for the new chunk instead of using chunks[x,y,z]
GameObject newChunk= Instantiate(chunk,new Vector3(x*chunkSize-0.5f,
y*chunkSize+0.5f,z*chunkSize-0.5f),new Quaternion(0,0,0,0)) as GameObject;

//Now instead of using a temporary variable for the script assign it
//to chunks[x,y,z] and use it instead of the old \"newChunkScript\"
chunks[x,y,z]= newChunk.GetComponent(\"Chunk\") as Chunk;
chunks[x,y,z].worldGO=gameObject;
chunks[x,y,z].chunkSize=chunkSize;
chunks[x,y,z].chunkX=x*chunkSize;
chunks[x,y,z].chunkY=y*chunkSize;
chunks[x,y,z].chunkZ=z*chunkSize;

Ok great! Sorry about that but now it's done. Now we can get started, create a new script called "ModifyTerrain.cs" and open it. This script is going to have a collection of functions for adding and removing blocks. We'll set it up by creating all the functions first and then writing what they do after.
public void ReplaceBlockCenter(float range, byte block){
//Replaces the block directly in front of the player
}

public void AddBlockCenter(float range, byte block){
//Adds the block specified directly in front of the player
}

public void ReplaceBlockCursor(byte block){
//Replaces the block specified where the mouse cursor is pointing
}

public void AddBlockCursor( byte block){
//Adds the block specified where the mouse cursor is pointing
}

public void ReplaceBlockAt(RaycastHit hit, byte block) {
//removes a block at these impact coordinates, you can raycast against the terrain and call this with the hit.point
}

public void AddBlockAt(RaycastHit hit, byte block) {
//adds the specified block at these impact coordinates, you can raycast against the terrain and call this with the hit.point
}

public void SetBlockAt(Vector3 position, byte block) {
//sets the specified block at these coordinates
}

public void SetBlockAt(int x, int y, int z, byte block) {
//adds the specified block at these coordinates
}

public void UpdateChunkAt(int x, int y, int z){
//Updates the chunk containing this block
}


That's a lot of functions but the way this is going to work is that if the player calls one of the top functions like ReplaceBlockCursor(block) it runs and then calls ReplaceBlockAt(RaycastHit, block) that runs and calls SetBlockAt (vector3, block) which calls SetBlockAt(int,int,int, block) which sets the block and calls UpdateChunkAt. So if you have a reason to you can set a block by its coordinates or you can just send collision data to the script or you can just call a function to remove the block in front of the player.

Now we also need access to some other things so add the following variables:
World world;
GameObject cameraGO;

And we'll assign those in the start function. We can get the world script  with gameObject.getComponent because we'll place both scripts on the same game object and we'll get the camera by its tag.

void Start () {

world=gameObject.GetComponent("World") as World;
cameraGO=GameObject.FindGameObjectWithTag("MainCamera");

}

Now we can start with the functions, let's start with SetBlockAt(int,int,int,block), here we just change the value in the data array in World.cs and run UpdateChunk:
public void SetBlockAt(int x, int y, int z, byte block) {
//adds the specified block at these coordinates

print("Adding: " + x + ", " + y + ", " + z);


world.data[x,y,z]=block;
UpdateChunkAt(x,y,z);

}

Let's get UpdateChunkAt while we're at it, we need to derive which chunk the block is in from its coordinates and run an update on that block. For now we'll just update the block immediately to get it working but this is an inefficient method because often the player will be editing multiple blocks in the same chunk in a single frame and this way we generate the mesh again for each change. Later we'll switch to setting a flag in the chunk and then updating the chunk if the flag is set at the end of the frame.
//To do: add a way to just flag the chunk for update then it update it in lateupdate
public void UpdateChunkAt(int x, int y, int z){
//Updates the chunk containing this block

int updateX= Mathf.FloorToInt( x/world.chunkSize);
int updateY= Mathf.FloorToInt( y/world.chunkSize);
int updateZ= Mathf.FloorToInt( z/world.chunkSize);

print(\"Updating: \" + updateX + \", \" + updateY + \", \" + updateZ);

world.chunks[updateX,updateY, updateZ].GenerateMesh();

}

So what we do is take each axis, divide the value by the chunk size and this gives us a value that used to be between 0 and (world width) as a value between 0 and (number of chunks on this axis) so when we round to the nearest whole number we round to the closed chunk index.

Continuing to work our way up move to SetBlockAt(Vector3, block) This takes a vector3 and finds the nearest block by rounding the float components of the vector3 to ints:
public void SetBlockAt(Vector3 position, byte block) {
//sets the specified block at these coordinates

int x= Mathf.RoundToInt( position.x );
int y= Mathf.RoundToInt( position.y );
int z= Mathf.RoundToInt( position.z );

SetBlockAt(x,y,z,block);
}

Now the RaycastHit functions, these will take a collision and find either the block collided with or the one next to the one collided with for placing blocks where you're looking. Lets start first with ReplaceBlockAt(RaycastHit, block):
public void ReplaceBlockAt(RaycastHit hit, byte block) {
//removes a block at these impact coordinates, you can raycast against the terrain and call this with the hit.point
Vector3 position = hit.point;
position+=(hit.normal*-0.5f);

SetBlockAt(position, block);
}

This takes the impact coordinates of a raycast and finds the block it hit by moving the point inwards into the block so that when we round it it's within the cube and is rounded to its coordinates. hit.normal is the outwards direction of the surface it hit so the reverse of that in the direction into the cube. Therefore we take the hit position and add to it the half the reverse normal (Half so that it doesn't come out the other end of the block). This places the point within the bounds of the cube so we send it off to SetBlockAt(Vector3, block).

The other RaycastHit function, AddBlockAt(RaycastHit,block) is very similar only that it doesn't invert the normal because it places a block at the block next to the block hit so we move the impact position outwards from the surface hit and run SetBlockAt(Vector3, block):
public void AddBlockAt(RaycastHit hit, byte block) {
//adds the specified block at these impact coordinates, you can raycast against the terrain and call this with the hit.point
Vector3 position = hit.point;
position+=(hit.normal*0.5f);

SetBlockAt(position,block);

}

Now that we have ways to handle raycast information we should carry out some raycasts, start with the cursor functions. These are only different in what function they call after they're done and they're pretty standard raycast from mouse position functions:
 public void ReplaceBlockCursor(byte block){
//Replaces the block specified where the mouse cursor is pointing

Ray ray = Camera.main.ScreenPointToRay (Input.mousePosition);
RaycastHit hit;

if (Physics.Raycast (ray, out hit)) {

ReplaceBlockAt(hit, block);
Debug.DrawLine(ray.origin,ray.origin+( ray.direction*hit.distance),
Color.green,2);

}

}

public void AddBlockCursor( byte block){
//Adds the block specified where the mouse cursor is pointing

Ray ray = Camera.main.ScreenPointToRay (Input.mousePosition);
RaycastHit hit;

if (Physics.Raycast (ray, out hit)) {

AddBlockAt(hit, block);
Debug.DrawLine(ray.origin,ray.origin+( ray.direction*hit.distance),
Color.green,2);
}

}

We define a ray using the mouse position, then use that to raycast and send the information with the RaycastHit functions.

The last two functions, the center functions are very similar to the last two just that the ray is derived from the camera position and rotation not taking into account the position of the mouse and these functions take a range parameter which stops the function if the terrain is beyond range:
 public void ReplaceBlockCenter(float range, byte block){
//Replaces the block directly in front of the player

Ray ray = new Ray(cameraGO.transform.position, cameraGO.transform.forward);
RaycastHit hit;

if (Physics.Raycast (ray, out hit)) {

if(hit.distance<range){
ReplaceBlockAt(hit, block);
}
}

}

public void AddBlockCenter(float range, byte block){
//Adds the block specified directly in front of the player

Ray ray = new Ray(cameraGO.transform.position, cameraGO.transform.forward);
RaycastHit hit;

if (Physics.Raycast (ray, out hit)) {

if(hit.distance<range){
AddBlockAt(hit,block);
}
Debug.DrawLine(ray.origin,ray.origin+( ray.direction*hit.distance),Color.green,2);
}

}


You can test all this by adding this to the update loop:
if(Input.GetMouseButtonDown(0)){
ReplaceBlockCursor(0);
}

if(Input.GetMouseButtonDown(1)){
AddBlockCursor(1);
}

You should be able to place and remove blocks but you might notice that sometimes it seems to glitch and you can see through the terrain after a block is removed. What's happening here is that after you remove a block and update the chunk it updates fine but if the block is on the border with another chunk then that chunk still won't update meaning the side of the now exposed block in the neighbor chunk won't get drawn.

To fix this we need to get back to the chunk update script which we were going to change a bit anyway to make more efficient. Lets start with the update method, we'll make some changes in Chunk.cs, first add a bool and call it update. Then create a new function called LateUpdate, this is a unity function called after all the other update functions, here we'll update the chunk if update is true:
public bool update;

void LateUpdate () {
if(update){
GenerateMesh();
update=false;
}
}


Now instead of calling the GenerateTerrain function in UpdateChunkAt in the ModifyTerrain.cs script just set update to true:
world.chunks[updateX,updateY, updateZ].update=true;

Now on to making neighbor blocks update when necessary, this is only needed when the block changed is on the edge of its chunk so only if x, y or z is 0 or 15 relative to its chunk. Based on the coordinates of the block we can find if its on the edge and also which edge like this:
if(x-(world.chunkSize*updateX)==0 && updateX!=0){
world.chunks[updateX-1,updateY, updateZ].update=true;
}

if(x-(world.chunkSize*updateX)==15 && updateX!=world.chunks.GetLength(0)-1){
world.chunks[updateX+1,updateY, updateZ].update=true;
}

if(y-(world.chunkSize*updateY)==0 && updateY!=0){
world.chunks[updateX,updateY-1, updateZ].update=true;
}

if(y-(world.chunkSize*updateY)==15 && updateY!=world.chunks.GetLength(1)-1){
world.chunks[updateX,updateY+1, updateZ].update=true;
}

if(z-(world.chunkSize*updateZ)==0 && updateZ!=0){
world.chunks[updateX,updateY, updateZ-1].update=true;
}

if(z-(world.chunkSize*updateZ)==15 && updateZ!=world.chunks.GetLength(2)-1){
world.chunks[updateX,updateY, updateZ+1].update=true;
}

This should keep all the neighbors updated if they need to be, it finds the x, y or z of the block relative to the chunk by subtracting the chunk's coordinates (world.chunkSize*updateX where updateX is how many chunks along on the x axis this chunk is) and then if the relative coordinate is 0 it updates the block further down on that axis, if it's 15 it updates the one further up. It also checks to make sure that there is a chunk in that direction in case it's the edge of the level.

It should now work as intended to left click and right click to remove and place blocks. Also at this point it's probably a good idea to add a directional light to the scene. I hope you guys come up with some cool uses for this!

Student Game Dev. Unfortunately I am art impaired.
Edit:
With fog enabled in render settings and shadows enabled on your directional lights it can look pretty cool.


Feel free to follow me on twitter or g+ and as always of you have a problem please let me know and I'll do my best to fix it.

Part 8: Loading Chunks
templates-office.com Tutorial, Unity, Voxel Tut, Voxels
Senin, 14 Oktober 2013

Unity Voxel Tutorial Part 5: Building a 3d Voxel


Ok, I took a long break since the last part. I'm pretty bad at being active especially with a lot of work to focus on but without further adieu we will start building our meshes to be viewed in 3d. This is probably what a lot of people had in mind when they started this tutorial series but I promise, with the understanding gained from the earlier tutorials this part will come a lot easier. However users that haven't followed the last 4 parts are welcome to start here but I won't be going into as much detail about how meshes are created.

Also this tutorial and the next one I'm writing as I go instead of using parts of my finished code (of course still using that as reference) so I'm hoping that will help stop me from making as many mistakes as I shouldn't skip things or have to make changes to things as I past them to the tutorial as much.

Let's start by making a new scene in unity with an empty game object. Name that object "Chunk", this will be the mesh for a 16x16x16 area (Or larger) of our world. Also make a new script and call it "Chunk" as well because it goes on the chunk object. Let's make our code create one cube to start.

First of all set up the variables:
using UnityEngine;
using System.Collections;
using System.Collections.Generic;

public class Chunk : MonoBehaviour {

private List<Vector3> newVertices = new List<Vector3>();
private List<int> newTriangles = new List<int>();
private List<Vector2> newUV = new List<Vector2>();

private float tUnit = 0.25f;
private Vector2 tStone = new Vector2 (1, 0);
private Vector2 tGrass = new Vector2 (0, 1);

private Mesh mesh;
private MeshCollider col;

private int faceCount;

When you're adding these remember to include the line "using System.Collections.Generic;" from line 3 up there. Now, this should look pretty familiar, same lists of verticies, tris and UVs, a tUnit and texture coordinates, our mesh filter and mesh collider and lastly a faceCount which is just a new name for the squareCount we used in the other script.

Set up the start function to set some of our variables:
mesh = GetComponent<MeshFilter> ().mesh;
col = GetComponent<MeshCollider> ();

After you've done this go to unity and add a Mesh Filter, a Mesh Renderer and a Mesh Collider to our Chunk game object.

Now create two functions:
void CubeTop (int x, int y, int z, byte block) {

}

void UpdateMesh ()
{

}

And call them in the start loop:
void Start () { 

mesh = GetComponent<MeshFilter> ().mesh;
col = GetComponent<MeshCollider> ();

CubeTop(0,0,0,0);
UpdateMesh ();
}

CubeTop will be one of six functions that generate a side of the cube and update mesh will commit the verticies and things to the mesh filter. We'll just start with the top to get it working.

Because this is actually very similar to the 2d example I'll take this in some larger steps than normal now, here is what we need in the CubeTop function:
void CubeTop (int x, int y, int z, byte block) {

newVertices.Add(new Vector3 (x, y, z + 1));
newVertices.Add(new Vector3 (x + 1, y, z + 1));
newVertices.Add(new Vector3 (x + 1, y, z ));
newVertices.Add(new Vector3 (x, y, z ));

newTriangles.Add(faceCount * 4 ); //1
newTriangles.Add(faceCount * 4 + 1 ); //2
newTriangles.Add(faceCount * 4 + 2 ); //3
newTriangles.Add(faceCount * 4 ); //1
newTriangles.Add(faceCount * 4 + 2 ); //3
newTriangles.Add(faceCount * 4 + 3 ); //4

Vector2 texturePos;

texturePos=tStone;

newUV.Add(new Vector2 (tUnit * texturePos.x + tUnit, tUnit * texturePos.y));
newUV.Add(new Vector2 (tUnit * texturePos.x + tUnit, tUnit * texturePos.y + tUnit));
newUV.Add(new Vector2 (tUnit * texturePos.x, tUnit * texturePos.y + tUnit));
newUV.Add(new Vector2 (tUnit * texturePos.x, tUnit * texturePos.y));

}

And here is the UpdateMesh Function:
void UpdateMesh ()
{

mesh.Clear ();
mesh.vertices = newVertices.ToArray();
mesh.uv = newUV.ToArray();
mesh.triangles = newTriangles.ToArray();
mesh.Optimize ();
mesh.RecalculateNormals ();

//col.sharedMesh=null;
//col.sharedMesh=mesh;

newVertices.Clear();
newUV.Clear();
newTriangles.Clear();

faceCount=0; //Fixed: Added this thanks to a bug pointed out by ratnushock!

}

What's happening here? Well CubeTop runs first and it creates verticies for a square facing upwards using the x,y,z coordinates, then it creates numbers for the triangles using the faceCount and lastly it applies the texture at the coordinates to the face. For now though texturePos is just set to tStone. We'll add some ifs to set the texture once we have more than one cube.

Now lets hop over to unity and place our gameobjects so that we can run. Put the Chunk at 0,0,0 and set the camera's position y to 10 and rotation x to 45. This should put it dead center.

This is what you should see when you run
So as you can see there are no textures yet and it's just the top face so let's add the materials first of all. Just drag the tilesheet texture onto the chunk gameobject (for those of you who haven't done the previous tutorials, the tilesheet is a 128x128 size image with 4x4 tiles. Here's the one I'm using: Link!).

For the rest of the faces the functions will be quite similar, all we'll be doing is adjusting the verticies. Pretty much the rest of the function will be the same for every face so what we'll do is remove the common parts of the functions and put them in a separate function instead of having it written out for each face.

So create a new function called Cube with a Vector2 called texturePos as a parameter, this function will be called for every face and run all the code common to all faces. Move the newTriangles lines to it and the newUV lines to it. Then add "faceCount++" to the end.
void Cube (Vector2 texturePos) {

newTriangles.Add(faceCount * 4 ); //1
newTriangles.Add(faceCount * 4 + 1 ); //2
newTriangles.Add(faceCount * 4 + 2 ); //3
newTriangles.Add(faceCount * 4 ); //1
newTriangles.Add(faceCount * 4 + 2 ); //3
newTriangles.Add(faceCount * 4 + 3 ); //4

newUV.Add(new Vector2 (tUnit * texturePos.x + tUnit, tUnit * texturePos.y));
newUV.Add(new Vector2 (tUnit * texturePos.x + tUnit, tUnit * texturePos.y + tUnit));
newUV.Add(new Vector2 (tUnit * texturePos.x, tUnit * texturePos.y + tUnit));
newUV.Add(new Vector2 (tUnit * texturePos.x, tUnit * texturePos.y));

faceCount++; // Add this line
}

Now your CubeTop function should be a little shorter but call Cube(texturePos); at the end of the function. We decide the texture coordinates in the function unique to each side because the Cube function doesn't have any block data to decide what texture to use and because textures might be based on which face of the cube we're making. Your CubeTop function should look like this now:
void CubeTop (int x, int y, int z, byte block) {

newVertices.Add(new Vector3 (x, y, z + 1));
newVertices.Add(new Vector3 (x + 1, y, z + 1));
newVertices.Add(new Vector3 (x + 1, y, z ));
newVertices.Add(new Vector3 (x, y, z ));

Vector2 texturePos;

texturePos=tStone;

Cube (texturePos);

}

Now we can make the other five functions, they'll look just the same as this one except that they'll use different coordinates for the verticies. Later on they will also decide what textures to use in the unique functions but for now just keep using texturePos=tStone.

Now create 5 new functions with the same content as CubeTop called CubeNorth, CubeEast, CubeSouth, CubeWest and CubeBot but change out the newVerticies lines with these:
//CubeNorth
newVertices.Add(new Vector3 (x + 1, y-1, z + 1));
newVertices.Add(new Vector3 (x + 1, y, z + 1));
newVertices.Add(new Vector3 (x, y, z + 1));
newVertices.Add(new Vector3 (x, y-1, z + 1));

//CubeEast
newVertices.Add(new Vector3 (x + 1, y - 1, z));
newVertices.Add(new Vector3 (x + 1, y, z));
newVertices.Add(new Vector3 (x + 1, y, z + 1));
newVertices.Add(new Vector3 (x + 1, y - 1, z + 1));

//CubeSouth
newVertices.Add(new Vector3 (x, y - 1, z));
newVertices.Add(new Vector3 (x, y, z));
newVertices.Add(new Vector3 (x + 1, y, z));
newVertices.Add(new Vector3 (x + 1, y - 1, z));

//CubeWest
newVertices.Add(new Vector3 (x, y- 1, z + 1));
newVertices.Add(new Vector3 (x, y, z + 1));
newVertices.Add(new Vector3 (x, y, z));
newVertices.Add(new Vector3 (x, y - 1, z));

//CubeBot
newVertices.Add(new Vector3 (x, y-1, z ));
newVertices.Add(new Vector3 (x + 1, y-1, z ));
newVertices.Add(new Vector3 (x + 1, y-1, z + 1));
newVertices.Add(new Vector3 (x, y-1, z + 1));

Now you should have 6 functions and one common function for the faces of the cube. Go to the start function and add the five new functions after CubeTop with the parameters 0,0,0,0 for all of them. If you run it in unity now you should see a cube, not so visible in the camera view but if you look around in the scene view you'll see it.

You should see this
Lets have a look at the collision model generation as well, in the 2d example we generated a different collision mesh after the mesh to be rendered but here we'll use the same mesh for both. The commented lines in the UpdateMesh function do just this. First of all we reset the collision mesh and then we set the collision mesh to mesh so we use the same one we've already made for the mesh renderer. So, uncomment these lines:
col.sharedMesh=null;
col.sharedMesh=mesh;

And you'll have a cube with a collision mesh!

I'll end this part here, it seems like a logical point to stop but what we have now is more than a cube, what we have is a system to create individual faces which will come in very handy when we're creating a surface that resembles cubes but is actually made of just the visible faces. But that's for next time.

Until then please message me with any problems you find and follow me on twitter or google plus to get updated!

Part 6
templates-office.com Tutorial, Unity, Voxel Tut, Voxels

Unity Voxel Tutorial Part 6: Building 3d Voxels


You may have noticed how I cleverly named the last part 3d voxel and this one 3d voxels. That it because in this part we'll be making our chunk show an actual chunk of blocks. So picking up from last tile where we had one block rendering what we'll do now is make a way to store the information of the chunk.

This is an interesting point because there are two ways to do this, you can store the information in each chunk so that every chunk has the data for the blocks it contains or you can use a big array for all the level data that each chunk refers to. I think we'll use the big array because it's easier later on. This will mean that our world has a fixed size though but making an infinitely generating world will have to remain outside of the scope of this tutorial.

So to store our level data make a new script and call it World .Also create a gameobject and call it world as well and put the script on it. The core of this script will be the data array, start by setting up the variables:
public byte[,,] data;
public int worldX=16;
public int worldY=16;
public int worldZ=16;

We'll initiate the byte array with the world* variables as the sizes of the array. Use the start array for this:
void Start () {

data = new byte[worldX,worldY,worldZ];

}

With the default variables our world is only one chunk in size but we'll change that later. This array is pretty useless when it's all empty so let's at least fill it with some placeholder data, similar to how we filled the 2d array we'll cycle through all the dimensions of this array and turn anything lower than 8 to stone. Remember that in our data array 0 is air, 1 is stone and 2 is dirt.
void Start () {

data = new byte[worldX,worldY,worldZ];

for (int x=0; x<worldX; x++){
for (int y=0; y<worldY; y++){
for (int z=0; z<worldZ; z++){

if(y<=8){
data[x,y,z]=1;
}

}
}
}

}

Later on we'll use this script to also generate all our chunk game objects but for now we're just going to use it to store the data while we finish setting up the chunk script so we'll jump back to that chunk script. Go ahead and add a new public variable to the chunk for the world object and a private one for the world script. This is temporary so that we can access the world data.
public GameObject worldGO;
private World world;

Go into unity and set the worldGO variable to the world gameobject by dragging it from the heirarchy window to the variable in the inspector on the Chunk game object. In the start function add the following line:
world=worldGO.GetComponent("World") as World;

Now we can access the world data with world.data but this isn't ideal so jump over to the world script and add a new function called Block:
public byte Block(int x, int y, int z){

if( x>=worldX || x<0 || y>=worldY || y<0 || z>=worldZ || z<0){
return (byte) 1;
}

return data[x,y,z];
}

Now in the chunk script we'll use world.block(0,0,0) to get block data. This function just returns the data from the array but it includes an if to check that the requested block is within the boundaries of the array and otherwise it returns stone.

Back in the chunk script let's get to generating. Create a new function in the chunk script and call it Generate Mesh, with this chunk we're going to cycle through every block in the chunk and based on data from the world.data array generate a mesh. We can't just create a face for every block though because that would be far too many faces that the player actually can't see, instead we're going to only make faces that are exposed to air. This means that blocks buried and surrounded by other blocks aren't rendered at all saving us time. Create a function like this:
Edit: as ratnushock pointed out we need to add this variable to the script first, this defines the chunk size:
public int chunkSize=16;


void GenerateMesh(){

for (int x=0; x<chunkSize; x++){
for (int y=0; y<chunkSize; y++){
for (int z=0; z<chunkSize; z++){
//This code will run for every block in the chunk

if(world.Block(x,y,z)!=0){
//If the block is solid

if(world.Block(x,y+1,z)==0){
//Block above is air
CubeTop(x,y,z,world.Block(x,y,z));
}

if(world.Block(x,y-1,z)==0){
//Block below is air
CubeBot(x,y,z,world.Block(x,y,z));

}

if(world.Block(x+1,y,z)==0){
//Block east is air
CubeEast(x,y,z,world.Block(x,y,z));

}

if(world.Block(x-1,y,z)==0){
//Block west is air
CubeWest(x,y,z,world.Block(x,y,z));

}

if(world.Block(x,y,z+1)==0){
//Block north is air
CubeNorth(x,y,z,world.Block(x,y,z));

}

if(world.Block(x,y,z-1)==0){
//Block south is air
CubeSouth(x,y,z,world.Block(x,y,z));

}

}

}
}
}

UpdateMesh ();
}

Now this will cycle through every block in the chunk, if the block is not air it will run through all the faces of the block and check adjacent blocks. For each adjacent air block it will create a face for that side. We just check if the block at x,y,z + 1 in whatever direction we're checking is air and if so we run the function for that face. At the end of the function we call UpdateMesh() to set the mesh to the new one.

Replace the code that generated a block in the start function (all the CubeTop, CubeNorth, etc. and the UpdateMesh() ) with GenerateMesh();

If you run now you should get a flat mesh showing the tops of 16x16 blocks.

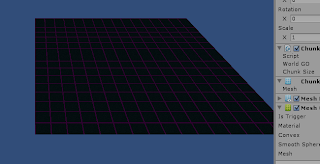
You should see this!
So this is pretty cool, it's terrain with a collision mesh and you can update it at any time by calling GenerateMesh(); You can also change the creation of the data array contents to get something more interesting than a plane. The problem here is that we've written the code so far just to make this one chunk but ideally we would have lots of chunks for more advanced terrain. Why don't we do that now.

What we'll do is just use the world gameobject for initialization and it will generate the chunk gameobjects as needed. Take your chunk gameobject in unity and drag it into the project window (into a prefabs folder if you want to keep it neat) and this will make a prefab of it. Now you can delete it from the scene. Switch to the world script and we can get going.

First add some variables to the world script:
public GameObject chunk;
public GameObject[,,] chunks;
public int chunkSize=16;

And go into unity and set the chunk gameobject to be the prefab we just created.

After we generate the contents of the data array we'll generate and array of chunk gameobjects:
chunks=new GameObject[Mathf.FloorToInt(worldX/chunkSize),
Mathf.FloorToInt(worldY/chunkSize),
Mathf.FloorToInt(worldZ/chunkSize)];

for (int x=0; x<chunks.GetLength(0); x++){
for (int y=0; y<chunks.GetLength(1); y++){
for (int z=0; z<chunks.GetLength(2); z++){

chunks[x,y,z]= Instantiate(chunk,
new Vector3(x*chunkSize,y*chunkSize,z*chunkSize),
new Quaternion(0,0,0,0)) as GameObject;

Chunk newChunkScript= chunks[x,y,z].GetComponent(\"Chunk\") as Chunk;

newChunkScript.worldGO=gameObject;
newChunkScript.chunkSize=chunkSize;
newChunkScript.chunkX=x*chunkSize;
newChunkScript.chunkY=y*chunkSize;
newChunkScript.chunkZ=z*chunkSize;

}
}
}

What this does is generate enough chunks to display the contents of the data array and then sets them up with the variables needed. First we initialize the chunks array taking the size of the level and dividing each dimension by the chunk size so that we get the right amount of chunks based on the size of our world and we turn them into ints rounding down so that if they don't match up we get fewer chunks rather than chunks that aren't filled. This means that we never have to define how many chunks we want instead we just define the size of the level and the size of the chunks to represent them.

Then we go through and for each slot in the chunks array we instantiate a new chunk prefab. They are positioned with a new one every chunksize so we get their position with dimension*chunksize. Then we get access to their Chunk script and then set some variables. The worldGO, the chunk size and then some new variables; the coordinates of the chunk so that it can know which blocks it represents.

Go into the chunk script because we have to make some changes here too. Add these new variables for the position that we'll use to access the right blocks from the data array.
public int chunkX;
public int chunkY;
public int chunkZ;

Secondly we're going to add yet another step to our getting block data method, create a new function called Block:
byte Block(int x, int y, int z){
return world.Block(x+chunkX,y+chunkY,z+chunkZ);
}

All this does is add on the position of the chunk to the position of the block we're accessing so that the chunk further to the center of the level accesses the blocks at it's location.

To use this function we have to change the way we accessed the blocks before so find are replace occurrences of world.Block with just Block. However don't replace the one in the function we just added.
byte Block(int x, int y, int z){
return world.Block(x+chunkX,y+chunkY,z+chunkZ); // Don't replace the world.Block in this line!
}

So you can either click replace for each instance and skip the one return line we want to keep or you can replace all then remember to change back that one line.
You open this menu by pressing ctrl+f and then pressing the down arrow on the left to get the replace box
Now we can set the size of the world in the world object and leave the chunk size at 16. If you set the size of the world to 64x64 it should generate 4x4 chunks!

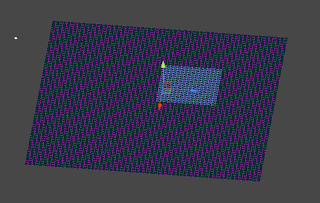
Now we're getting somewhere
But the problem now is that this terrain is super boring, why don't we fix that? To the World Script!
This is very similar to the way we added noise to the 2d level, we'll be generating perlin noise for each column.

First of all we now need more advanced noise than the standard unity perlin noise can offer as far as I know so we'll be using someone else's implementation of Perlin's Simplex noise in c#: Perlin Simplex Noise for C# and XNA. What you'll need to do is create a new C# script, call it "Noise" and remove everything but:
using UnityEngine;
using System.Collections;

Then after that paste in the code from simplex noise implementation linked as Download at the bottom of the post I just linked. Just save this file and we can access it from the World script.

Now we'll create a new function in the world script to retrieve the noise:
int PerlinNoise(int x,int y, int z, float scale, float height, float power){
float rValue;
rValue=Noise.GetNoise (((double)x) / scale, ((double)y)/ scale, ((double)z) / scale);
rValue*=height;

if(power!=0){
rValue=Mathf.Pow( rValue, power);
}

return (int) rValue;
}

Now we can call Perlin noise with some extra variables like scale and height and power like in the 2d version but now we have a whole new dimension. Up in the start function where we created a floor of stone let's replace that with something a little more interesting.
for (int x=0; x<worldX; x++){
for (int z=0; z<worldZ; z++){
int stone=PerlinNoise(x,0,z,10,3,1.2f);
stone+= PerlinNoise(x,300,z,20,4,0)+10;
int dirt=PerlinNoise(x,100,z,50,2,0) +1; //Added +1 to make sure minimum grass height is 1

for (int y=0; y<worldY; y++){
if(y<=stone){
data[x,y,z]=1;
} else if(y<=dirt+stone){ //Changed this line thanks to a comment
data[x,y,z]=2;
}

}
}
}

This should add a little noise to the surface and in addition add a new block. If you run now the surface should be noisy but everything will be the same block. What you can do now is add different textures for blocks.

Back in the chunk script in the code for each face we decided what texture to use but just set it to stone, now let's change that.

I created a new variable called tGrassTop to set a texture based on the face of the block:
private Vector2 tGrassTop = new Vector2 (1, 1);

Then in the CubeTop function I use this:
Vector2 texturePos=new Vector2(0,0);

if(Block(x,y,z)==1){
texturePos=tStone;
} else if(Block(x,y,z)==2){
texturePos=tGrassTop;
}

Now the sides of the blocks are often going to be the same so if you want you can set up a common function to set the textures for the sides of the blocks but what I've done is used this for all of them and the bottom:
if(Block(x,y,z)==1){
texturePos=tStone;
} else if(Block(x,y,z)==2){
texturePos=tGrass;
}

If you run this you should get some ugly terrain with our placeholder textures but it should work as a prototype:


Now it needs some remove and place block functions and some more block types but you can see how it's done. Next time I think we'll be able to place and remove blocks and come up with a better way to generate the chunks than before the game loads.

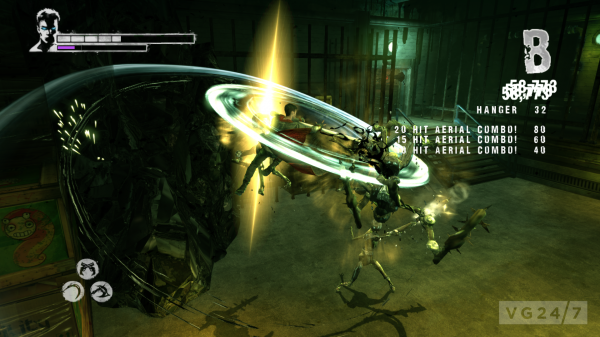
Here's an example of what you could do with what we've made so far, with some new textures and directional lights it's starting to look professional.


Until then though good luck, even with just this I think you have a good start to work from if you feel like you don't want to rely on my tutorial. Feel free to follow me on twitter or g+ and as always of you have a problem please let me know and I'll do my best to fix it.


Part 7: Modifying the terrain
templates-office.com Terrain Generation, Tutorial, Unity, Voxel Tut, Voxels
Minggu, 06 Oktober 2013

DEAD NATION

DEAD NATION

Developer        : Housemargue
Publisher         : Sony Computer Entertainment
Platform          : PlayStation 3, PlayStation Vita
Release Date   : 30 Nopember 2010
Genre              : Action – Shooter - Shoot ‘em up Game
Mode(s)           : Single Player, Offline/ Online Multiplayer (co-op)
Rating             : Menurut Game Rangkings dan Metacritic, rating DeadNation adalah 78% dari 100 %.

=============================================================
Screenshoot


1.      Trailer dan Gameplay


Pemain diberikan skor dan uang ketika zombie terbunuh. Uang digunakan untuk membeli dan upgrade senjata ketika checkpoint dan skor digunakan untuk melihat score tiap di cekpoint. Ketika pemain dipukul oleh zombie, maka point skor pemain kehilangan skor dan kesehatan. Pemain berperang melawan zombie di 10 level dengan disetiap level terdiri dari beberapa checkpoint untuk mengupgrade senjata dan mengganti armour. Selama di permainan, pemain memiliki kesempatan untuk menemukan peti harta karun yang berisi amunisi, uang, pengganda kesehatan dan kecepatan, armor, dan dapat menjarah mobil untuk mendapatkan uang. Jika mobil diledakkan terlebih dahulu sebelum diambil uangnya, maka pemain kehilangan kesempatan untuk mendapatkan uang tersebut. Ada suatu keadaan dimana pemain terjebak di suatu area dan harus bertahan sampai menyelesaikan tujuan tertentu( misalnya menunggu elevator sambil berperang dengan zombie atau membunuh semua zombie di area tersebut). Armor (pelindung) mempengaruhi kekuatan, daya tahan, dan kecepatan.
Zombie tertarik mendekati player atau area yang dekat dengan flare, alarm mobil, granat, ranjau. Zombie dapat dibunuh dengan memanfaatkan keadaan disekeliling kita, missal ada mobil yang alarm nya bunyi dan pasti didekati oleh zombie, mobil itu bisa kita ledakkan dengan tembakan, atau pemain dapat melemparkan flare kearah menjauhi pemain dan membunuh zombie tersebut dari jarak jauh. Pemain akan bertemu denan berbagai macam zombie. Semakin tinggi level yang sedang dihadapi maka semakin banyak varietas zombie, semakin banyak jumlahnya, dan semakin tinggi pula kekuatan mereka.  
Pemain dapat menggunakan tangan untuk memukul jika kehabisan amo atau dengan menggunakan rush attack untuk menyerang zombie seperti halnya menggunakan senjata.

2      Plot
Masyarakat telah runtuh dan sebagian besar populasi dunia telah menjadi zombie karena wabah virus . Setahun kemudian , protagonis (baik Jack McReady , Scarlett Blake atau keduanya saat dimainkan dalam mode co - op ) bersiap-siap meninggalkan persembunyian mereka untuk mencari makanan dan air . Mereka kebal terhadap serangan virus itu saat ini . Setelah mencapai sebuah pompa bensin , mereka mengambil transmisi radio , tapi sinyal radio kurang kuat. Mereka menuju ke kantor polisi  yang bertujuan untuk memperkuat sinyal radio, akhirnya mereka menemukan cara yaitu mereka harus meraih tempat yang lebih tinggi untuk mendapatkan sinyal., tapi mengetahui mereka harus pergi ke tempat yang lebih tinggi untuk melakukannya .
Setelah mengambil transmisi , mereka dihubungi oleh Dokter Morton , yang memberitahu mereka bahwa dia bekerja untuk perusahaan Farmasi Egogate , dan bahwa ia sedang mengembangkan obat , tetapi membutuhkan dua hal yaitu sampel DNA mereka dan sampel jaringan dari pasien bernama Douglas Bane , manusia pertama yang terinfeksi , ia kemudian mengarahkan mereka ke rumah sakit Marrow , melalui pinggir kota .
Mereka berjuang mereka melalui jalan-jalan penuh  zombie dan ketika sampai di rumah sakit mereka menemukan catatan bahwa tubuh Bane dimakamkan di kuburan terdekat . Hal ini menunjukkan bahwa tubuh dipindahkan ke dermaga pelabuhan melalui kereta . Namun, ternyata tubuh Bane tidak ada disana sehingga mereka melanjutkan perjalanan untuk mecari tubuh Bane. Mereka menuju ke Airport Raven , utara pelabuhan . Setelah menemukan kepala Bane di Airport tersebut dengan berbagai rintangan , mereka terbang menggunakan helikopter  menuju fasilitas bawah tanah tempat dokter Morton berlindung. Disana mereka diberikan serum dan akan dijadikan senjata biologis untuk menghancurkan zombie. Perusahaan dokter Morton ingin memerangi zombie – zombie dinegara mereka dan menyelamatkan manusia dari teror zombie.
Menyadari bahwa mereka tidak akan rugi dan tidak ada jalan keluar lain untuk memerangi zombie , mereka setuju dan akhirnya menggigit kapsul sianida. Namun rencana hanyalah rencana, ternyata percobaan ini gagal dan Jack McReady malah bermutasi menjadi zombie dan orang yang pertama kali dia bunuh adalah dokter Morton.

Tamat : 1 minggu
Alasan Mengapa Terbaik
a.       Genre : Shot ‘em up
b.      Menarik dari segi cerita
c.       Tidak banyak aturan dan mudah dimainkan
d.      Tegang dengan semakin naiknya kesulitain dan bahaya disetiap level

Ditulis Oleh
Eva Yuliani - 5109100194

4.       
Konveksi Surabaya

Create Your Badge