Sabtu, 28 September 2013

Fitur Tertutup Dalam Game Pendekar Naga Indonesia

Fitur Tertutup Dalam Game Pendekar Naga Indonesia juga bisa Meningkatkan EXP kamu, Disaat kamu sedang sibuk dan tidak bisa hunting untuk menaikan lv maka kamu bisa menggunakan Fitur Tertutup Dalam Game Pendekar Naga Indonesia ini, selain meningkatkan EXP kamu juga bisa mendapatkan barang-barang selayak nya kamu sedang hunting.


Fitur ini sangat mempermudah player untuk menaikan lv mereka dengan tidak perlu online berjam-jam untuk menaikan lv atau mencari barang, fitur ini bisa di gunakan ketika nilai CON atau contribusi kamu sesuai dengan syarat pada Fitur Tertutup Dalam Game Pendekar Naga Indonesia, syarat nya adalah nilai CON atau Contribusi kamu sejumlah 5 CON atau lebih, Setiap 1 kali Tertutup Memakan 5 CON dan nilai Frezee dalam 1 kali tertutup itu adalah 5 menit jadi setiap 5 menit kamu baru bisa mendapatkan EXP dan barang dari Fitur Tertutup Dalam Game Pendekar Naga Indonesia ini.

Cara menggunakan Fitur ini pun cukup mudah Berikut Cara nya :

1. Kamu klik tombol Map pada bagian atas sebelah kanan, kamu bisa lihat SS nya di bawah :

netbook-game.blogspot.com
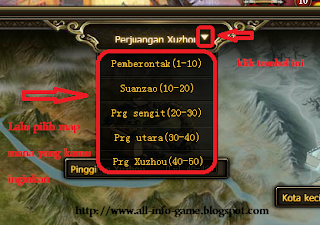
 2. Pilih map dan Lokasi monster yang kamu inginkan, kamu juga bisa melihat Dropan apa saja yang nanti nya akan keluar, Lihat SS di bawah ini :

netbook-game.blogspot.com


netbook-game.blogspot.com

netbook-game.blogspot.com
 3. Setelah itu Tinggal kamu atur jumlah pemakaian tertutup sesuai yang kamu inginkan, Lalu tekan tombol Standby, Lihat SS di bawah :

netbook-game.blogspot.com

Setelah di mulai tertutup maka akan otomatis waktu berjalan mundur selama 5 menit kamu akan mendapatkan EXP dan barang, Tertutup juga bisa dijalankan bersamaan dengan Fitur Latihan, jadi kamu akan mendapatkan EXP 2x selama kamu AFK kamu bisa hunting, Menarik bukan ?
tetapi selama masa tertutup kamu tidak bisa membuka fitur" lain seperti event atau semacam fitur bertarung dengan monster lain nya.

 Sekian dulu info tentang game ini, Have fun :)
templates-office.com Pendekar Naga Indonesia

Fitur Latihan Game Pendekar Naga

Fitur Latihan Game Pendekar Naga ini bisa meningkatkan EXP kamu ini bisa disamakan dengan fitur AFK pada game" lain nya dimana saat kamu mengaktifkan fitur ini secara otomatis setiap 1 menit EXP kamu akan bertambah, dalam hal penambahan EXP Latihan kamu bisa mengupgrade nya di dalam fitur IPTEK Legion.


Semakin tinggi lv IPTEK Legion akan Semakin besar EXP yang didapatkan Selama Latihan, jika lv kamu sudah lv 40 ke atas maka kamu akan mendapat nilai exp tambahan yaitu add lv dunia + 50% , Berikut Foto saat sedang menggunakan fitur latihan :

netbook-game.blogspot.com

Cara nya sangat mudah untuk menggunakan fitur ini tinggal mengklik pada menu fitur di sebelah kanan bawah saja 
Berikut Foto nya :


netbook-game.blogspot.com

Mudah bukan ? Selamat Bermain Have fun :)
templates-office.com Pendekar Naga Indonesia

Game Pendekar Naga Indonesia


all-info-game.com


Game Pendekar Naga adalah game MMORPG terbaru dari Webgame dengan latar belakang sejarah terkenal Three Kingdoms. Perang 3 negara khas Wu, Wei dan Shu.

Fitur-fitur dalam game :

  1. Latihan
  2. Tertutup
  3. Taktik
  4. Perkuat Armor & Senjata
  5. Upgrade Armor & Senjata
  6. Formasi
  7. Inlay GEM
  8. Mustika
  9. Rekrut Jendral
  10. Transaksi
  11. PET
  12. Legion
  13. E-Mail
  14. Perang Kuil Naga
  15. Cek Poin
  16. Medan Bahaya
  17. Perang Klasik
  18. Penguasa Samkok
  19. Diagram Naga
  20. Perang Legion
  21. Dajjal
  22. Toko Legion
  23. IPTEK Legion
  24. Pohon Rejeki
  25. Reward Harian
Ok sampai disini nanti akan saya update lagi tentang game ini, Terimakasih...
templates-office.com Pendekar Naga Indonesia
Sabtu, 14 September 2013

Grapple now with hamster

Leaps and bounds of progress on grapple recently:


Animations and art for the character, carrots are collectible and textures for the surfaces!
templates-office.com Grapple
Senin, 02 September 2013

Unity Voxel Tutorial Part 4: Destroying and placing blocks


Now that we have semi realistic terrain we need to be able to manipulate the terrain in real time because that's kind of a staple of these kinds of games or even the point of these kinds of games. The difficulty of this mostly comes down to converting floating point positions from unity to coordinates in our grid array. Our grid array is offset by a little so we need to figure out these offsets. We could also adjust our block generation to align it better to the real positions but this solution is easier.

What we'll start off with is a raycasting script to destroy blocks. Make a new script and call it "RaycastExample". Give it the following variables:
public GameObject terrain;
private PolygonGenerator tScript;
public GameObject target;
private LayerMask layerMask = (1 << 0);

The terrain GameObject will refer to the object with the "PolygonGenerator" script and in the start function we'll get the polygon generator script and save it as the tScript variable:

void Start () {
tScript=terrain.GetComponent("PolygonGenerator") as PolygonGenerator;
}

Now in the update function we'll raycast every frame from this object to the target object destroying the first block hit.
void Update () {

RaycastHit hit;

float distance=Vector3.Distance(transform.position,target.transform.position);

if( Physics.Raycast(transform.position, (target.transform.position -
transform.position).normalized, out hit, distance , layerMask)){

Debug.DrawLine(transform.position,hit.point,Color.red);


} else {
Debug.DrawLine(transform.position,target.transform.position,Color.blue);
}
}

If you haven't used raycasts before I won't go into the basics here but essentially it's the origin of the ray, the direction that we calculate using the origin and the target location, the variable we'll output the hit data to, the max distance of the ray which is calculated earlier as the distance between origin and target, and lastly the layer mask which is which layers this ray collides with. The layermask we've already defined in the start, it's set to 0 which is the default layer. This way you could have characters or entities on another layer and not have them stop the raycasts.

Add the script to a gameobject and create another gameobject to set as the target, make sure they are both at 10 z. Also set the raycaster's terrain variable to the gameobject containing the polygon generator.

If you run it now you should see a line drawn in red to the hit point if it collides and a blue line to the target if not.

The raycast hitting the terrain.
Now we'll use the location of the hit to figure out which block it is. So create a vector2 with the hit.point's x and y and then add the inverse of the hit's x and y normals. What this does is that it gives use the hit location and then moves it further into the block using the normals.
 if( Physics.Raycast(transform.position, (target.transform.position -
transform.position).normalized, out hit, distance , layerMask)){

Debug.DrawLine(transform.position,hit.point,Color.red);

Vector2 point= new Vector2(hit.point.x, hit.point.y); //Add this line
point+=(new Vector2(hit.normal.x,hit.normal.y))*-0.5f; //And this line

} else {
Debug.DrawLine(transform.position,target.transform.position,Color.blue);
}
}
What these lines do is that they take the position of the collision (hit.point) and create a new vector2 with the position, then we add to that Vector2 half of the reverse of the normal of the surface hit. The normal is the direction that would point straight away from the surface, so adding the reverse takes us 1 unit further into the block but half that takes us half a unit further in where we can round to the position of the block.

You won't see this but this is a visualization of the raycast to the hitpoint and then a line to the new point with the inverse normals added, you can see that it now ends up inside the block.
Now we'll set the block at this point to air:
tScript.blocks[Mathf.RoundToInt(point.x-.5f),Mathf.RoundToInt(point.y+.5f)]=0;

This goes after the vector2 point is defined and adjusted. It rounds the point's x and y to ints to that we can use them to choose points in the array. First though you have to subtract .5f from x and add .5f from y because of the terrain's offset from the world coordinates. You wouldn't need this if block 0,0's center was at 0,0 but it isn't.

Now to update the blocks but instead of just rebuilding and updating the mesh remotely we'll use the polygon generator's update to let it do it. Go back to the polygon generator and add a public bool called update.

public bool update=false;

Then create an Update function for the polygon generator. In the Update loop add this:
void Update(){
if(update){
BuildMesh();
UpdateMesh();
update=false;
}
}

This way we can set update to true remotely and the mesh will update but the best part is that even if several scripts change blocks they will and just change update to true but the mesh will only update once for all of them when its Update loop runs.

So set update to true for our polygon generator from the raycast script:
tScript.update=true;

The raycast should destroy one block per frame until it reaches it's target.
Sweet, now we have lasers. You could easily convert this to a part of a player script to run once and destry the block for example in front of the player.

Now that's not all though, sometimes you don't want to destroy a block at a specific point, you want to destroy all the blocks in a general area. For this we'll make a new script "ColliderExample". Give it the following variables:
public GameObject terrain;
private PolygonGenerator tScript;
public int size=4;
public bool circular=false;

And we'll use the same start code to get the Polygon Generator script
void Start () {
tScript=terrain.GetComponent("PolygonGenerator") as PolygonGenerator;
}
Because this is going to be removing a lot of blocks at once we'll make a RemoveBlock function:

bool RemoveBlock(float offsetX, float offsetY){
int x =Mathf.RoundToInt(transform.position.x+offsetX);
int y=Mathf.RoundToInt(transform.position.y+1f+offsetY);

if(x<tScript.blocks.GetLength(0) && y<tScript.blocks.GetLength(1) && x>=0 && y>=0){

if(tScript.blocks[x,y]!=0){
tScript.blocks[x,y]=0;
return true;
}
}
return false;
}

What we do here is very similar to the last remove block code we wrote only this time we also check first to see if the block is within the bounds of the array (in case our object is placed close to the edge). Then if the block isn't already air we just set the block to zero and return true to let the script that calls it know that a change was made.

Now in the update loop we'll run the remove block script for all the blocks in an area. I'll just paste in the whole chunk:
void Update () {


bool collision=false;
for(int x=0;x<size;x++){
for(int y=0;y<size;y++){
if(circular){

if(Vector2.Distance(new Vector2(x-(size/2),
y-(size/2)),Vector2.zero)<=(size/3)){

if(RemoveBlock(x-(size/2),y-(size/2))){

collision=true;
}

}
} else {

if(RemoveBlock(x-(size/2),y-(size/2))){

collision=true;
}
}

}
}
if( collision){
tScript.update=true;

}

}

So we run this for each block in a square of size by size, if the circular bool is true then first we check to see if the distance from the origin is smaller than one third the size to create a circular effect. Originally I used half the size consistent with everything else but I found that at low values some sides would be cut off so when set to circular the blast radius is smaller that otherwise. Then for both the circular and noncircular parts we remove the block at that point subtracting half the size (Because otherwise the object would be in the top left of the blast, this offsets it to the center) if the remove block function returns true we set the collision we defined earlier to true. After the loops if anything set collision to true we update the polygon generator, this way we don't update the mesh if nothing was removed.

Apply the script to a gameobject and you can do this.
Now you have both area and specific point block removers. You could even combine them and do this:

For explosive effects
Now I also promised creating blocks, this will work exactly like the raycast code. Make a new script called BlockPlaceExample and copy the contents of the raycast example there but replace the name with BlockPlaceExample.

Now all you have to change is instead of multiplying the normals that you add to the hit point by -0.5f you just multiply by 0.5f to get the block next to the block hit. And instead of setting it to air you set it to whatever you want. For example:


point+=(new Vector2(hit.normal.x,hit.normal.y))*0.5f;

tScript.blocks[Mathf.RoundToInt(point.x-.5f),Mathf.RoundToInt(point.y+.5f)]=1;


And instead of destroying a block every frame you will build one.

It looks kind of freaky.
Now instead of running it every frame you could run it once and instead of using a target just shoot it one meter to the left or right of the player and place a block!

And that's part 4, message me with any problems you find or feedback you think of. Follow me on twitter (@STV_Alex) or G+ to get updated when I post part five!

Completed code for the tutorial so far: http://netbook-game.blogspot.no/p/part-4-complete-code.html

Part 5
templates-office.com Tutorial, Unity, Voxel Tut, Voxels

Unity Voxel Tutorial Part 3: Perlin noise for terrain


Welcome to part three of the voxel tutorial. We'll be setting up the 2d game with some perlin noise to give the terrain some shape.
We'll get started by using perlin noise to create some varied terrain and caves from our blocks. Start by increasing the size of the block array to 96x128 so that we have some more room to work with. This is defined in the GenTerrain function. Also take away the old code that we used to generate terrain, the one that gave us 5 rows of blocks.

void GenTerrain(){
blocks=new byte[96,128];

for(int px=0;px<blocks.GetLength(0);px++){

for(int py=0;py<blocks.GetLength(1);py++){

}
}
}

To use perlin noise I like to use a separate function to call the Mathf.PerlinNoise unity function so that I can include things like scale and apply exponents with the parameters of my function. Here's that function:
int Noise (int x, int y, float scale, float mag, float exp){

return (int) (Mathf.Pow ((Mathf.PerlinNoise(x/scale,y/scale)*mag),(exp) ));

}

Perlin noise is an algorithm created by Ken Perlin to create gradient noise. Other people can explain it much better than me: This is a good source. But all you really need to know is that it returns values between 1 and 0 based on the values you enter. It can be used for numbers of dimentions far beyond what we need but the Unity function only takes two. For now that will be fine because this example is 2d.

What the function above does is it takes coordinates for x and y to sample for noise, then it calls the perlin noise function with those divided by scale. Because perlin noise isn't random but bases itself on the coordinates supplied then the closer those coordinates are to each other the more similar the values it returns. So when we divide the coordinates by a number they end up as smaller numbers closer to each other. (1,0) and (2,0) might return 0.5 and 0.3 respectively but if we divide them by two calling perlin noise for (0.5,0) and (1,0) instead the numbers might be 0.4 and 0.5. This will be more clear once we apply it to the terrain.

Then we take the value we get from perlin noise and multiply it by the magnitude "mag" because perlin noise returns a value between 0 and 1 and we are going to want noise that creates hills that vary in height by larger sizes like between 0 and 10. Then we take the result and put it to the power of the exponent "exp". This is useful for mountains and things. Lastly we convert the float returned into an int.

We'll apply this to the GenTerrain function column by column. By getting a number for perlin noise in the first loop (for each x) and then using that number in the y loop as the height of the terrain:

void GenTerrain(){
blocks=new byte[96,128];

for(int px=0;px<blocks.GetLength(0);px++){
int stone= Noise(px,0, 80,15,1);
stone+= Noise(px,0, 50,30,1);
stone+= Noise(px,0, 10,10,1);
stone+=75;

int dirt = Noise(px,0, 100,35,1);
dirt+= Noise(px,0, 50,30,1);
dirt+=75;

for(int py=0;py<blocks.GetLength(1);py++){
if(py<stone){
blocks[px, py]=1;


} else if(py<dirt) {
blocks[px,py]=2;
}


}
}
}


We create a stone int and a dirt int and using a few layers of perlin noise they get more textured values. Because this is essentially a 1d heightmap we only need x and the y variable can be used just to sample from a different area to make sure the results aren't the same. You can see the stone is three noise layers with different values.

Layer 1:
int stone= Noise(px,0, 80,15,1);

Layer one has a scale of 80 making it quite smooth with large rolling hills, the magnitude is 15 so the hills are at most 15 high (but in practice they're usually around 12 at the most) and at the least 0 and the exponent is 1 so no change is applied exponentially.

Layer 2:
stone+= Noise(px,0, 50,30,1);

The next layer has a smaller scale so it's more choppy (but still quite tame) and has a larger magnitude so a higher max height. This ends up being the most prominent layer making the hills.

Layer 3:
stone+= Noise(px,0, 10,10,1);

The third layer has an even smaller scale so it's even noisier but it's magnitude is 10 so its max height is lower, it's mostly for adding some small noise to the stone to make it look more natural. Lastly we add 75 to the stone to raise it up.

The dirt layer has to be mostly higher than the stone so the magnitudes here are higher but the scales are 100 and 50 which gives us rolling hills with little noise. Again we add 75 to raise it up.

The result is a noisy stone layer with highs and lows and a smooth dirt layer on top that's usually higher than the stone layer but sometimes the stone sticks out. You could also change the y value to offset the location of the noise sample. This is applied in the y loop where we change all blocks with a y below the stone int to stone and if they're higher than the stone (else) we check if y is below the dirt in and if so change the blocks to dirt.

Stone and dirt noise.
Also with noise we will add caves and spots of dirt in the stone. Surprisingly this is simpler than the dirt and stone layers. What we do is that in the if function for creating stone to a certain height we add another two ifs for caves and dirt so if the block is made into stone check to see if it should be a cave or a dirt spot instead. Here we'll use both x and y because the noise should be 2d.

void GenTerrain(){
blocks=new byte[96,128];

for(int px=0;px<blocks.GetLength(0);px++){
int stone= Noise(px,0, 80,15,1);
stone+= Noise(px,0, 50,30,1);
stone+= Noise(px,0, 10,10,1);
stone+=75;

print(stone);

int dirt = Noise(px,0, 100f,35,1);
dirt+= Noise(px,100, 50,30,1);
dirt+=75;


for(int py=0;py<blocks.GetLength(1);py++){
if(py<stone){
blocks[px, py]=1;

//The next three lines make dirt spots in random places
if(Noise(px,py,12,16,1)>10){
blocks[px,py]=2;

}

//The next three lines remove dirt and rock to make caves in certain places
if(Noise(px,py*2,16,14,1)>10){ //Caves
blocks[px,py]=0;

}

} else if(py<dirt) {
blocks[px,py]=2;
}


}
}
}

So you see inside the stone if ( if(py<stone) ) we also have an if that compares noise with 10 so if the noise we return is larger than 10 it turns the block to dirt instead of stone. The magnitude of the noise value is 16 so it reruns a over 10 only a little of the time and the scale is fairly low so the spots are pretty small and frequent. We're using x and y here and running the if for every block so the dirt is distributed through the whole array.

After that we add caves with a similar function but we multiply y by two to stretch out the caves so they are wider than they are tall and we use a larger scale to make larger less frequent caves and the magnitude is lower to reduce the size of the caves that was increased by the scale.

Now you should get caves and dirt spots.
The caves and spots are pretty evenly distributed, I like to use y to change the scale and magnitude for both to make caves more likely and large the lower you go and the opposite for dirt spots but that's all taste. You can also use similar functions to add things like ores and things.

Thanks for reading part 3, let me know about any problems you find or feedback you think of. Follow me on twitter (@STV_Alex) or G+ to get updated when I post part four. It should be out very shortly, part three was actually going to include it but I decided to split them up, anyway in that one we'll be destroying and placing blocks!

Edit: Thanks again to Taryndactyl! Taryndactyl's post: Link

Part 4
templates-office.com Terrain Generation, Tutorial, Unity, Voxel Tut, Voxels
Minggu, 25 Agustus 2013

Unity Voxel Tutorial Part 2: Level Array and Collision Meshes


Now that we've managed to display one square a lot of the work is done, we just have to find a good way to use that code a few thousand times based on some kind of level information. We'll also be adding in collision meshes for blocks exposed to air.

We'll start off by taking the code we wrote yesterday and splitting it up into more manageable chunks. First of all the end of the code in our last part is used to update the mesh component of the game object. This will be separated into its own function so that we can run it once the entire mesh is planned.

 void UpdateMesh () {
mesh.Clear ();
mesh.vertices = newVertices.ToArray();
mesh.triangles = newTriangles.ToArray();
mesh.uv = newUV.ToArray();
mesh.Optimize ();
mesh.RecalculateNormals ();
}

Now in addition, put all the new* lines in their own function with parameters for the position and texture. We'll be making some changes to the code then using it to call for every square we want to generate with unique positions textures assigned to them.

void GenSquare(int x, int y, Vector2 texture){
newVertices.Add( new Vector3 (x , y , z ));
newVertices.Add( new Vector3 (x + 1 , y , z ));
newVertices.Add( new Vector3 (x + 1 , y-1 , z ));
newVertices.Add( new Vector3 (x , y-1 , z ));

newTriangles.Add(0);
newTriangles.Add(1);
newTriangles.Add(3);
newTriangles.Add(1);
newTriangles.Add(2);
newTriangles.Add(3);

newUV.Add(new Vector2 (tUnit * tStone.x, tUnit * tStone.y + tUnit));
newUV.Add(new Vector2 (tUnit * tStone.x + tUnit, tUnit * tStone.y + tUnit));
newUV.Add(new Vector2 (tUnit * tStone.x + tUnit, tUnit * tStone.y));
newUV.Add(new Vector2 (tUnit * tStone.x, tUnit * tStone.y));
}

To make this code work on a larger scale we'll have to make some changes. Because we are using lists opposed to arrays there's a lot less work because we're using the .Add() command to add a lot of the info which appends to the end of the list but the triangles list refers to specific indexes in the vertices array which means that while the first 6 entries might be 0,1,3,1,2,3 after we get to the 150th square it might have to be something like 1000,1001,1003,1001,1002,1003. To address this we'll add a new variable to the script, "squareCount". This will be an int that keeps track of which square we're on so how much we have to add to the ints we send to the triangles.

  public class PolygonGenerator : MonoBehaviour {

public List<vector3> newVertices = new List<vector3>();
public List<int> newTriangles = new List<int>();
public List<vector2> newUV = new List<vector2>();

private Mesh mesh;

private float tUnit = 0.25f;
private Vector2 tStone = new Vector2 (1, 0);
private Vector2 tGrass = new Vector2 (0, 1);

private int squareCount;


Then we change the new GenSquare function to use this variable. What we do is add (squareCount*4) to each number we .Add() to newTriangles. This needs to be done because the numbers we add to newTriangles are referring to the newVerticies we added 2 lines up. Earlier we didn't need this because with only one set of 4 vertices we knew exactly which vertices to point to in newTriangles but now that we're planning on adding several squares we need each time we call this function for for the numbers added to newTriangles to be incremented by new number for newVertices added each time. To make squareCount accurately show how many squares in we are we also need to add a squareCount++; to the bottom of the function.

Also replace all the references to tStone with texture. Now when we call the function we'll call it with the desired texture as a parameter that will be used for that square.
 
void GenSquare(int x, int y, Vector2 texture){

newVertices.Add( new Vector3 (x , y , 0 ));
newVertices.Add( new Vector3 (x + 1 , y , 0 ));
newVertices.Add( new Vector3 (x + 1 , y-1 , 0 ));
newVertices.Add( new Vector3 (x , y-1 , 0 ));

newTriangles.Add(squareCount*4);
newTriangles.Add((squareCount*4)+1);
newTriangles.Add((squareCount*4)+3);
newTriangles.Add((squareCount*4)+1);
newTriangles.Add((squareCount*4)+2);
newTriangles.Add((squareCount*4)+3);

newUV.Add(new Vector2 (tUnit * texture.x, tUnit * texture.y + tUnit));
newUV.Add(new Vector2 (tUnit*texture.x+tUnit, tUnit*texture.y+tUnit));
newUV.Add(new Vector2 (tUnit * texture.x + tUnit, tUnit * texture.y));
newUV.Add(new Vector2 (tUnit * texture.x, tUnit * texture.y));

squareCount++;

}

Also go ahead and reset the squareCount at the end of the UpdateMesh function we made earlier with squareCount=0; so that the next time we generate the mesh the count starts at 0 and add in clear commands for all our lists so that we can start again without adding on top of existing data.

 
void UpdateMesh () {
mesh.Clear ();
mesh.vertices = newVertices.ToArray();
mesh.triangles = newTriangles.ToArray();
mesh.uv = newUV.ToArray();
mesh.Optimize ();
mesh.RecalculateNormals ();

squareCount=0;
newVertices.Clear();
newTriangles.Clear();
newUV.Clear();

}

Now let's start making more squares. We're going to make a 2d array to store block information so add a 2d byte array called blocks to the script.
 
public byte[,] blocks;

A byte array is an easy choice for level information. It supports numbers 0-255 so that's a lot of blocks and it saves us the hassle of using enumerators. What we'll do is have 0 be air, 1 is rock and 2 is grassand that should be enough for now.

We'll need a way to build this array into something other than blank space so create a function called GenTerrain. In the next part we'll do some basic perlin noise operations for generating terrain but for now we'll do half air half rock.
 
void GenTerrain(){
blocks=new byte[10,10];

for(int px=0;px<blocks.GetLength(0);px++){
for(int py=0;py<blocks.GetLength(1);py++){
if(py==5){
blocks[px,py]=2;
} else if(py<5){
blocks[px,py]=1;
}
}
}
}

This makes blocks a 10x10 array then goes through each block making any block with a y less that 5 into rock and the row at 5 into grass. Now we need to make a function that will read our block array and build blocks based on it. We'll make another function called BuildMesh to do this.

 
void BuildMesh(){
for(int px=0;px<blocks.GetLength(0);px++){
for(int py=0;py<blocks.GetLength(1);py++){

if(blocks[px,py]==1){
GenSquare(px,py,tStone);
} else if(blocks[px,py]==2){
GenSquare(px,py,tGrass);
}

}
}
}

Now this function really just runs through every block in the array and if the byte is 1 it creates runs the GenSquare function using the array index as the position and stone as the texture and if the byte is 2 it does the same with a grass texture.

Now for us to test this we just need to add the following to the start function to run all of these functions at game start:
 
GenTerrain();
BuildMesh();
UpdateMesh();

Now in unity you should be able to run and you'll see this:
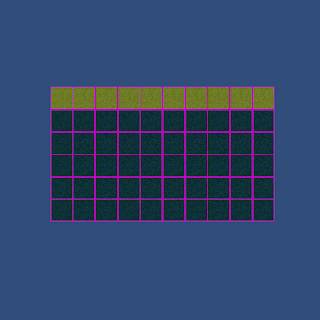
Might need to add some proper textures soon.
You can also make the array bigger or smaller or mess with the GenTerrain function to get some cool effects.
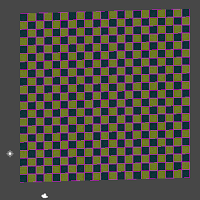
For example.
Now I also promised collision meshes in this part. Collision meshes are really exactly the same as the meshes we made so far just without the textures. They also can't face the camera like the block textures do, they'll have to face up, left, right and down. We can't just go and add collision meshes to every block in the scene though because most of these are surrounded by other blocks, if there's no way to get to a block there's no need to spend time making it solid.

We'll start just making the colliders and think about how to implement them later. For testing you'll want to make your block array into a 1x1 array. Also make new variables colVertices and colTriangles, a new int colCount and a MeshCollider.
 

public List<Vector3> colVertices = new List<Vector3>();
public List<int> colTriangles = new List<int>();
private int colCount;

private MeshCollider col;

To use the MeshCollider you'll have to define it in Start() with:
 
col = GetComponent<MeshCollider> ();

And the UpdateMesh() function will need a few additions, firstly we make a temporary mesh to apply the collision mesh data to and then we apply it to the collision mesh. Then like with the other lists we need to clear the collision lists and reset the counter.
 

Mesh newMesh = new Mesh();
newMesh.vertices = colVertices.ToArray();
newMesh.triangles = colTriangles.ToArray();
col.sharedMesh= newMesh;

colVertices.Clear();
colTriangles.Clear();
colCount=0;

On to actually making the mesh, we're going to let collider generation happen in it's own function that we'll call for each block when we update the mesh so make a function called GenCollider with the parameters (int x, int y):

void GenCollider(int x, int y){

}

We're now going to make squares just like before except that these will face up, left, right and down to make the squares we've drawn already be solid. You can probably guess what the code is going to look like. We'll be using colVertices and colTriangles instead of newVertices and newTriangles and we won't by using UVs because a collision model doesn't need a texture but otherwise these squares are made in the same way as our textures square.

We'll start with just a top collider, put this in your GenCollider function:
//Top
colVertices.Add( new Vector3 (x , y , 1));
colVertices.Add( new Vector3 (x + 1 , y , 1));
colVertices.Add( new Vector3 (x + 1 , y , 0 ));
colVertices.Add( new Vector3 (x , y , 0 ));

colTriangles.Add(colCount*4);
colTriangles.Add((colCount*4)+1);
colTriangles.Add((colCount*4)+3);
colTriangles.Add((colCount*4)+1);
colTriangles.Add((colCount*4)+2);
colTriangles.Add((colCount*4)+3);

colCount++;


And call the GenCollider function for every block by putting it in the BuildMesh function in the for loops along with an if to check if the block is air:
 void BuildMesh(){
for(int px=0;px<blocks.GetLength(0);px++){
for(int py=0;py<blocks.GetLength(1);py++){

//If the block is not air
if(blocks[px,py]!=0){

// GenCollider here, this will apply it
// to every block other than air
GenCollider(px,py);

if(blocks[px,py]==1){
GenSquare(px,py,tStone);
} else if(blocks[px,py]==2){
GenSquare(px,py,tGrass);
}
}//End air block check
}
}
}
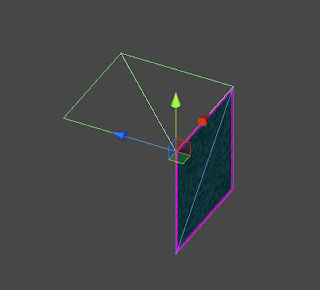
Your scene view should show this when run now. One face with an upward facing collider behind it.
Edit: Taryndactyl pointed out that displaying mesh colliders may be turned off by default in the editor, if you don't see a collider like above check Mesh Colliders in the gizmos menu:


So that code was just defining the points of the square and then creating the triangle data. The colCount is the same as the squareCount was to the last mesh code we did. Now I'll lay out the code for the other sides, there's really not much to learn in what numbers the vertices should be using; for me at least it's mostly a lot of trial and error, scribbling on paper and trying to visualize the four points' coordinates to figure out where each mesh should have its vertices. As long as you understand that each colVertices is a coordinate in 3d space that a corner of the cube uses and that the side that's facing you when you put down the triangle coordinates clockwise will be the solid one you've got it.

Before we add the other sides though let's move the triangle code to it's own small function because we're going to be using it so much, call it ColliderTriangles:
 void ColliderTriangles(){
colTriangles.Add(colCount*4);
colTriangles.Add((colCount*4)+1);
colTriangles.Add((colCount*4)+3);
colTriangles.Add((colCount*4)+1);
colTriangles.Add((colCount*4)+2);
colTriangles.Add((colCount*4)+3);
}

Good, now we can call that function instead of writing it out four times. Now all the sides for the collider should look like this:
void GenCollider(int x, int y){

//Top
colVertices.Add( new Vector3 (x , y , 1));
colVertices.Add( new Vector3 (x + 1 , y , 1));
colVertices.Add( new Vector3 (x + 1 , y , 0 ));
colVertices.Add( new Vector3 (x , y , 0 ));

ColliderTriangles();

colCount++;

//bot
colVertices.Add( new Vector3 (x , y -1 , 0));
colVertices.Add( new Vector3 (x + 1 , y -1 , 0));
colVertices.Add( new Vector3 (x + 1 , y -1 , 1 ));
colVertices.Add( new Vector3 (x , y -1 , 1 ));

ColliderTriangles();
colCount++;

//left
colVertices.Add( new Vector3 (x , y -1 , 1));
colVertices.Add( new Vector3 (x , y , 1));
colVertices.Add( new Vector3 (x , y , 0 ));
colVertices.Add( new Vector3 (x , y -1 , 0 ));

ColliderTriangles();

colCount++;

//right
colVertices.Add( new Vector3 (x +1 , y , 1));
colVertices.Add( new Vector3 (x +1 , y -1 , 1));
colVertices.Add( new Vector3 (x +1 , y -1 , 0 ));
colVertices.Add( new Vector3 (x +1 , y , 0 ));

ColliderTriangles();

colCount++;

}
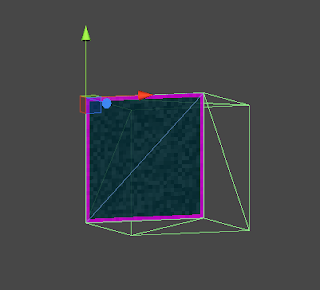
You should see this; all four colliders.
Now, we have a working square with colliders. if you were to extend the size of the array for more squares however, you would run into an efficiency problem because every solid square is creating eight triangles. That's a lot more than we need so we need a way to only make these colliders when they face an empty block. For that we'll need a function to check the contents of a block.
 byte Block (int x, int y){

if(x==-1 || x==blocks.GetLength(0) || y==-1 || y==blocks.GetLength(1)){
return (byte)1;
}

return blocks[x,y];
}
This is a simple function that checks if the block you're checking is within the array's boundaries, if not it returns 1 (Solid rock) otherwise it returns the block's value. This means that we can use this places where we're not sure that the block we're checking is within the level size. We'll use this in the collider function.

This is done by surrounding every collider side generation with an if that checks in the direction of the collider. ie. the left collider is only generated if the block to this block's left is air. Do it like this:
 void GenCollider(int x, int y){

//Top
if(Block(x,y+1)==0){
colVertices.Add( new Vector3 (x , y , 1));
colVertices.Add( new Vector3 (x + 1 , y , 1));
colVertices.Add( new Vector3 (x + 1 , y , 0 ));
colVertices.Add( new Vector3 (x , y , 0 ));

ColliderTriangles();

colCount++;
}

//bot
if(Block(x,y-1)==0){
colVertices.Add( new Vector3 (x , y -1 , 0));
colVertices.Add( new Vector3 (x + 1 , y -1 , 0));
colVertices.Add( new Vector3 (x + 1 , y -1 , 1 ));
colVertices.Add( new Vector3 (x , y -1 , 1 ));

ColliderTriangles();
colCount++;
}

//left
if(Block(x-1,y)==0){
colVertices.Add( new Vector3 (x , y -1 , 1));
colVertices.Add( new Vector3 (x , y , 1));
colVertices.Add( new Vector3 (x , y , 0 ));
colVertices.Add( new Vector3 (x , y -1 , 0 ));

ColliderTriangles();

colCount++;
}

//right
if(Block(x+1,y)==0){
colVertices.Add( new Vector3 (x +1 , y , 1));
colVertices.Add( new Vector3 (x +1 , y -1 , 1));
colVertices.Add( new Vector3 (x +1 , y -1 , 0 ));
colVertices.Add( new Vector3 (x +1 , y , 0 ));

ColliderTriangles();

colCount++;
}

}

Now when you run it you should get a much more efficient collision mesh, go ahead and switch the array size back to 10 by 10.

Colliders only along the top where the blocks are exposed to air.
With changes to the GenTerrain function you can see the side colliders in action too:

Hmm... these are almost starting to look like cubes
If you want you can do the same to the block visuals as with the colliders and not render (Or render a different texture for) blocks that aren't exposed to air in order to hide ores and things. I'll let you figure that out.

That concludes part two, as always if there are any problems please leave a comment as soon as possible and I'll fix it. I'm open for any feedback. Feel free to follow me on twitter (@STV_Alex) or G+ to get updated when I post part three.

Here is a complete version of the code as of the end of part 2: Part 2 finished code

Next time we'll be using perlin noise to make more interesting terrain, caves and ores and adding functions to build/destroy blocks based on mouse clicks or collisions with the blocks (Like when a character hits a block with a hammer for example).

Edit: Thanks again to Taryndactyl on the unity forums and thanks to Wolli in the comments for pointing out some errors! Taryndactyl's post: Link

Part 3
templates-office.com Tutorial, Unity, Voxel Tut, Voxels
Minggu, 18 Agustus 2013

Unity Voxel Tutorial Part 1: Generating meshes from code

I've been meaning to write this tutorial for a long time. It's going to be a long series so bear with me.


We won't be starting with voxels, instead we'll keep to something a little more basic to understand the systems of generating meshes for render and collision. We will be building a tilebased sidescroller where the tiles can be generated proceduraly and edited in-game. Later on we'll be expanding to 3d. In this part we'll write a script that creates a textured square in 3d space.
Let's start with and empty Unity project. I like to set up a folder structure to get started but that's up to you. Make a new scene "RenderTest" and a new C# script in the level folder (Or anywhere)  and call it "PolygonGenerator".

What we're going to do here is go through the basics of building meshes from scratch using the Mesh Class. So, in our new scene add a Game Object with a Mesh Filter, a Mesh Renderer and a Mesh Collider. Also add our new script PolygonGenerator. Make sure that the Game Object is at (0, 0, 10) so that it can be seen by the default camera.


Because we're using lists we need to add some code below the "using System.Collections", add
using System.Collections.Generic; 
below it.

Now let's move on to the script and start making in do things. We'll start with the following variables:

 // This first list contains every vertex of the mesh that we are going to render
public List<Vector3> newVertices = new List<Vector3>();

// The triangles tell Unity how to build each section of the mesh joining
// the vertices
public List<int> newTriangles = new List<int>();

// The UV list is unimportant right now but it tells Unity how the texture is
// aligned on each polygon
public List<Vector2> newUV = new List<Vector2>();


// A mesh is made up of the vertices, triangles and UVs we are going to define,
// after we make them up we'll save them as this mesh
private Mesh mesh;


With those defined we'll assign the mesh some simple values to display something. In the Start function we'll use the following code:

// Use this for initialization
void Start () {

mesh = GetComponent<MeshFilter> ().mesh;

float x = transform.position.x;
float y = transform.position.y;
float z = transform.position.z;


newVertices.Add( new Vector3 (x , y , z ));
newVertices.Add( new Vector3 (x + 1 , y , z ));
newVertices.Add( new Vector3 (x + 1 , y-1 , z ));
newVertices.Add( new Vector3 (x , y-1 , z ));

newTriangles.Add(0);
newTriangles.Add(1);
newTriangles.Add(3);
newTriangles.Add(1);
newTriangles.Add(2);
newTriangles.Add(3);

mesh.Clear ();
mesh.vertices = newVertices.ToArray();
mesh.triangles = newTriangles.ToArray();
mesh.Optimize ();
mesh.RecalculateNormals ();
}


What you should see

Now to explain how this works, first of all line 4: We get the component from the Game Object and assign in to the mesh we defined earlier. This means we can now use "mesh" to access the mesh filter. Next I assigned every axis of the object's position a float, this is just because writing x is easier than transform.position.x.

Now the vertices, if you've run this code you'll see it generates a single pink square on the screen. Each corner of that square is a vertex defined here. Now one thing to remember is that positive x is to the right and negative y is down. If we assume the Game Object's origin to be 0,0,0 then we put the first point at origin, the next one to the right at 1,0,0, then 1,-1,0 so the bottom right and lastly 0,-1, 0 the bottom left. 

After that we define the triangles. Because without them all we have is points in space, we have to show how those points are connected and we connect them in triangles. You probably know that in a 3d model a square is made up of two triangles, that's what we need to define here. An important thing to remember is that with the mesh class you create your triangles by adding the three points clockwise, this defines which direction is solid on your mesh. If you find that you can see a mesh from the back but not from the front it's this. The first triangle we define is 0,1,2 referring to the first second and third vertices we defined. The next triangle is 0,2,3 the first, third and fourth vertices. (The reason the 0,1,2 is the 1st, 2nd and 3rd is because the computer refers to the first point made as point 0).

Sometimes it's easiest to explain on paper.
Then last of all we clear anything in the mesh to begin with, we set the mesh's vertices to ours (But we have to convert the list to an array with the .ToArray() command) and set the mesh's triangles to ours. Then unity does some work for us when we call the optimize command (This usually does nothing but it doesn't use any extra time so don't worry) and the recalculate normals command so that the normals are generated automatically.

And that's how you get a square on the screen.

Now let's put a texture on it. For that we'll be using the newUV list we defined. Because we're almost always going to be using a tilesheet for this sort of thing we'll get to that now. We'll use 32x32 size tiles and we'll have 4x4 tiles on the texture, that makes it a 128x128 sized texture.

Like this!
Drop that thing in your art folder. Now click on the texture file in unity because we're going to change some import settings. You need to set Texture type: Advanced, Generate Mipmaps: False, Filter Mode: Point, Format: ARGB 32 bit.

Like so!
Then drag and drop the texture onto your gameobject so that it uses that texture as its material.

Now that you have that we can get back to the code! For convenience we're going to define a float and change it in the start function. This is something I call a tUnit and it's the fraction of space 1 tile takes up out of the width of the texture. In our case it's 1/4 or 0.25. In addition we'll be adding the coordinates for two textures to test with.

 private float tUnit = 0.25f;
private Vector2 tStone = new Vector2 (0, 0);
private Vector2 tGrass = new Vector2 (0, 1);

When we create texture coordinates it's in tiles away from the texture's 0,0 and 0,0 is the bottom left. Assigning the texture to the polygon we just made is not too hard. Just add some code to define the texture coordinates with newUV right after newTriangles and don't forget to apply our UVs to the mesh:

void Start () {

mesh = GetComponent<MeshFilter> ().mesh;

float x = transform.position.x;
float y = transform.position.y;
float z = transform.position.z;

newVertices.Add( new Vector3 (x , y , z ));
newVertices.Add( new Vector3 (x + 1 , y , z ));
newVertices.Add( new Vector3 (x + 1 , y-1 , z ));
newVertices.Add( new Vector3 (x , y-1 , z ));

newTriangles.Add(0);
newTriangles.Add(1);
newTriangles.Add(3);
newTriangles.Add(1);
newTriangles.Add(2);
newTriangles.Add(3);

newUV.Add(new Vector2 (tUnit * tStone.x, tUnit * tStone.y + tUnit));
newUV.Add(new Vector2 (tUnit * tStone.x + tUnit, tUnit * tStone.y + tUnit));
newUV.Add(new Vector2 (tUnit * tStone.x + tUnit, tUnit * tStone.y));
newUV.Add(new Vector2 (tUnit * tStone.x, tUnit * tStone.y));

mesh.Clear ();
mesh.vertices = newVertices.ToArray();
mesh.triangles = newTriangles.ToArray();
mesh.uv = newUV.ToArray(); // add this line to the code here
mesh.Optimize ();
mesh.RecalculateNormals ();
}
You will have to add a light to the scene to be able to see it but your square should now be textured! Hell Yeah! The code to create the UV information is quite simple, it just defines what 4 corners of the texture you would like the four corners of the square to use. So, tUnit*tStone.x is the left of the tStone tile and tUnit*tStone.x+tUnit is the left plus one tile's width making it the tile's right. To match the order we made the vertices in we define the top left texture coordinate first, then the top right, then the bottom right and last the bottom left.

You should see this.
So that was a lot of work to make a textured square but I promise, this really is the backbone of the whole thing. Next time we'll do collision meshes and generating based on an array.

Please if you're interested in this tutorial leave a comment here or on g+ letting me know what you think, what needs more explanation etc. If you have a better suggestion for a part of my implementation let me know and if you have any problems I'll try and answer as soon as possible.

Bonus: Take this chunk out of the start function and put it in the update loop:

  mesh.Clear ();
mesh.vertices = newVertices.ToArray();
mesh.triangles = newTriangles.ToArray();
mesh.uv = newUV.ToArray();
mesh.Optimize ();
mesh.RecalculateNormals ();

Now you can change the values of newVertices while the game runs and it will move the cube's corners.

Edit: Feel free to follow me on twitter (@STV_Alex) or G+ to get updated when I post part two. Or check back here every day, that's good too.

Edit 2: Thanks to Taryndactyl for pointing out some errors. Those are now fixed, link.

Part 2
templates-office.com Tutorial, Unity, Voxel Tut, Voxels
Sabtu, 17 Agustus 2013

Grapple: an android game where you swing on a rope


Decided to upload an early version of Grapple for those that would like to try it. So far it has been testing on android JellyBean and IceCream Sandwich on two different phones. I haven't done much testing yet so I apologize if there are bugs for your device/version. Please do leave comments here, on reddit or on g+ if you try. Let me know what levels got you stuck or what levels weren't fun.

Known bugs:
-Grapple can misfire when pressing the drag button before fully releasing the tap to aim the grapple.
-Slow Mo when holding in before releasing a grapple will reduce velocity over time.
- Sometimes a level will start with the grapple already attached
- swinging hard into rock will often cause the ball to stick there (releasing the grapple or pulling yourself will unstick you).

This version is far from finished and not completely playable, the tutorial overlay is a 10 minute thing to be able to release this version and there are only 12 levels so far. Have fun.

http://www.mediafire.com/?8u4kgrarz4mhl2o 

templates-office.com Grapple
Jumat, 16 Agustus 2013

Something different

So I've been quiet all summer and now I'm back. Through the summer I haven't been working on the voxel game but on a summer project for mobile. I think releasing games is an important experience for a game dev and I think that a smaller game is what I need to complete and release a finished stand alone game.

The game I've been working on is a remake of a prototype I developed months ago in flash and I decided to try again in Unity. It's a very satisfying gameplay prototype where the player controls a ball by swinging from ropes. It's not that unique an idea but it's an implementation I have yet to see, at least on mobile.

It involves a lot of lines
My implementation makes ropes bend and wrap around obstacles. I've been working for a while to make this element as smooth as possible and the result is a very natural feeling effect. Also I've written physics code to handle the ball hanging on a rope which makes the core gameplay possible.

Once the rope can bend you can swing in ways never possible before.

As well as making a prototype I moved further, started adding art assets and making playable levels and the project is in alpha stage.

The ball wraps around small obstacles quickly.
Although I enjoy the core programming above all it is very satisfying to see the game become more polished with the addition of functional menus and the things a real game needs.


So this is my first attempt at mobile games but it's an interesting platform. It's hard to find a gameplay element that is any fun but I feel like this is pretty fun. I guess I'll get a clearer picture once I move on to playtesting, but I feel I should have more levels ready before then.

templates-office.com Grapple